Connect your Meta Pixel to OnlyFans API Smart Links
Send every OnlyFans subscription, purchase, and message event straight to your Meta (Facebook) Pixel with server-side postbacks. No JavaScript, nothing to install on OnlyFans.
What is a Meta Pixel?
A Meta Pixel (now called a dataset in Events Manager) is Meta's conversion tracking tool for Facebook and Instagram ads. It tells Meta's ad platform when someone takes a valuable action, like subscribing or making a purchase, after clicking your ad. This data is what Meta's algorithm uses to find more people who are likely to convert, which lowers your cost per subscriber over time.
Why connect it to Smart Links? OnlyFans doesn't support Meta's pixel natively, and there's no way to install tracking code on OnlyFans pages. Smart Links bridge the gap by tracking everything server-side through Meta's Conversions API: every click, subscription, tip, and purchase is sent back to your Meta Pixel automatically. No JavaScript, nothing to install on OnlyFans.
What you'll need
- An active OnlyFans API account with Smart Links enabled
- A Meta Business account with access to Events Manager
- Your Meta Pixel ID and a Conversions API access token (we'll get both below)
Why this matters for Meta
Most OnlyFans media buyers run Meta Ads, but Meta's pixel can't see what happens on OnlyFans: subscriptions, tips, PPV purchases, messages. Without conversion data flowing back, Meta optimizes for clicks, not buyers, and your cost-per-sub stays high.
- Without conversion data, Meta optimizes for link clicks and landing-page views. You pay for traffic that doesn't subscribe.
- With Smart Links + your Meta Pixel, every subscription and transaction is sent to Meta via the server-side Conversions API. Meta learns which clicks become paying fans and finds more people like them.
Meta's browser pixel is JavaScript that loads in the fan's browser, which makes it vulnerable to ad blockers, iOS tracking restrictions, cross-device loss, and redirect drop-off. Smart Links postbacks bypass all of that: our servers talk directly to Meta's Conversions API, so events can't be blocked or dropped.
This guide is the Meta-specific setup. For how Smart Links work under the hood, including attribution rules, the conversion window, lifetime revenue attribution, and postback variables, see the Smart Links guide.
Step-by-step setup
Find your Meta Pixel ID
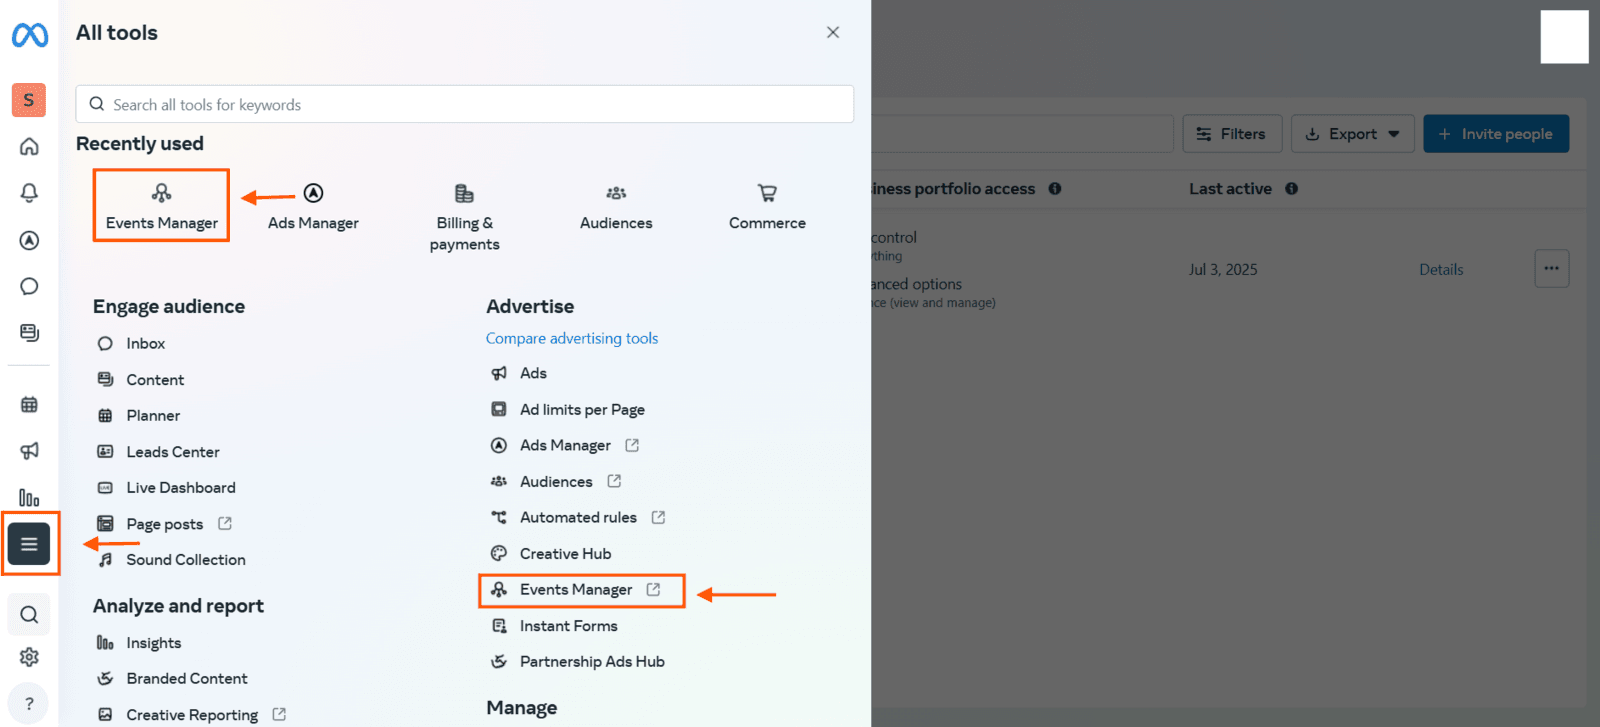
In Meta Events Manager, open the All Tools menu and select Events Manager.
In Events Manager, open Data Sets and select your dataset. Your Pixel ID (also called the Dataset ID) is shown next to the dataset name. Copy it, then open the Settings tab to grab the access token next.

If you manage multiple businesses or clients, make sure you've selected the correct Business and Pixel/Dataset before copying the ID and generating the token below.
Generate a Conversions API access token
Meta's server-side Conversions API needs an access token in addition to the Pixel ID. This is how Smart Links authenticate when sending events to Meta.
With your dataset selected, open the Settings tab, scroll to the Conversions API section, and click Generate access token.
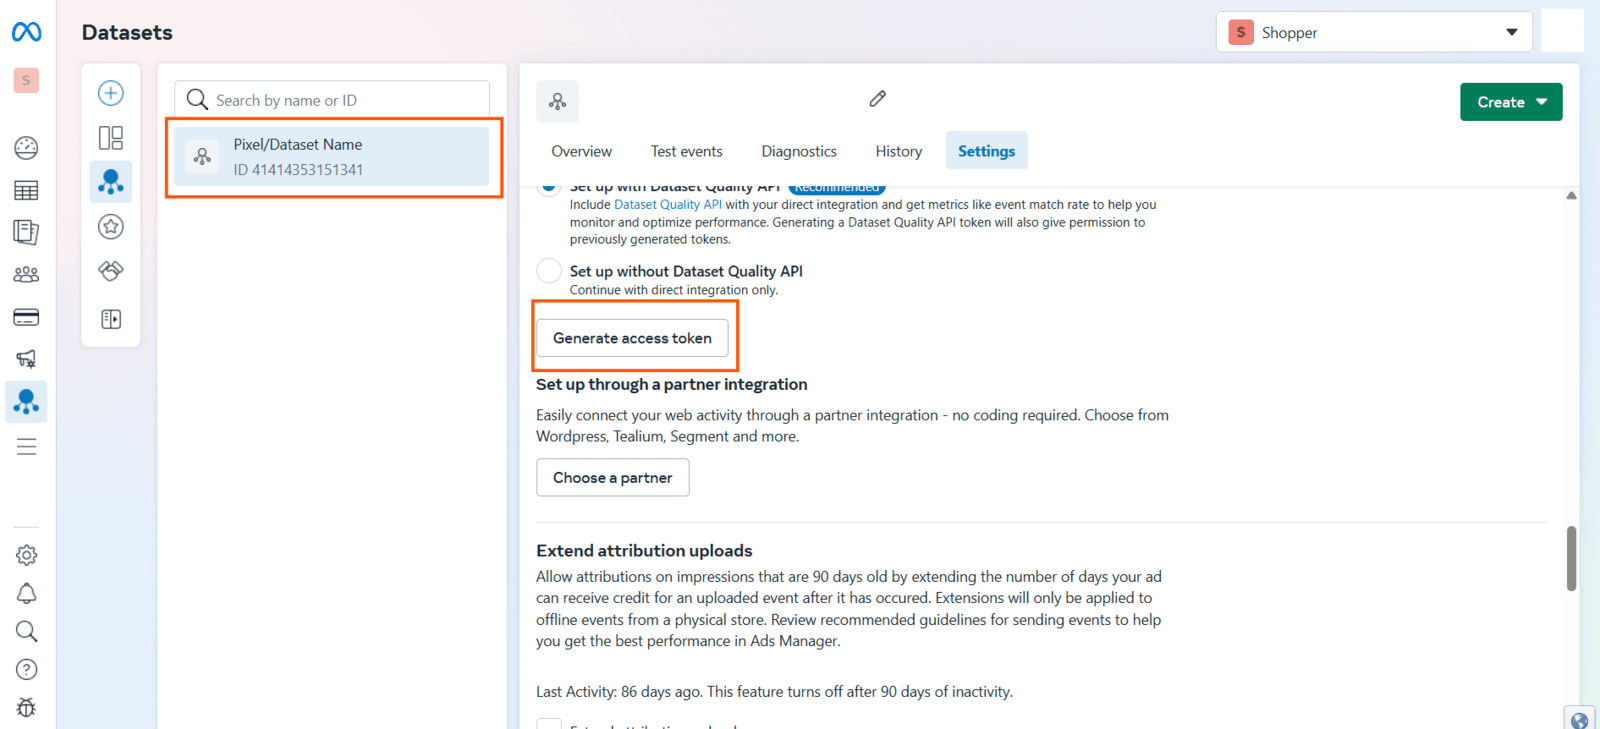
Copy the access token and keep it safe, and treat it like a password. Make sure the correct Pixel/Dataset is selected before generating, or the token won't match the Pixel ID you copied.
Create or open a Smart Link
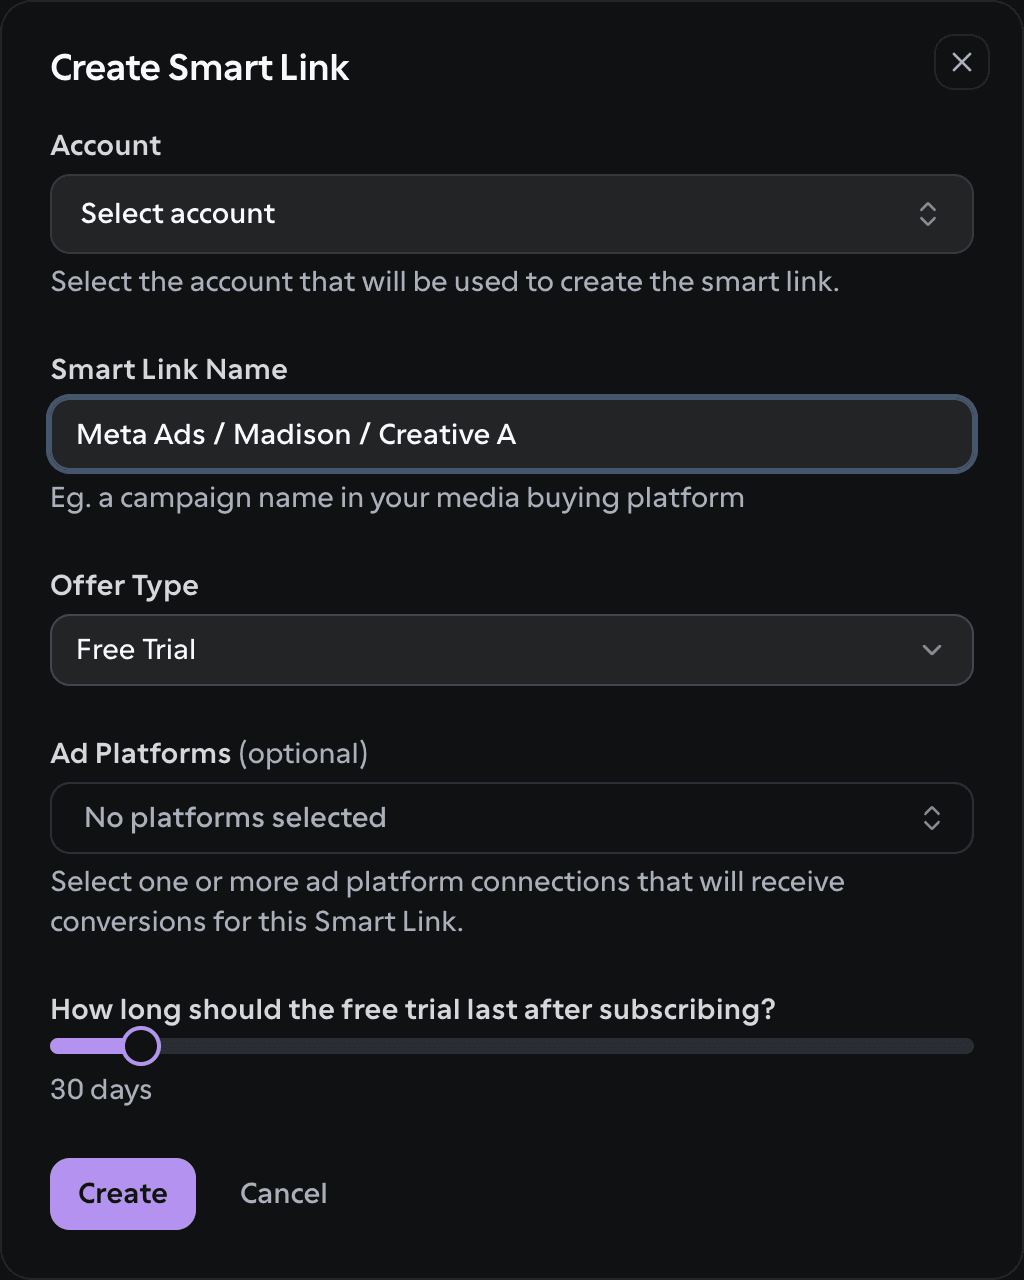
Log into your OnlyFans API Dashboard and open Smart Links in the left sidebar. Click Create Smart Link (or open an existing one) and fill in:
- Account: the OnlyFans account you're running ads for
- Smart Link Name: something descriptive, e.g. your Meta campaign name
- Offer Type: Free Trial or Tracking Link
Add your Meta pixel
Open Smart Links → Manage Ad Platforms and click Add Platform (you can also pick platforms inline from the Ad Platforms selector when you create or edit a Smart Link). In the Add Ad Platform dialog:
- Set Platform to Meta Ads
- Paste your Pixel ID from Step 1
- Paste your Conversions API access token from Step 2 into the Access Token field
- Review the Event Configuration. The defaults are sensible (see Events sent to Meta below)
- Click Create

Attach the pixel to your Smart Link
If you added the platform from the Manage Ad Platforms page rather than inline, attach it when you create or edit a Smart Link using the Ad Platforms selector. You can connect more than one platform to a single link. Once selected, it shows as 1 Platform (or more).

Send a test event
In Meta Events Manager, open your dataset's Test Events tab and copy the test event code.
Back in the OnlyFans API Dashboard, open the Send Test Event dialog on your pixel, pick an Event, paste the Test Event Code, and send it. Then check the Test Events tab in Meta, where your event should appear within a few minutes.
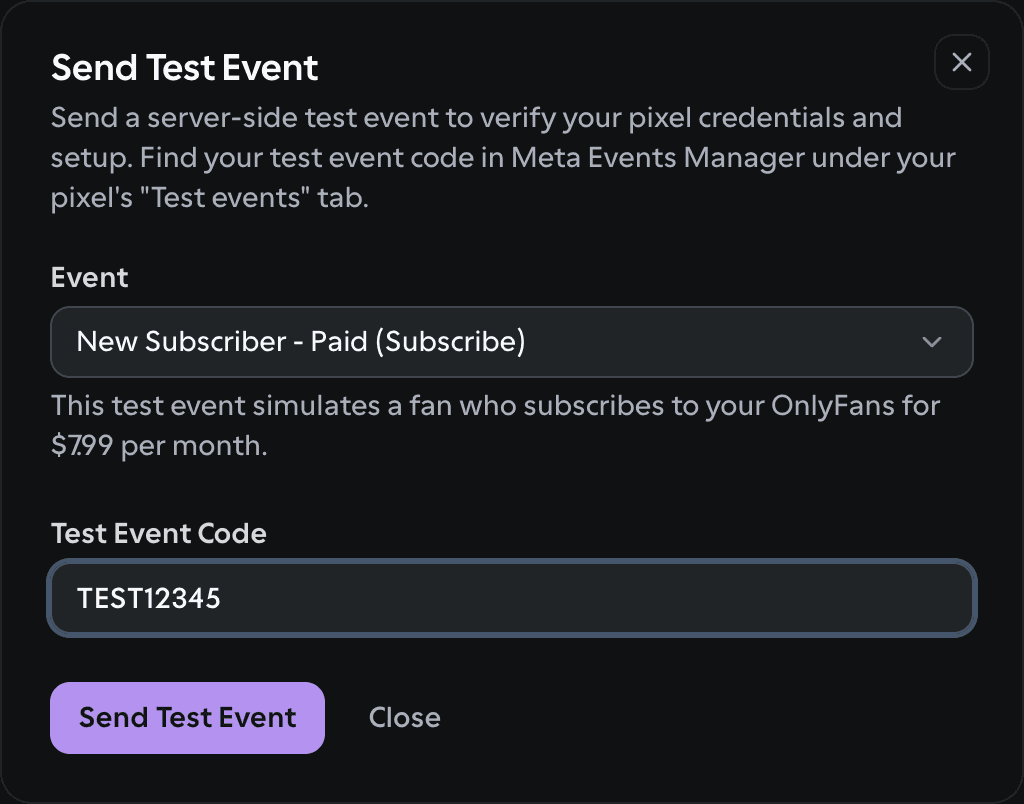
Events sent with a test event code don't affect your live data. They're only for verifying the connection. The Test Event Code is required for Meta.
Use the Smart Link in your Meta ad
In Meta Ads Manager, set your ad's Website URL to your Smart Link:
https://trk.of-traffic.com/go/YOUR_SMART_LINK_ID?ecid={{ad.id}}Replace YOUR_SMART_LINK_ID with the ID from your Smart Links dashboard. Meta automatically appends its click ID (fbclid) to the destination URL, and Smart Links reads it straight from the fbclid parameter to attribute conversions to your Meta Pixel. There's no macro to add for pixel tracking.
The optional ?ecid={{ad.id}} parameter passes Meta's Ad ID as your external click ID so you can match conversions back to specific ads in your own reporting. Swap in {{campaign.id}}, {{adset.id}}, or any other Meta dynamic parameter for the level of granularity you need.
Verify conversions are flowing
Once your ads are live:
- Smart Links dashboard: you should see clicks, subscribers, and revenue
- Meta Events Manager: conversion events appearing on your pixel (check the Overview and Test Events tabs)
- Meta Ads Manager: the campaign's Results column filling in with tracked conversions
Events sent to Meta
Smart Links can send the following events to your Meta Pixel. Each one maps to a Meta event in the Event Configuration section when you add the pixel. These are the defaults, and every event is configurable (map it to any Meta standard event, a custom event, or turn it off).
| Smart Link event | When it fires | Meta event (default) |
|---|---|---|
| Click | Fan clicks the Smart Link and is redirected to OnlyFans | ViewContent |
| New Subscriber | Fan subscribes through the Smart Link | Subscribe |
| First Purchase | Fan's first non-subscription transaction (tip, PPV, etc.) | Purchase |
| Repeat Purchase | Any transaction after the first | Purchase |
| Message Received from Fan | Fan sends a message after converting | Not sent by default |
| Fan Sent 3+ Messages | Fan reaches their 3rd inbound message | Lead |
For subscriber and purchase events, Smart Links also sends the conversion value and currency when available, so Meta can optimize toward your highest-value fans, not just any conversion. The Fan Sent 3+ Messages event maps to Lead by default, and our top agencies optimize Meta around this high-signal event for the lowest cost-per-sub.
Troubleshooting
| Problem | Fix |
|---|---|
| No events showing in Meta | Double-check you pasted both the Pixel ID and the Conversions API access token, and that the token was generated for the same Pixel/Dataset as the ID. |
| Test event never appears | A Test Event Code is required for Meta. Copy it from your dataset's Test Events tab and paste it into the Send Test Event dialog. Allow a few minutes. |
| Events arrive but the campaign isn't optimizing | Set your ad set's optimization goal to the matching conversion event (e.g. Purchase or Subscribe). |
| Meta shows the pixel as inactive | Send a test event from the Smart Link settings to wake it up, then check the Overview tab. |
Meta Pixel-Like Revenue Tracking for OnlyFans Media Buyers
Track fans and revenue generated from your media buying campaigns based on Country, Creative, UTM, Click ID, or anything else. Integrate directly with Meta Pixel or set up your own Postbacks. 10x your media buying volume from most accurate revenue attribution in the space.
Connect your TikTok Pixel to OnlyFans API Smart Links
Send every OnlyFans subscription, purchase, and message event straight to your TikTok Pixel with server-side postbacks. No JavaScript, nothing to install on OnlyFans.