# Frequently Asked Questions (/faq)
import { Accordion, Accordions } from "fumadocs-ui/components/accordion";
## Getting Started
Follow the steps at [app.onlyfansapi.com/register](https://app.onlyfansapi.com/register). It takes less than 1 minute.
Yes! You can use our no-code integrations with [Make](/integrations/make), [n8n](/integrations/n8n), or [Zapier](/integrations/zapier). If you need hands-on help, email us at [hello@onlyfansapi.com](mailto:hello@onlyfansapi.com).
No sandbox environment is available. However, you can simply create a new account on OnlyFans.com and connect it to OnlyFans API for testing purposes.
All of our API endpoints can be used with any programming language. Click on any endpoint in our [API Reference](/api-reference) to view code examples in cURL, JavaScript/TypeScript, Go, Python, Java, and C#.
Yes, absolutely. Just make sure you don't connect multiple services in parallel to the same account.
## API Capabilities & Features
Yes, our API fully supports reading and sending messages. Refer to our [List Chats](/api-reference/chats/list-chats) and [Send Message](/api-reference/chats/send-message) endpoints for more details.
Image generation is not natively supported at this time. However, we recommend third-party solutions like [fanscreator.ai](https://fanscreator.ai) for this functionality.
Direct vault uploads aren't supported by OnlyFans. However, you have a few options:
* **Recommended:** Upload media exactly when and where it needs to be posted — for example, directly to a post, message, or scheduled post — instead of preloading it into the vault. This keeps your workflow simple and avoids unnecessary steps.
* If you still want to store media in the vault ahead of time, you can:
* Upload media using our [OnlyFans CDN upload](/api-reference/media/upload-media-to-the-only-fans-cdn) endpoint.
* [Create a post](/api-reference/posts/send-post) with the media, then delete it immediately - the media will remain in your vault
* Use our [Send Message](/api-reference/chats/send-message) endpoint to include the media in a message, then delete the message — again, the media will stay in your vault.
Yes! Many customers successfully use tools like [n8n](https://n8n.io) and [Supabase](https://supabase.com) for faster development and deployment.
Use our [Send Mass Message](/api-reference/mass-messaging/send-mass-message) endpoint. Include just one user ID in the `userIds` array to effectively schedule a message for an individual chat. This behaves exactly like the native "Scheduled Messages" feature in OnlyFans.
Refer to our dedicated guide on [setting a price for PPV content](/introduction/guides/composing-messages#setting-a-price-ppv).
This will be available in our upcoming Advanced Endpoints feature.
You're likely missing the account prefix.
* ❌ Wrong: `/api/fans/active`
* ✅ Correct: `/api/acct_XXXXXXXX/fans/active`
## Security & Safety
Yes, absolutely. We have a 5-year track record with:
* Zero accounts banned
* Zero accounts red-flagged
* Enterprise-grade security measures
No. We have a track record of zero account bans over the past 5 years, including many customers using OnlyFans API to build chatbots.
Your security is our priority:
* All passwords and cookies are hashed in our database
* We use OpenSSL with AES-256-CBC encryption
* All data is signed with MAC (Message Authentication Code)
We implement robust proxy protection:
* Each connected account gets a dedicated IP address
* Public endpoints use rotating residential proxies
* This prevents detection and ensures account safety
For more information, refer to our dedicated [proxies guide](introduction/essentials/proxies).
## API Stability & Performance
Our API infrastructure includes:
* Web Application Firewall (WAF)
* Proxy management
* Built-in rate limiting
* No stability issues reported to date
Check our real-time status at: [status.onlyfansapi.com](https://status.onlyfansapi.com)
Website updates have minimal impact:
* Downtime only occurs if OnlyFans itself is down
* We typically adapt to changes within minutes
* No extended service interruptions
Cache duration varies per endpoint, though most endpoints are not cached. Check our [response structure guide](/introduction/essentials/response-structure) for specific cache durations.
## Rate Limiting & Best Practices
**Recommended approach:** Implement exponential backoff
1. When you receive a 429 error, wait 1 second
2. If it happens again, double the wait time (2s → 4s → 8s)
3. Continue up to a maximum wait time
4. Use queuing systems like AWS SQS, Laravel Queues, or Ruby Sidekiq
Email us at [hello@onlyfansapi.com](mailto:hello@onlyfansapi.com) for code examples.
Rate limits are documented in our [Rate Limits](/introduction/essentials/rate-limits) guide.
## API Keys Management
**Best practice:** One API key per service/integration
* Create separate keys for different features
* Assign dedicated keys to external developers
* This improves security and tracking
No, you can create as many API keys as you want, regardless of your subscription plan.
Yes, a single API key can access all available endpoints.
No. Every API key has full access to every account you've connected to OnlyFans API, including every endpoint.
## Account Authentication & Management
**Through our [Console](https://app.onlyfansapi.com):**
1. Go to Dashboard -> Accounts
2. Find the relevant account
3. Click on the Account ID to copy it
**Through our API:**
1. Call our [List Accounts](/api-reference/account/list-accounts) endpoint
2. The response includes the account ID in the `id` field
OnlyFans API account IDs **always** start with `acct_`
Always use the format: `acct_XXXXXXXX`
* Include the `acct_` prefix
* Endpoint URL example: `https://app.onlyfansapi.com/api/acct_abc123/chats`
Yes! Use these endpoints for authentication:
* [Start Authentication](/api-reference/connect-onlyfans-account/start-authentication)
* [Poll Authentication Status](/api-reference/connect-onlyfans-account/poll-authenticationStatus)
* Optionally, [Submit 2FA](/api-reference/connect-onlyfans-account/submit2fa)
Use our [Get Current Account](/api-reference/account/get-current-account) endpoint to retrieve the authenticated account details.
No need to use our UI - integrate these endpoints directly with your platform.
Yes! Use our [Start Authentication](/api-reference/connect-onlyfans-account/start-authentication) endpoint. We also have an authentication library available on NPM — see our [Auth documentation](/auth).
Follow the "Option 2: By providing cURL request" step in our [connect OnlyFans account guide](/introduction/guides/connect-onlyfans-account#option-2-by-providing-curl-request).
It is currently not possible to retrieve the user agent that OnlyFans API uses to make requests.
Unfortunately, no — not without risking a red-flag from OnlyFans. Our authentication process is already optimized to be as fast as possible while maintaining safety.
The experience is nearly identical to OnlyFans' native process:
1. The QR code that the model normally scans during OF login will appear in our dashboard and via email (sent to both the OnlyFans API user and the model)
2. After scanning the code and completing the selfie check, the account will be authenticated
You're probably adding the account again instead of re-connecting it. Use the [Re-authenticate Account](/api-reference/connect-onlyfans-account/re-authenticate-account) endpoint instead of [Start Authentication](/api-reference/connect-onlyfans-account/start-authentication).
Yes! Use our [List Accounts](/api-reference/account/list-accounts) endpoint.
You can retrieve this through:
* The [Get Current Account](/api-reference/account/get-current-account) endpoint under `subscribersCount`
* Or the [List User Lists](/api-reference/user-list-collections/list-user-lists) endpoint under `fans.usersCount`
The "top X percentage of all creators" value can be retrieved through:
* [Get Top Percentage](/api-reference/account/get-top-percentage) endpoint
* Or [Get Current Account](/api-reference/account/get-current-account) under `performerTop`
Go to our dashboard at [app.onlyfansapi.com](https://app.onlyfansapi.com) and click on "Invite & manage members" in the sidebar.
## Fan Data & Analytics
This is normal behavior:
* Chat lists return immediately
* Fan details are scraped in the background (usually takes 2-3 seconds)
Either call our [Get User Details](/api-reference/users/get-user-details) endpoint, or retry the original endpoint after 10 seconds.
Use the lastSeen field from our [Get Profile Details](/api-reference/public-profiles/get-profile-details) or [Get User Details](/api-reference/users/get-user-details) endpoints. If the `lastSeen` value is recent, the fan is likely online.
```json
{
"lastSeen": "2025-05-01T15:01:07+00:00"
...
}
```
[-> Read more about caching](/introduction/essentials/response-structure#cache-control)
There's two options available:
* **Calculate manually:** Use `subscribedOnData.subscribeAt` on endpoints like [List Active Fans](/api-reference/fans/list-active-fans) or [Get User Details](/api-reference/users/get-user-details).
* **Human-readable format:** Use `subscribedOnData.duration` (e.g., "3 months")
Access comprehensive spending data through these fields:
| Field | Description |
| ---------------- | ------------------------------ |
| `totalSumm` | Combined total of all spending |
| `subscribesSumm` | Total spent on subscriptions |
| `tipsSumm` | Total spent on tips |
| `messagesSumm` | Total spent on paid messages |
| `postsSumm` | Total spent on paid posts |
| `streamsSumm` | Total spent on streams |
* [Get User Details](/api-reference/users/get-user-details)
* [List Active Fans](/api-reference/fans/list-active-fans)
Filter by fan spendings in our [List Active Fans](/api-reference/fans/list-active-fans), [List All Fans](/api-reference/fans/list-all-fans), and [List Expired Fans](/api-reference/fans/list-expired-fans) endpoints by adding `filter.total_spent` to the query parameters. You can even filter by minimum tips.
Use our [Search Profiles](/api-reference/public-profiles/search-profiles) endpoint with the `sort` query parameter set to `subscribers`.
Retrieve it through the [List User Lists](/api-reference/user-list-collections/list-user-lists) endpoint under `following.usersCount`.
Use the [Get User List](/api-reference/user-list-collections/get-user-list) endpoint with `rebill_on` as the `{userListId}`.
Call the [List User Lists](/api-reference/user-list-collections/list-user-lists) endpoint and calculate the difference between `rebill_on.usersCount` and `rebill_off.usersCount`.
Use our [Set Fan's Custom Name](/api-reference/fans/set-fans-custom-name) endpoint.
Sadly, OnlyFans doesn't store language preferences. Workaround:
1. Fetch chat messages from the fan
2. Use a third-party language detection API
3. Store the detected language in your database
No direct endpoint exists, but you can:
1. Retrieve chat messages using the [List ChatMessage](/api-reference/chats/list-chat-message) endpoint
2. Check if `isOpened = true` AND `price > 0`, which indicates a purchased PPV
Yes. Any data that you can retrieve through our API endpoints, you can programmatically scrape.
`data.fan.id` is the OnlyFans User ID of the fan, which you can also use to get the chat's messages in the [List Chat Messages](/api-reference/chat-messages/list-chat-messages) endpoint.
Use our [List Chats](/api-reference/chats/list-chats) endpoint, where `data.fan.id` is the `chat_id` you need for the [List Chat Messages](/api-reference/chat-messages/list-chat-messages) endpoint.
Currently, OnlyFans API doesn't support removing multiple users from a list in a single request. You have two options:
1. Clear the entire list using [Clear User List](/api-reference/user-list-collections/clear-user-list)
2. Send one DELETE request per user via [Remove User from a User List](/api-reference/user-list-collections/remove-user-from-a-user-list)
## Webhooks & Media Handling
* 📚 Documentation: [docs.onlyfansapi.com/webhooks](/webhooks)
* 🎥 Video Demo: [cap.so/s/p2wfkj072yt2x96](https://cap.so/s/p2wfkj072yt2x96)
When `"isReady": false`, the media is still processing.
**Solution:**
1. Get the chat ID from the webhook
2. Poll the [List ChatMessage](/api-reference/chats/list-chat-message) endpoint every 10-20 seconds
3. Wait for `"isReady": true`
4. The URL will then be available
**Alternatively:** Download and store vault content internally for reverse searching by media ID, once the media is ready.
Yes, you can use webhooks with no-code tools like Make, n8n or Zapier. Just set up a webhook listener in your tool and configure it to receive data from our API.
We have most webhook events available as Make and Zapier modules, which you can find in our [Make](/integrations/make/available-modules#instant-triggers) and [Zapier](/integrations/zapier/available-modules#instant-triggers) directories.
Click on the webhook in your dashboard. It will take you to a details page where you can view all events that have recently been sent to your webhook URL.
No. Here's how OnlyFans handles typing indicators:
* When `users.typing` is received, OnlyFans shows a typing indicator for exactly 5 seconds
* If a user continues typing, consecutive `users.typing` events are sent every \~3 seconds, resetting the timer
* If no new `users.typing` event is received after 5 seconds, the indicator is hidden
* If a `messages.received` event is received while the indicator is active, it is hidden
You can replicate this logic in your own UI. You may need to adjust the timing slightly due to webhook delivery delays.
We use **at-least-once delivery semantics** for webhooks. If your server doesn't respond within **15 seconds**, the event will be retried up to 5 times with exponential backoff.
**Best practices:**
* Return a 2xx status code as quickly as possible, then handle logic asynchronously
* Implement **idempotency** by deduplicating events based on their unique `event_id`
* Check the "Attempts" column in the dashboard to confirm if retries are occurring
## Media & Downloads
`cdn*.onlyfans.com` URLs cannot be accessed directly due to OnlyFans' security — they are tied to specific IPs (in this case, our proxy IP). Use our [Download Media from the OnlyFans CDN](/api-reference/media/download-media-from-the-only-fans-cdn) endpoint to successfully download media files.
When a 403 occurs:
1. Call the endpoint again that you retrieved the `cdn*.onlyfans.com` URL from
2. Call the download endpoint again with the newly retrieved CDN URL
**Important checks:**
* Always use the **same Account ID** for both retrieving and downloading. For example, if you got the URL from `/api/acct_ABC123/chats/123/messages`, you must use `acct_ABC123` in your download request
* Use the CDN URL immediately — don't wait longer than 1 minute, as CDN URLs expire quickly
No distinction between public vs. premium or owned vs. subscribed content. The only limitation is that the authenticated account must have access to view the media file on OnlyFans.
No. Any account type can download media as long as the authenticated account has access to view the media file.
This happens when `convertedToVideo` is set to `false`. The file is still being converted. Once the conversion completes and the status changes to `true`, you'll be able to download the video successfully.
You can only view content that is accessible to the connected account — either your own content (if it's a creator account) or content from creators the account is subscribed to.
**TL;DR:** Through our API, you can view all content you can also see when logging into onlyfans.com. Our API does not bypass any subscription or PPV pricing.
## Tracking & Free Trial Links
Yes! In our dashboard at [app.onlyfansapi.com](https://app.onlyfansapi.com), click on "Trial & Tracking Links" in the sidebar. You'll see an overview with clicks, subscribers, revenue, spender count, ARPS, creation date, and expiration date.
You can also create links and generate shareable URLs with optional revenue visibility.
For calculation logic details, see our [Free Trial Links documentation](/api-reference/free-trial-links).
No limits! We've created hundreds to thousands of links per day via our API with no restrictions:
* 🎁 Free Trials: No limit per day
* 🔗 Tracking Links: No limit per day
## API Troubleshooting
A 401 error indicates an authorization problem — usually an invalid API key. Verify that:
* Your API key is correct
* The authorization header is set up correctly in your request
Check your API key status at [app.onlyfansapi.com/api-keys](https://app.onlyfansapi.com/api-keys).
You're using the wrong HTTP method. Check our [API Reference](/api-reference) to see which HTTP method (GET, POST, DELETE, etc.) is required for the endpoint.
The API URL doesn't exist. This usually means:
* You're missing the account prefix (use `/api/acct_XXXXXXXX/...`)
* The endpoint URL is incorrect
Check our [API Reference](/api-reference) for valid endpoint URLs.
Double-check that the URL has the correct parameters and there are no network issues on your side.
In our dashboard, click on "Logs" in the sidebar to see an overview of all requests and any errors. Click on a specific request to view the full details and response.
## Billing & Subscriptions
All of our subscription plans, account pricing, and credit pricing are explained at [onlyfansapi.com/pricing](https://onlyfansapi.com/pricing).
For as long as you want, until you've consumed all of your 10 free credits. Afterwards, you'll need to subscribe to a plan.
Pricing depends on your needs — the more accounts or credits you need, the better our pricing. Schedule a call at [cal.com/onlyfansapi/15min](https://cal.com/onlyfansapi/15min).
We offer dynamic pricing for additional accounts, explained at [onlyfansapi.com/pricing](https://onlyfansapi.com/pricing). You can also pre-purchase account seats.
View and change your current plan at [app.onlyfansapi.com/billing](https://app.onlyfansapi.com/billing).
You currently cannot pause your subscription. To cancel, go to [app.onlyfansapi.com/billing](https://app.onlyfansapi.com/billing).
## Documentation & Resources
Yes! Our OpenAPI schema is available at [app.onlyfansapi.com/scribe-docs/openapi.yaml](https://app.onlyfansapi.com/scribe-docs/openapi.yaml).
No. Please refer to our [API Reference](/api-reference) for a complete list of available endpoints.
Yes! Visit [docs.onlyfansapi.com/llms.txt](https://docs.onlyfansapi.com/llms.txt) for the canonical AI-friendly version of our documentation. We also keep [docs.onlyfansapi.com/llms-full.txt](https://docs.onlyfansapi.com/llms-full.txt) for backward compatibility.
# Introduction (/auth)
import { Card, Cards } from "fumadocs-ui/components/card";
import {
ShieldCheckIcon,
ZapIcon,
CodeIcon,
MonitorSmartphoneIcon,
FeatherIcon,
HeartHandshakeIcon,
DownloadIcon, RocketIcon
} from "lucide-react";
import {SiNextdotjs, SiTypescript} from "@icons-pack/react-simple-icons";
@onlyfansapi/auth - Official Authentication Library
The official authentication library for OnlyFans API provides a seamless, secure way to authenticate users with their OnlyFans accounts directly from your application.
## Features
} title="Secure & Responsive">
Built with enterprise-grade security and works seamlessly on both desktop and mobile devices.
} title="Lightning Fast">
1.5kB script loads in just 2ms on 4G internet, ensuring your users never wait for authentication.
} title="Developer Experience">
Developer-friendly with TypeScript support, comprehensive docs, and intuitive APIs.
## Why choose @onlyfansapi/auth?
}>
Built with industry-standard security practices to protect user credentials and authentication flows. Trusted by developers who prioritize security.
}>
Seamlessly works across all devices—desktop, mobile, and tablet. Your users get a consistent authentication experience regardless of their platform.
}>
Minimal footprint at just 1.5kB ensures lightning-fast load times. Authenticate users in under 2ms even on slower 4G connections.
}>
Full TypeScript definitions included for better developer experience, type safety, and autocomplete support in your IDE.
}>
Use with any framework or no framework at all. Works seamlessly with React, Vue, Svelte, Angular, and vanilla JavaScript with zero dependencies.
}>
Intuitive APIs designed for ease of use with comprehensive documentation, clear examples, and straightforward integration patterns.
## Getting started
Ready to integrate authentication into your application? Check out our installation guide and quickstart to get started in minutes.
}>
Learn how to install and set up @onlyfansapi/auth in your project.
}>
Get up and running with our auth package in just a few minutes.
}>
Explore a complete example of using @onlyfansapi/auth with Next.js and Prisma.
# Installation (/auth/installation)
import { Tabs, Tab } from "fumadocs-ui/components/tabs";
import { Step, Steps } from "fumadocs-ui/components/steps";
import { Card, Cards } from "fumadocs-ui/components/card";
import { TerminalIcon } from "lucide-react";
## Package Manager
Install `@onlyfansapi/auth` using your preferred package manager:
```bash
npm install @onlyfansapi/auth
```
```bash
pnpm add @onlyfansapi/auth
```
```bash
yarn add @onlyfansapi/auth
```
```bash
bun add @onlyfansapi/auth
```
## Prerequisites
Before you begin, make sure you have:
} href="https://app.onlyfansapi.com" title="An OnlyFans API account">
If you don't have one yet, registering takes just a few seconds.
» Create a free account
## Get Your API Key
Before creating a client session token, you'll need an API key to authenticate your requests to the OnlyFans API.
### Go to the OnlyFans API console → API Keys
Navigate to your [OnlyFans API console](https://app.onlyfansapi.com) and click on **API Keys** in the navigation menu.
### Create a new API key
Click the **"Create API Key"** button to generate a new API key.
Copy and save your API key securely - you'll need it to create client session tokens.
## Create Your Client Session Token
To use `@onlyfansapi/auth`, you'll need to create a client session token (starts with `ofapi_cs_`) through the [Create Client Session](/api-reference/client-sessions/create-client-session) API endpoint.
### Make a POST request to create a client session
Use your API key to authenticate the request:
```bash
curl -X POST "https://app.onlyfansapi.com/api/client-sessions" \
-H "Authorization: Bearer YOUR_API_KEY" \
-H "Content-Type: application/json" \
-d '{
"display_name": "My Application / Model: John Doe"
}'
```
**Optional fields:**
* `client_reference_id` - Your internal reference ID for the connected account
* `proxy_country` - Proxy country value (`"us" | "uk" | "de" | "fr" | "it"`)
### Get the client session token from the response
The response will include a `token` field that starts with `ofapi_cs_`:
```json
{
"data": {
"token": "ofapi_cs_OriR8Sdocp0f97eFOdbMMZtiz4Aw5FLX",
"display_name": "My Application / Model: John Doe"
}
}
```
This token is what you'll use with the `@onlyfansapi/auth` package.
### Use the client session token
Copy the client session token and use it in your application with `@onlyfansapi/auth`.
**Important:** Keep your client session token secure. While it's designed for client-side use, treat it with appropriate security measures.
## Next Steps
Once you've installed the package and created your client session token, you're ready to start implementing authentication in your application.
* [Quick Start Guide](/auth/quickstart) - Get up and running in minutes
* [Create Client Session API Reference](/api-reference/client-sessions/create-client-session) - Full API documentation
* [NPM Package](https://www.npmjs.com/package/@onlyfansapi/auth) - Full package documentation on npm
# Quick Start (/auth/quickstart)
import { Tabs, Tab } from "fumadocs-ui/components/tabs";
import { Step, Steps } from "fumadocs-ui/components/steps";
import { Callout } from "fumadocs-ui/components/callout";
## Overview
This guide will walk you through implementing `@onlyfansapi/auth` in your application. The authentication library provides a simple, secure way to authenticate users with their OnlyFans accounts.
## Before You Start
Make sure you've completed the [installation](/auth/installation) steps first. You'll need:
* The package installed in your project
* An API key to create client session tokens
* A client session token (starts with `ofapi_cs_`) to use with the library
## Basic Usage
The library exports a single function `startOnlyFansAuthentication` that handles the entire authentication flow. When called, it opens a secure iframe modal where users can authenticate with their OnlyFans account.
### Import
```typescript twoslash
import { startOnlyFansAuthentication } from '@onlyfansapi/auth';
```
### Function Signature
```typescript
const startOnlyFansAuthentication: (clientSessionToken: string, options: {
onSuccess: (data: AuthSuccessData) => void;
onError: (error: AuthFailureError) => void;
onContinue?: () => void;
}) => void
```
**Parameters:**
* `clientSecret` (string, required): Your client session token obtained from the [Create Client Session](/api-reference/client-sessions/create-client-session) API endpoint
* `options.onSuccess` (function, required): Callback invoked when authentication succeeds
* `options.onError` (function, required): Callback invoked when authentication fails
## Framework Examples
```tsx
import React, { useState } from 'react';
import { startOnlyFansAuthentication } from '@onlyfansapi/auth';
export default function AuthComponent() {
const [isLoading, setIsLoading] = useState(false);
const [authData, setAuthData] = useState(null);
const [error, setError] = useState(null);
const handleAuthentication = () => {
setIsLoading(true);
setError(null);
startOnlyFansAuthentication('ofapi_cs_XXXXXXXXXXXXXXXXXXXXXXXXXXXXXXXX', {
onSuccess: (data) => {
console.log('Authentication successful:', data);
setAuthData(data);
setIsLoading(false);
// data.accountId - The authenticated account ID
// data.username - The authenticated username
// data.response - Full response from the API
},
onError: (error) => {
console.error('Authentication failed:', error);
setError(error);
setIsLoading(false);
// error.message - Error message
// error.code - Error code (if available)
// error.details - Additional error details (if available)
},
});
};
return (
{authData && (
Authentication Successful!
Account ID: {authData.accountId}
Username: {authData.username}
)}
{error && (
Authentication Failed
{error.message}
)}
);
}
```
```vue
Authentication Successful!
Account ID: {{ authData.accountId }}
Username: {{ authData.username }}
Authentication Failed
{{ error.message }}
```
```svelte
{#if authData}
Authentication Successful!
Account ID: {authData.accountId}
Username: {authData.username}
{/if}
{#if error}
Authentication Failed
{error.message}
{/if}
```
```typescript
import { Component } from '@angular/core';
import { startOnlyFansAuthentication } from '@onlyfansapi/auth';
@Component({
selector: 'app-auth',
template: `
```
## Response Data
The library provides TypeScript types for better type safety. Import them if needed:
```typescript
import type { AuthSuccessData, AuthError } from '@onlyfansapi/auth';
```
### Success Response
When authentication is successful, the `onSuccess` callback receives an `AuthSuccessData` object:
```typescript
interface AuthSuccessData {
accountId: string; // The authenticated OnlyFans account ID
username: string; // The authenticated OnlyFans username
response: object; // Full response object from the API containing additional metadata
}
```
**Example usage:**
```typescript
onSuccess: (data) => {
// Store the account ID for future API requests
localStorage.setItem('ofAccountId', data.accountId);
// Redirect to dashboard or update UI
console.log(`Authenticated as ${data.username}`);
}
```
### Error Response
When authentication fails, the `onError` callback receives an `AuthError` object:
```typescript
interface AuthError {
message: string; // Human-readable error message
code?: string; // Error code (if available) for programmatic handling
details?: object; // Additional error details (if available)
}
```
**Common error scenarios:**
* User cancels the authentication flow
* Network connectivity issues
* Invalid or expired client session token
* OnlyFans account access issues
**Example error handling:**
```typescript
onError: (error) => {
if (error.code === 'AUTH_CANCELLED') {
// User closed the authentication modal
console.log('Authentication cancelled by user');
} else {
// Handle other errors
console.error('Authentication failed:', error.message);
// Display error to user
}
}
```
## Security
The authentication library implements multiple security measures to protect user data:
* **Origin validation**: All communication with the authentication iframe is validated by origin
* **Domain whitelisting**: Only messages from the configured OnlyFansAPI.com domain are accepted
* **Secure token transmission**: Client session tokens are passed securely via URL parameters
* **HTTPS required**: The library requires HTTPS connections in production environments
## Best Practices
### Storing Client Session Tokens
Store your client session token securely:
```typescript
// ✅ Good: Use environment variables (if using a build tool)
const CLIENT_SECRET = process.env.NEXT_PUBLIC_OFAPI_CLIENT_SECRET;
// ✅ Good: Fetch from your backend API (most secure)
const clientSecret = await fetch('/api/client-secret').then(r => r.json());
// ❌ Bad: Hardcode in your source code
const CLIENT_SECRET = 'ofapi_cs_...';
```
### Error Handling
Always handle both success and error cases:
```typescript
startOnlyFansAuthentication("clientSecret", {
onSuccess: (data) => {
// Update your application state
// Persist authentication data if needed
// Redirect or update UI
},
onError: (error) => {
// Log errors for debugging
// Show user-friendly error messages
// Provide fallback options
},
});
```
### User Experience
* Show a loading state while authentication is in progress
* Disable the authentication button during the flow to prevent duplicate requests
* Provide clear feedback on success or failure
* Consider adding a "try again" option if authentication fails
## Troubleshooting
### Common Issues
**Authentication modal doesn't open:**
* Ensure your client session token is valid and properly formatted
* Check browser console for any error messages
* Verify that pop-ups aren't blocked by your browser
**"Invalid client secret" error:**
* Verify your client session token is correct (starts with `ofapi_cs_`)
* Check that the token hasn't expired
* Ensure you're using a token created via the [Create Client Session API](/api-reference/client-sessions/create-client-session)
**Network errors:**
* Check your internet connection
* Verify OnlyFansAPI.com is accessible from your network
* Some corporate firewalls may block the authentication iframe
## Next Steps
* Review the [Installation Guide](/auth/installation) if you haven't already
* Check out the [NPM package](https://www.npmjs.com/package/@onlyfansapi/auth) for the latest version and updates
* Visit [onlyfansapi.com/auth](https://onlyfansapi.com/auth) for more information
* Explore the [API Reference](/api-reference) to see what you can do with authenticated accounts
# Introduction (/data-exports)
import { Step, Steps } from 'fumadocs-ui/components/steps';
import {
ArrowLeftRightIcon,
BanknoteArrowDownIcon, BanknoteXIcon,
HeartIcon,
ImageIcon,
MessagesSquareIcon,
TagIcon, TagsIcon,
UserSearchIcon, UsersIcon, UserStarIcon
} from "lucide-react";
## Available data export types
} title="Transactions" />
} title="Chat Messages" />
} title="Media" />
} title="Trial Links" />
} title="Tracking Links" />
} title="Payouts" />
} title="Chargebacks" />
} title="Public Profiles" />
} title="Followings" />
} title="Fans" />
## Getting started
You can create and manage data exports in two ways:
* **Dashboard**: Visit the [Data Exports page](https://app.onlyfansapi.com/tools/data-export) on our Console for a no-code interface
* **API**: Use our [Data Exports API endpoints](#using-the-api) to programmatically create and manage exports
### Starting an export via Dashboard
To get started, click on the "Create Export" button, which will take you to the export creation page. You're then prompted customize your export:
#### Data type
As the first step, select the type of data you want to export. Please refer to [the list above](#available-data-export-types) for available export types.
#### Export fields
Select the fields you want to include in your export. For a full list of available fields, please refer to [the available export fields list](#available-export-fields).
#### Accounts
Choose which accounts you want to include in your export. You can select all connected accounts, or select specific accounts.
#### Date range
Select the data range that you wish to be included in your export.
#### View the export cost
For some Data Export types, it is not possible to calculate the cost upfront. If this is the case, it will be calculated once the export is completed. For other Data Export types, you will see the cost of the export here.
#### Select the export file type
Click on "Export Data", and choose either CSV or Excel (XSLX). This will start the export!
Your data export will now be processed by our servers in the background, and you will be able to download it once completed.
## Using the API
Data exports can be created and managed either through our [Dashboard](https://app.onlyfansapi.com/tools/data-export) or programmatically using our API endpoints. The API provides full control over the export lifecycle, allowing you to automate data exports and integrate them into your workflows.
### Export workflow
The data export process follows a two-step workflow:
#### Create Data Export
Use the [Create Data Export](/api-reference/data-exports/create-data-export) endpoint to create a new export request. This endpoint will calculate the required credits based on your selected parameters (data type, fields, accounts, and date range) and prepare the export for processing.
#### Start Data Export
Once the export has been created and credit calculation is complete, use the [Start Data Export](/api-reference/data-exports/start-data-export) endpoint to begin processing. This will charge the calculated credits and start the actual export process.
### Monitoring exports
You can monitor the status and progress of your exports using the following endpoints:
* **[List Data Exports](/api-reference/data-exports/list-data-exports)** - Get a paginated list of all data exports for your team
* **[Get Data Export Status](/api-reference/data-exports/get-data-export-status)** - Check the current status, progress, and download URL for a specific export
Once an export is completed, you can download the file using the download URL provided in the export status response.
## Big data exports
Depending on the chosen date range and account size, your export might take several hours to complete if you're exporting a large amount of data. You can safely close the browser window, and return to the Data Exports page later to check the status of your export.
## Available export fields
| Transactions | Chat Messages | Trial Links | Tracking Links | Payouts | Chargebacks | Public Profiles | Media | Fans | Followings |
| ---------------- | ---------------------------- | ---------------------- | ---------------------- | ------------------- | ------------------- | ------------------- | --------------------------------------------------- | ------------------ | ----------------------------- |
| Account ID | Account ID | Account ID | Account ID | Account ID | Account ID | OnlyFans ID | ZIP of every media vault file (photo, video, audio) | ID | OnlyFans ID |
| Account Name | Account Name | Account Name | Account Name | Account Name | Account Name | Username | | OnlyFans ID | Username |
| Account Username | Account Username | Account Username | Account Username | Account Username | Account Username | Name | | Username | Name |
| Transaction ID | Fan ID | OnlyFans ID | OnlyFans ID | OnlyFans ID | OnlyFans ID | About | | Name | Avatar |
| Type | Fan Username | Name | Campaign Code | Amount | Payment Type | Location | | Display Name | Is Performer |
| Fan ID | Fan Name | URL | Campaign Name | Currency | Fan ID | Website | | Avatar | Is Verified |
| Fan Username | Chat ID | Claim Counts | OnlyFans URL | State | Fan Username | Subscribe Price | | Location | Is Real Performer |
| Fan Name | Message ID | Clicks Counts | Count Subscribers | Reject Reason | Fan Name | Min Subscribe Price | | Is Performer | Subscribe Price |
| Amount | Message Text | Subscribe Counts | Count Transitions | OnlyFans Created At | Amount | Posts Count | | Is Verified | Subscription Price |
| VAT Amount | Price | Subscribe Days | Revenue | | VAT Amount | Photos Count | | Can Add Subscriber | Subscription Autoprolong |
| Tax Amount | Tip Amount | Is Finished | Revenue Per Subscriber | | Tax Amount | Videos Count | | Can Chat | Subscription Is Muted |
| Net Amount | Is Free | Revenue | Revenue Per Click | | Media Tax Amount | Audios Count | | Subscribe Price | Show Posts In Feed |
| Fee Amount | Is Tip | Revenue Per Subscriber | OnlyFans Created At | | Net Amount | Favorites Count | | Total Summ | Has Active Paid Subscriptions |
| Currency | Sent by (`creator` or `fan`) | OnlyFans Created At | OnlyFans End Date | | Fee Amount | Favorited Count | | Messages Summ | Subscription Status |
| Description | Is Opened | OnlyFans Expired At | | | Currency | Subscribers Count | | Subscribes Summ | Subscribe At |
| Status | Media Count | Tags (comma separated) | Tags (comma separated) | | Description | Is Verified | | Posts Summ | Expired At |
| Created At | OnlyFans Created At | | | | Status | Is Performer | | Tips Summ | Renewed At |
| | | | | | Payment Created At | Is Real Performer | | Streams Summ | Last Seen At |
| | | | | | OnlyFans Created At | Avatar URL | | Rebill On | Regular Price |
| | | | | | | Header URL | | Subscribe At | Discount Percent |
| | | | | | | Instagram | | Expired At | Duration |
| | | | | | | Twitter | | Renewed At | Can Receive Chat Message |
| | | | | | | TikTok | | | Is Blocked |
| | | | | | | Facebook | | | Can Unsubscribe |
| | | | | | | Gender | | | Tips Enabled |
| | | | | | | Gender Confidence | | | |
| | | | | | | Join Date | | | |
| | | | | | | Last Seen At | | | |
## Pricing
The following pricing applies to our data exports:
| Export type | Cost |
| --------------- | ----------------------- |
| Transactions | 1 credit per 20 results |
| Chat Messages | 1 credit per 20 results |
| Media | 1 credit per 20 results |
| Trial Links | 1 credit per 20 results |
| Tracking Links | 1 credit per 20 results |
| Payouts | 1 credit per 20 results |
| Chargebacks | 1 credit per 20 results |
| Public Profiles | 3 credits per profile |
| Fans | 1 credit per 20 results |
| Followings | 1 credit per 20 results |
# Use Cases (/data-exports/use-cases)
import { Callout } from 'fumadocs-ui/components/callout';
import {
DatabaseIcon,
UsersIcon,
BrainCircuitIcon,
BarChart3Icon,
ArchiveIcon
} from "lucide-react";
Data exports unlock the full potential of your OnlyFans data. Whether you're building automations, training AI models, or migrating to new systems, our comprehensive export tools give you complete control over your data.
} title="AI & LLM Training" href="#download-media-and-chats-for-llm-and-lora-training" />
} title="Financial Analytics" href="#export-financial-data-for-analytics-and-automation" />
} title="Backup & Migration" href="#complete-data-backup-and-migration" />
***
## Download Media and Chats for LLM and LoRA Training
AI developers, chatbot builders, and content personalization tools
Training AI models to mimic a creator's voice, style, or persona? Our **Media** and **Chat Messages** exports provide the raw data you need for LLM fine-tuning and LoRA training.
### Media exports for visual AI
Export your entire **Media Vault** as a ZIP file containing:
* All photos (full resolution)
* All videos (original quality)
* All audio files
This is invaluable for training:
* **LoRA models** for Stable Diffusion and similar image generators
* **Content classifiers** and moderation systems
* **Style transfer** and editing tools
### Chat exports for language models
The **Chat Messages** export includes:
* Complete message history
* Message text and timestamps
* Fan context (ID, username, name)
* Tip and pricing data
* Media attachment counts
Use this data to:
* **Fine-tune LLMs** on a creator's communication style
* **Build AI chatbots** that authentically represent creator personalities
* **Analyze conversation patterns** for engagement optimization
* **Train response suggestion systems**
### Technical integration
```python title="Example: Processing chat exports for training"
import pandas as pd
# Load your chat export
chats = pd.read_csv('chat_messages_export.csv')
# Filter for creator's own messages
creator_messages = chats[chats['Is From Account'] == True]
# Prepare training pairs
training_data = []
for idx, row in creator_messages.iterrows():
training_data.append({
"role": "assistant",
"content": row['Message Text']
})
# Export for fine-tuning
# ... your ML pipeline here
```
***
## Export Financial Data for Analytics and Automation
Accountants, agencies managing multiple creators, and analytics platforms
Need to sync your OnlyFans financial data with external tools? Export **Transactions**, **Payouts**, and **Chargebacks** to power your analytics dashboards and automation workflows.
### Available financial exports
| Export Type | Key Fields |
| ---------------- | --------------------------------------------------------------- |
| **Transactions** | Amount, VAT, tax, net, fee, currency, type, status, fan details |
| **Payouts** | Amount, currency, state, reject reason, timestamps |
| **Chargebacks** | Amount, payment type, status, fan info, media tax breakdown |
### Power your automation stack
Integrate data exports with tools like **n8n**, **Zapier**, or **Make** to build powerful financial workflows:
#### Example: n8n revenue sync workflow
1. **Schedule trigger** — Run weekly or monthly
2. **API call** — Create and start a Transactions export
3. **Wait for completion** — Poll export status
4. **Download CSV** — Fetch the completed export
5. **Parse data** — Transform for your target system
6. **Update database** — Sync to Airtable, Google Sheets, or your data warehouse
7. **Trigger alerts** — Notify on anomalies (chargebacks, revenue drops)
Starting fresh with a new analytics tool? Export your **entire transaction history** to backfill your database with years of financial data in minutes.
### Real-world applications
* **Revenue dashboards**: Sync to Metabase, Tableau, or custom BI tools
* **Tax preparation**: Export all transactions for your accountant
* **Chargeback monitoring**: Track and analyze disputed payments
* **Multi-account reconciliation**: Consolidate finances across all managed creators
* **Payout forecasting**: Analyze historical patterns to predict future earnings
***
## Complete Data Backup and Migration
Creators switching platforms, agencies managing transitions, and disaster recovery
Your OnlyFans data is valuable. Whether you're preparing for a platform migration, setting up disaster recovery, or just want peace of mind, our comprehensive exports have you covered.
### Export everything
| Data Type | What's Included |
| ------------------- | -------------------------------------------------- |
| **Media** | Every photo, video, and audio file from your vault |
| **Chat Messages** | Complete conversation history with all fans |
| **Transactions** | Full financial record of all earnings |
| **Trial Links** | All free trial campaigns and performance data |
| **Tracking Links** | Marketing campaign data and attribution |
| **Payouts** | Complete payout history |
| **Chargebacks** | Dispute and chargeback records |
| **Public Profiles** | Profile snapshots for record-keeping |
### Backup strategy
Set up a robust backup workflow:
1. **Monthly full exports** — Download all data types for comprehensive snapshots
2. **Weekly incremental exports** — Export recent data using date range filters
3. **Store securely** — Save to cloud storage (S3, Google Cloud, Azure) or local NAS
4. **Version your backups** — Maintain historical snapshots for point-in-time recovery
### Migration use cases
* **Platform switch**: Export everything before moving to a new content platform
* **Agency transition**: Hand off complete data when onboarding or offboarding creators
* **Legal compliance**: Maintain records for regulatory requirements
* **Content repurposing**: Access your full media library for use on other platforms
Exporting years of data? Our system handles big exports seamlessly. Start the export, close your browser, and come back later to download your complete archive.
***
## Get Started
Ready to unlock the full potential of your OnlyFans data?
# Overview (/api-reference)
import {
BanknoteArrowDownIcon,
BotMessageSquareIcon,
ChartSplineIcon,
GalleryVerticalEndIcon,
ImageDownIcon,
ImageIcon,
ImageUpIcon,
MessageSquareReplyIcon,
MessageSquareTextIcon,
MessagesSquareIcon,
RocketIcon,
ScrollTextIcon,
SendIcon,
SmilePlusIcon,
UserCheckIcon,
UserSearchIcon,
UsersIcon,
UserXIcon,
} from "lucide-react";
Not sure where to start?
Browse our frequently used API endpoints below to get a feel for what's possible
with OnlyFans API.
## Chats & Messages \[!toc]
} href="/api-reference/chats/list-chats" title="List Chats">
Retrieve the latest chats, including details like last message and fan details.
} href="/api-reference/chat-messages/list-chat-messages" title="List Chat Messages">
Retrieve messages from a specific chat.
} href="/api-reference/chat-messages/send-message" title="Send Message">
Send a new chat message to a fan, including support for media and PPVs.
} href="/api-reference/mass-messaging/send-mass-message" title="Send Mass Message">
Send or schedule a mass message to collections or individual fans, including support for media and PPVs.
## Payouts & Earnings \[!toc]
} href="/api-reference/payouts/get-earning-statistics" title="Earning Statistics">
Get a summary of model earnings over time, including totals and breakdowns.
} href="/api-reference/payouts/list-transactions-earnings" title="List Transactions (Earnings)">
Get a list of earning transactions, including details like amount, type, and fan info.
} href="/api-reference/payouts/request-manual-withdrawal" title="Request Manual Withdrawal">
Initiate a manual withdrawal, perfect for automating daily payouts.
## Fans & Subscribers \[!toc]
} href="/api-reference/fans/list-all-fans" title="List All Fans">
Retrieve a list of all fans, and filter by online, total spendings, duration, and more.
} href="/api-reference/fans/list-active-fans" title="List Active Fans">
Get a list of fans who have an active subscription.
} href="/api-reference/fans/list-expired-fans" title="List Expired Fans">
Get a list of fans whose subscriptions have expired.
} href="/api-reference/fans/list-latest-fans" title="List Latest Fans">
Get a list of fans within a specific date range.
## Media & Vault \[!toc]
} href="/api-reference/media-vault/list-vault-media" title="List Vault Media">
Retrieve a list of all fans, and filter by online, total spendings, duration, and more.
} href="/api-reference/media-vault-lists/list-vault-lists" title="List Vault Lists">
Get a list of fans who have an active subscription.
} href="/api-reference/media/upload-media-to-the-only-fans-cdn" title="Upload media to OnlyFans">
Upload an image, video or audio file to the OnlyFans CDN to include in a message or post.
} href="/api-reference/media/download-media-from-the-only-fans-cdn" title="Download media from OnlyFans">
Download an image, video or audio file from OnlyFans to our own CDN.
Haven't found what you're looking for?
} title="Explore our full API reference in the sidebar" href="/api-reference">
We have over 100 endpoints covering most OnlyFans functionality. Check out the sidebar to explore all available endpoints.
} title="Ask our AI chatbot">
Our AI chatbot can help you find the right endpoint for your use case. Click the "Ask AI" button in the bottom right to get started.
} title="Request a new functionality" href="mailto:hello@onlyfansapi.com">
Need something specific? Let us know! We're constantly adding new endpoints based on user feedback.
# Introduction (/integrations)
import {
SiMake,
SiMakeHex,
SiZapier,
SiZapierHex,
SiIfttt,
SiIftttHex,
SiN8n,
SiN8nHex
} from "@icons-pack/react-simple-icons";
Please choose an integration to get started:
} href="/integrations/n8n" title="n8n (recommended)">
Best for building complex, multi-step no-code automations. Perfect for users who want powerful automation capabilities with full control over their workflows.
} href="/integrations/make" title="Make">
Best for simple OnlyFans automations, all without writing code. Ideal for users who want simple visual workflow design.
} href="/integrations/zapier" title="Zapier">
Best for quickly setting up no-code automations based on triggers like new messages, PPV purchases, or new fan subscriptions. Great for those who want ease-of-use and a large library of app connections.
Or watch our tutorial video:
# Introduction (/introduction)
import {
CodeXmlIcon,
KeyRoundIcon,
LockIcon,
WebhookIcon,
} from 'lucide-react';
## Why OnlyFansAPI.com?
OnlyFansAPI.com is a platform that allows you to interact with the OnlyFans API without the need to build
your proxy management system, reverse engineer the API, or deal with WebSockets.
Our engineers who have been working with the OnlyFans API for years have built **a huge set of simple REST API endpoints** that allows you to:
* Access all public information about OnlyFans Creator Profiles
* Search within a database of over 3.5m+ OnlyFans Creator Profiles
* Connect your own OnlyFans account and:
* Get a list of your chats and messages
* Send messages (i.e. if you're building AI Chatbot solution)
* Get a list of your fans, and automatically follow them back
* Literally anything else you can think of!
## Get started
Whether you're building a chatbot, OnlyFans Search Engine, OnlyFans CRM, or anything else, you can get started with OnlyFansAPI.com in minutes.
} href="/introduction/quickstart">
Learn how to make your first API request and get started with OnlyFans API
} href="https://app.onlyfansapi.com/api-keys">
Create your first API Key and start making requests
} href="/introduction/guides/connect-onlyfans-account">
Learn how to connect you OnlyFans accounts in under 2 minutes
} href="/webhooks">
Get webhook notifications for new messages, new subscribers, tips, ...
# Quickstart (2m) (/introduction/quickstart)
import {
CodeIcon, CoinsIcon, GaugeIcon, ShieldHalfIcon, ShieldIcon, ShieldUserIcon,
} from "lucide-react";
## Getting Started with OnlyFans API
Follow these steps to start using the OnlyFans API for your project.
### 1. Create Your API Key
To get started with the OnlyFans API, you'll need an API key:
1. Sign up for an account at [OnlyFansAPI Console](https://app.onlyfansapi.com)
2. Navigate to the API Keys section
3. Create a new API key for your project
4. Save your API key securely - you'll need it for all API requests
### 2. Connect Your OnlyFans Account
You'll need to connect your OnlyFans account to use the API. We offer two methods:
#### Automated Login Flow (Recommended)
1. Go to [OnlyFansAPI Console -> Accounts](https://app.onlyfansapi.com/accounts)
2. Click "+ Connect Account"
3. Follow the setup process (supports 2FA and captcha)
#### Manual cURL Method
An alternative method using cURL request is available. See our [detailed guide](/introduction/guides/connect-onlyfans-account) for instructions.
### 3. Essential Concepts
Before you start making API calls, familiarize yourself with these important concepts:
} href="/introduction/essentials/response-structure">
Understand how our API responses are structured.
} href="/introduction/essentials/rate-limits">
Understand API rate limits and how to handle them properly.
} href="/introduction/essentials/credits">
Learn about our credit-based billing and how to manage your usage.
} href="/introduction/essentials/proxies">
Learn about proxy options for secure API access.
### 4. Next Steps
Once you're set up, you can:
* Explore our API endpoints in the [API Reference](/api-reference)
* Test API calls directly from our documentation
* Start building your application with our comprehensive guides
# Available webhook events (/webhooks/available-events)
Please reach out to us, we can add it!
## Accounts
### `accounts.connected`
A new OnlyFans account was connected.
Please note that `payload.client_reference_id` can be null - it's only
included if you provided us with `client_reference_id` while [Creating Client
Session](/api-reference/client-sessions/create-client-session)
```json title="Example payload"
{
"event": "accounts.connected",
"account_id": "acct_123",
"payload": {
"client_reference_id": "my_crm_model_12345", // Optional - Value you provided while creating Client Session - otherwise null
"state": "authenticated",
"progress": "started",
"latestAuthAttempt": {
"started_at": "2025-05-13T20:26:56.000000Z",
"completed_at": null,
"success": false,
"error_message": null,
"needs_otp": false,
"needs_face_otp": false,
"otp_phone_ending": null
}
}
}
```
### `accounts.reconnected`
An OnlyFans account was reconnected.
```json title="Example payload"
{
"event": "accounts.reconnected",
"account_id": "acct_123",
"payload": {
"state": "authenticated",
"progress": "started",
"latestAuthAttempt": {
"started_at": "2025-05-13T20:26:56.000000Z",
"completed_at": null,
"success": false,
"error_message": null,
"needs_otp": false,
"needs_face_otp": false,
"otp_phone_ending": null
}
}
}
```
### `accounts.session_expired`
OnlyFans account connection has expired, but we automatically re-connected it using our system - you don't need to do anything.
```json title="Example payload"
{
"event": "accounts.session_expired",
"account_id": "acct_123",
"payload": {
"state": "authenticated",
"progress": "started",
"latestAuthAttempt": {
"started_at": "2025-05-13T20:26:56.000000Z",
"completed_at": null,
"success": false,
"error_message": null,
"needs_otp": false,
"needs_face_otp": false,
"otp_phone_ending": null
}
}
}
```
### `accounts.authentication_failed`
OnlyFans account connection has expired, and we couldn't automatically re-connect it using our system. You need to reconnect with our [/authenticate](/api-reference/connect-onlyfans-account/start-authentication) endpoint or manually in our [dashboard](https://app.onlyfansapi.com).
```json title="Example payload"
{
"event": "accounts.authentication_failed",
"account_id": "acct_123",
"payload": {
"state": "authenticated",
"progress": "started",
"latestAuthAttempt": {
"started_at": "2025-05-13T20:26:56.000000Z",
"completed_at": null,
"success": false,
"error_message": null,
"needs_otp": false,
"needs_face_otp": false,
"otp_phone_ending": null
}
}
}
```
### `accounts.otp_code_required`
A two-factor authentication code is required to connect one of your OnlyFans accounts.
```json title="Example payload"
{
"event": "accounts.otp_code_required",
"account_id": "acct_123",
"payload": {
"state": "authenticated",
"progress": "started",
"latestAuthAttempt": {
"started_at": "2025-05-13T20:26:56.000000Z",
"completed_at": null,
"success": false,
"error_message": null,
"needs_otp": false,
"needs_face_otp": false,
"otp_phone_ending": null
}
}
}
```
### `accounts.face_otp_required`
Face verification is required to connect one of your OnlyFans accounts.
```json title="Example payload"
{
"event": "accounts.face_otp_required",
"account_id": "acct_123",
"payload": {
"state": "authenticated",
"progress": "started",
"face_otp_verification_url": "https://id.onlyfans.com/s?123",
"latestAuthAttempt": {
"started_at": "2025-05-13T20:26:56.000000Z",
"completed_at": null,
"success": false,
"error_message": null,
"needs_otp": false,
"needs_face_otp": false,
"otp_phone_ending": null
}
}
}
```
## Transactions
### `transactions.new`
A new transaction has been received from a fan (eg. a subscription, a tip, a post, etc.).
Please note that this event may be delayed by up to 3 minutes.
| Supported `payload.type` values | Description | |
| ------------------------------- | ------------------------------------ | ------ |
| `message` | A message has been sent to you | |
| `post` | Payment for a post | `post` |
| `tip` | Payment for a tip | `tip` |
| `new_subscription` | Payment for a new subscription | |
| `recurring_subscription` | Payment for a recurring subscription | |
| `stream` | Payment for a stream | |
| `other` | Another type of transaction | |
```json title="Example payload"
{
"event": "transactions.new",
"account_id": "acct_123",
"payload": {
"id": "04a2e89491bcd97ddc60b1ead7915f7c",
"created_at": "2026-01-06T01:48:47+00:00",
"type": "message",
"amount": 3.0,
"vat_amount": 0.63,
"tax_amount": 0.0,
"net_amount": 2.4,
"fee_amount": 0.6,
"currency": "USD",
"description": "Payment for message from John Doe",
"fanData": {
"available": true,
"last_updated_at": "2026-01-10 17:12:00",
"spending": {
"total": 6.6,
"messages": 10,
"subscribes": 2.6,
"posts": 0,
"tips": 4,
"streams": 0
}
}
}
}
```
## Messages
### `messages.received`
New message received from a fan.
```json title="Example payload"
{
"event": "messages.received",
"account_id": "acct_123",
"payload": {
"responseType": "message",
"text": "
All types of webhook events are available on every plan - Basic, Pro and Enterprise.
How to Subscribe to webhooks
List of available webhook events
We offer native integrations for most no-code tools. Get started in minutes without writing a single line of code.
n8n integration
Make.com integration
Zapier integration
A webhook is an HTTP endpoint that receives events from OnlyFans API. They allow you to be notified about events such as:
* Receiving a message from a fan ([`messages.received`](/webhooks/available-events#messagesreceived))
* New fan subscriptions ([`subscriptions.new`](/webhooks/available-events#subscriptionsnew))
* Fan has renewed their subscription ([`subscriptions.renewed`](/webhooks/available-events#subscriptionsrenewed))
* Fan purchased a PPV message ([`messages.ppv.unlocked`](/webhooks/available-events#messagesppvunlocked))
* And more! See a [complete list of available webhook events](/webhooks/available-events)
You can use our API for less frequent actions like retrieving specific chats, profiles, or earning details, while webhooks help you scale your integration and process large volumes of business-critical events in near real-time.
# Protecting your webhooks (/webhooks/protecting-your-webhooks)
You can choose any signing secret, but it is recommended to use a long, random string.
## How the signature is calculated
We calculate the signature using the HMAC SHA256 algorithm. The payload (as json) is the string, and the signing secret is the key.
## Verifying the signature
Below you can find examples of how to verify the signature in different programming languages.
PHP
Python
JavaScript
Go
Java
Ruby
```php
$computedSignature = hash_hmac('sha256', $requestContent, $signingSecret);
```
```python
import hmac
import hashlib
computed_signature = hmac.new(signing_secret.encode(), request_content.encode(), hashlib.sha256).hexdigest()
```
```javascript
const crypto = require('crypto');
const computedSignature = crypto
.createHmac('sha256', signingSecret)
.update(requestContent)
.digest('hex');
```
```go
package main
import (
"crypto/hmac"
"crypto/sha256"
"encoding/hex"
)
func main() {
signingSecret := []byte("your_signing_secret")
requestContent := []byte("your_request_content")
h := hmac.New(sha256.New, signingSecret)
h.Write(requestContent)
computedSignature := hex.EncodeToString(h.Sum(nil))
// Use `computedSignature` as needed
}
```
```java
import javax.crypto.Mac;
import javax.crypto.spec.SecretKeySpec;
import java.util.Base64;
import java.nio.charset.StandardCharsets;
public class HmacSha256Example {
public static void main(String[] args) throws Exception {
String signingSecret = "your_signing_secret";
String requestContent = "your_request_content";
Mac mac = Mac.getInstance("HmacSHA256");
SecretKeySpec secretKeySpec = new SecretKeySpec(signingSecret.getBytes(StandardCharsets.UTF_8), "HmacSHA256");
mac.init(secretKeySpec);
byte[] hmacBytes = mac.doFinal(requestContent.getBytes(StandardCharsets.UTF_8));
String computedSignature = bytesToHex(hmacBytes);
// Use `computedSignature` as needed
}
private static String bytesToHex(byte[] bytes) {
StringBuilder hexString = new StringBuilder();
for (byte b : bytes) {
String hex = Integer.toHexString(0xff & b);
if (hex.length() == 1) {
hexString.append('0');
}
hexString.append(hex);
}
return hexString.toString();
}
}
```
```ruby
require 'openssl'
computed_signature = OpenSSL::HMAC.hexdigest('sha256', signing_secret, request_content)
```
# Subscribing to webhooks (/webhooks/subscribing-to-webhooks)
Webhooks are only available for Pro and Enterprise plans.
You can easily subscribe to webhooks using our console. To do this, follow these steps:
1. Go to the [OnlyFansAPI Console -> Webhooks](https://app.onlyfansapi.com)
2. Click on the **+ Add Webhook** button
3. Fill in the **Endpoint URL** field with your webhook endpoint
4. Optionally, add a [Signing Secret](/webhooks/protecting-your-webhooks) to verify the webhook payloads (recommended)
5. Select the [events](/webhooks/available-events) you want to subscribe to
Once you have added your webhook, you will start receiving events on your webhook endpoint.
You will be able to view the latest response status in the console.
# Next.js & Prisma (/auth/examples/nextjs-prisma)
## Overview
This guide walks you through building a complete account management dashboard that:
* Authenticates OnlyFans accounts using `@onlyfansapi/auth`
* Stores account data in a PostgreSQL database via Prisma
* Provides a UI to view and manage connected accounts
The complete source code is available at [auth-example-nextjs-prisma](https://github.com/onlyfansapi/auth-example-nextjs-prisma).
## Prerequisites
Before starting, ensure you have:
* Node.js 18+ or Bun installed
* A PostgreSQL database
* An OnlyFans API key from [app.onlyfansapi.com/api-keys](https://app.onlyfansapi.com/api-keys)
## Step 1: Create a Next.js Project
Create a new Next.js project with TypeScript and Tailwind CSS:
```bash
npx create-next-app@latest my-app --typescript --tailwind --app
cd my-app
```
## Step 2: Install Dependencies
Install the required packages:
```bash
npm install @onlyfansapi/auth prisma @prisma/client @prisma/adapter-pg pg
```
## Step 3: Set Up Prisma
Initialize Prisma with PostgreSQL:
```bash
npx prisma init
```
Update your `prisma/schema.prisma` to define the Account model:
```prisma
generator client {
provider = "prisma-client"
}
datasource db {
provider = "postgresql"
url = env("DATABASE_URL")
}
model Account {
id String @id @default(cuid())
accountId String @unique // OnlyFans account ID
username String // OnlyFans username
displayName String // User-defined label
name String? // OnlyFans profile name
avatar String? // Avatar URL
createdAt DateTime @default(now())
updatedAt DateTime @updatedAt
}
```
Create the Prisma client singleton in `lib/prisma.ts`:
```typescript
import { Pool } from "pg";
import { PrismaPg } from "@prisma/adapter-pg";
import { PrismaClient } from "@prisma/client";
const globalForPrisma = globalThis as unknown as { prisma?: PrismaClient };
function createPrismaClient() {
const pool = new Pool({ connectionString: process.env.DATABASE_URL });
const adapter = new PrismaPg(pool);
return new PrismaClient({ adapter });
}
export const prisma = globalForPrisma.prisma ?? createPrismaClient();
if (process.env.NODE_ENV !== "production") {
globalForPrisma.prisma = prisma;
}
```
## Step 4: Configure Environment Variables
Create a `.env` file with your credentials:
```bash
# PostgreSQL connection string
DATABASE_URL="postgresql://user:password@localhost:5432/mydb"
# OnlyFans API Key (keep this secret, server-side only)
OFAPI_API_KEY="ofapi_..."
```
The `OFAPI_API_KEY` should never be exposed to the client. We'll create a server-side endpoint to generate client session tokens.
## Step 5: Create the Client Session API Route
Create `app/api/client-session/route.ts` to securely generate client session tokens:
```typescript
import { NextRequest, NextResponse } from "next/server";
export async function POST(request: NextRequest) {
const body = await request.json();
const { displayName } = body;
if (!displayName) {
return NextResponse.json(
{ error: "displayName is required" },
{ status: 400 }
);
}
const apiKey = process.env.OFAPI_API_KEY;
if (!apiKey) {
return NextResponse.json(
{ error: "API key not configured" },
{ status: 500 }
);
}
// Create client session via OnlyFans API
const response = await fetch(
"https://app.onlyfansapi.com/api/client-sessions",
{
method: "POST",
headers: {
"Content-Type": "application/json",
Authorization: `Bearer ${apiKey}`,
},
body: JSON.stringify({ display_name: displayName }),
}
);
if (!response.ok) {
return NextResponse.json(
{ error: "Failed to create client session" },
{ status: response.status }
);
}
const data = await response.json();
return NextResponse.json({ token: data.data.token });
}
```
This endpoint calls the [Create Client Session](/api-reference/client-sessions/create-client-session) API to generate a temporary token for authentication.
## Step 6: Create the Accounts API Routes
Create `app/api/accounts/route.ts` for listing and creating accounts:
```typescript
import { NextRequest, NextResponse } from "next/server";
import { prisma } from "@/lib/prisma";
export async function GET() {
const accounts = await prisma.account.findMany({
orderBy: { createdAt: "desc" },
});
return NextResponse.json(accounts);
}
export async function POST(request: NextRequest) {
const { accountId, username, displayName, name, avatar } = await request.json();
if (!accountId || !username || !displayName) {
return NextResponse.json(
{ error: "accountId, username, and displayName are required" },
{ status: 400 }
);
}
const account = await prisma.account.create({
data: { accountId, username, displayName, name, avatar },
});
return NextResponse.json(account, { status: 201 });
}
```
Create `app/api/accounts/[id]/route.ts` for deleting accounts:
```typescript
import { NextRequest, NextResponse } from "next/server";
import { prisma } from "@/lib/prisma";
export async function DELETE(
request: NextRequest,
{ params }: { params: Promise<{ id: string }> }
) {
const { id } = await params;
await prisma.account.delete({ where: { id } });
return NextResponse.json({ success: true });
}
```
## Step 7: Build the Dashboard UI
Create a dashboard page in `app/page.tsx` that uses the auth package:
```tsx
"use client";
import { useState } from "react";
import { startOnlyFansAuthentication } from "@onlyfansapi/auth";
export default function Dashboard() {
const [displayName, setDisplayName] = useState("");
const [isLoading, setIsLoading] = useState(false);
const handleAddAccount = async () => {
if (!displayName.trim()) return;
setIsLoading(true);
try {
// Step 1: Get client session token from our backend
const sessionRes = await fetch("/api/client-session", {
method: "POST",
headers: { "Content-Type": "application/json" },
body: JSON.stringify({ displayName: displayName.trim() }),
});
if (!sessionRes.ok) throw new Error("Failed to create session");
const { token } = await sessionRes.json();
// Step 2: Start authentication with the token
startOnlyFansAuthentication(token, {
onSuccess: async (data) => {
// Step 3: Save account to database
await fetch("/api/accounts", {
method: "POST",
headers: { "Content-Type": "application/json" },
body: JSON.stringify({
accountId: data.accountId,
username: data.username,
displayName: displayName.trim(),
name: data.onlyfansData?.name,
avatar: data.onlyfansData?.avatar_url,
}),
});
// Refresh account list or show success message
window.location.reload();
},
onError: (error) => {
console.error("Authentication failed:", error.message);
setIsLoading(false);
},
});
} catch (error) {
console.error("Error:", error);
setIsLoading(false);
}
};
return (
);
}
```
## Step 8: Initialize the Database
Generate the Prisma client and push the schema to your database:
```bash
npx prisma generate
npx prisma db push
```
## Step 9: Run the Application
Start the development server:
```bash
npm run dev
```
Open [http://localhost:3000](http://localhost:3000) to see your dashboard.
## Authentication Flow Summary
1. **User initiates auth**: Clicks "Add Account" and enters a display name
2. **Backend creates session**: Server calls OnlyFans API to create a client session token
3. **Auth popup opens**: `startOnlyFansAuthentication()` opens a secure popup
4. **User authenticates**: User logs into their OnlyFans account
5. **Callback fires**: `onSuccess` receives account data
6. **Account saved**: Backend stores account in database via Prisma
## Best Practices
### Keep API Keys Server-Side
Never expose your `OFAPI_API_KEY` to the client. Always create client session tokens via a server-side API route.
```typescript
// ✅ Good: Server-side token generation
const response = await fetch("/api/client-session", { ... });
// ❌ Bad: Client-side API key usage
startOnlyFansAuthentication("ofapi_...", { ... });
```
### Handle Duplicate Accounts
Check for existing accounts before creating:
```typescript
const existing = await prisma.account.findUnique({
where: { accountId: data.accountId },
});
if (existing) {
// Update existing account or show error
}
```
### Store Display Names
The `displayName` field helps users identify accounts in your dashboard:
```typescript
body: JSON.stringify({
accountId: data.accountId,
username: data.username,
displayName: "Agency / Model: Stella", // User-defined label
})
```
## TypeScript Support
The auth package includes full TypeScript definitions:
```typescript
import {
startOnlyFansAuthentication,
AuthSuccessData,
AuthFailureError
} from "@onlyfansapi/auth";
startOnlyFansAuthentication(token, {
onSuccess: (data: AuthSuccessData) => {
console.log(data.accountId); // string
console.log(data.username); // string
console.log(data.onlyfansData.name); // string
},
onError: (error: AuthFailureError) => {
console.log(error.message); // string
},
});
```
## Next Steps
* **Add webhooks**: Listen for account events via [Webhooks](/webhooks)
* **Explore the API**: Use account credentials for [API calls](/api-reference)
* **View example repo**: See the complete implementation at [auth-example-nextjs-prisma](https://github.com/onlyfansapi/auth-example-nextjs-prisma)
## Related Resources
* [Installation Guide](/auth/installation)
* [Quick Start](/auth/quickstart)
* [Create Client Session API](/api-reference/client-sessions/create-client-session)
* [API Reference](/api-reference)
# Disconnect Account (/api-reference/account/disconnect-account)
{/* This file was generated by Fumadocs. Do not edit this file directly. Any changes should be made by running the generation command again. */}
Disconnect an OnlyFans account.
# Get Current Account (/api-reference/account/get-current-account)
{/* This file was generated by Fumadocs. Do not edit this file directly. Any changes should be made by running the generation command again. */}
Get OnlyFans Profile details for the currently used Account
# Get Model Start Date (/api-reference/account/get-model-start-date)
{/* This file was generated by Fumadocs. Do not edit this file directly. Any changes should be made by running the generation command again. */}
Get the start date of the model (the date+time monetization was enabled)
# Get Top Percentage (/api-reference/account/get-top-percentage)
{/* This file was generated by Fumadocs. Do not edit this file directly. Any changes should be made by running the generation command again. */}
Get the top percentage of the model (e.g., top 0.02% of all creators)
# List Accounts (/api-reference/account/list-accounts)
{/* This file was generated by Fumadocs. Do not edit this file directly. Any changes should be made by running the generation command again. */}
List all connected OnlyFans accounts.
# Get Earnings Overview (/api-reference/analytics-summary/get-earnings-overview)
{/* This file was generated by Fumadocs. Do not edit this file directly. Any changes should be made by running the generation command again. */}
Get earnings overview by category for selected accounts within a date range. Returns total earnings, subscriptions, posts, messages, tips, streams, and content stats.
# Get Historical Performance (/api-reference/analytics-summary/get-historical-performance)
{/* This file was generated by Fumadocs. Do not edit this file directly. Any changes should be made by running the generation command again. */}
Get historical earnings chart data for the team. Returns monthly aggregated revenue data for the specified time range.
# Get Period Comparison (/api-reference/analytics-summary/get-period-comparison)
{/* This file was generated by Fumadocs. Do not edit this file directly. Any changes should be made by running the generation command again. */}
Compare two time periods to analyze performance changes. Returns summary, breakdown, and chart data for the comparison.
# Get Profitability History (/api-reference/analytics-financial/get-profitability-history)
{/* This file was generated by Fumadocs. Do not edit this file directly. Any changes should be made by running the generation command again. */}
Get historical profitability data for a specific account over multiple months.
# Get Profitability (/api-reference/analytics-financial/get-profitability)
{/* This file was generated by Fumadocs. Do not edit this file directly. Any changes should be made by running the generation command again. */}
Calculate profitability for creators including revenue, costs, commissions, and margins for a specific month.
# Get Revenue Forecast (/api-reference/analytics-financial/get-revenue-forecast)
{/* This file was generated by Fumadocs. Do not edit this file directly. Any changes should be made by running the generation command again. */}
Generate revenue or churn forecasts using statistical models (Moving Average, Linear Regression, ARIMA, SARIMA).
# Get Transaction Summary (/api-reference/analytics-financial/get-transaction-summary)
{/* This file was generated by Fumadocs. Do not edit this file directly. Any changes should be made by running the generation command again. */}
Get transaction summary including counts for succeeded, refunded, and disputed transactions, plus gross, net, and fee totals.
# Get Transactions By Type (/api-reference/analytics-financial/get-transactions-by-type)
{/* This file was generated by Fumadocs. Do not edit this file directly. Any changes should be made by running the generation command again. */}
Get transaction totals grouped by transaction type (subscriptions, tips, messages, etc.).
# Whoami (/api-reference/api-keys/whoami)
{/* This file was generated by Fumadocs. Do not edit this file directly. Any changes should be made by running the generation command again. */}
Get details about the currently used API Key & the relevant Team
# Get Account Country Details (/api-reference/banking/get-account-country-details)
{/* This file was generated by Fumadocs. Do not edit this file directly. Any changes should be made by running the generation command again. */}
Returns the account owner's country details for banking, including country code, name, whether the country has states and zip codes, payout eligibility, and W9 form availability.
# Get Bank Payout Details (/api-reference/banking/get-bank-payout-details)
{/* This file was generated by Fumadocs. Do not edit this file directly. Any changes should be made by running the generation command again. */}
Returns the account owner's bank payout details, including whether payout data is filled, available payout methods with their descriptions, and required bank fields.
# Get DAC7 Form Details (/api-reference/banking/get-dac7form-details)
{/* This file was generated by Fumadocs. Do not edit this file directly. Any changes should be made by running the generation command again. */}
If available, returns the account owner's DAC7 form information required for tax reporting, including personal details, address, tax identification, country information, and DAC7 status.
# Get Legal and Tax Status (/api-reference/banking/get-legal-and-tax-status)
{/* This file was generated by Fumadocs. Do not edit this file directly. Any changes should be made by running the generation command again. */}
Returns the account owner's legal and tax status required for banking and payout configuration, including W9 requirements, identity verification status, DAC7 compliance, and tax information.
# Get Legal Form Details (/api-reference/banking/get-legal-form-details)
{/* This file was generated by Fumadocs. Do not edit this file directly. Any changes should be made by running the generation command again. */}
Returns the account owner's legal form details for banking, including personal or business name, address, social media links, date of birth, and available document types for identity verification.
# List Available Payout Systems (/api-reference/banking/list-available-payout-systems)
{/* This file was generated by Fumadocs. Do not edit this file directly. Any changes should be made by running the generation command again. */}
Returns a list of available payout systems for the account, including details such as payout method codes, titles, descriptions, minimum payout amounts, processing times, and the currently selected payout method.
# List Countries (/api-reference/banking/list-countries)
{/* This file was generated by Fumadocs. Do not edit this file directly. Any changes should be made by running the generation command again. */}
List countries, their internal OnlyFans IDs, and their payment & tax information.
# Calculate Chargeback Ratio (/api-reference/chargebacks/calculate-chargeback-ratio)
{/* This file was generated by Fumadocs. Do not edit this file directly. Any changes should be made by running the generation command again. */}
The Chargeback Ratio reflects the number of chargebacks compared to the total number of payments as a percentage. Ideally, your Chargeback Ratio should be under 1%.
# List Chargeback Statistics (/api-reference/chargebacks/list-chargeback-statistics)
{/* This file was generated by Fumadocs. Do not edit this file directly. Any changes should be made by running the generation command again. */}
List chargeback counts & amounts per hour, day or month.
# List Chargebacks (/api-reference/chargebacks/list-chargebacks)
{/* This file was generated by Fumadocs. Do not edit this file directly. Any changes should be made by running the generation command again. */}
Retrieve a list of chargebacks within a specified date range.
# Attach Tags (Release Forms) to Message (/api-reference/chat-messages/attach-tags-release-forms-to-message)
{/* This file was generated by Fumadocs. Do not edit this file directly. Any changes should be made by running the generation command again. */}
Attach Tags (Release Forms) to a message that has already been sent. Please note, that this is a "sync" operation - for example, if you provide empty `rfTag` it will remove all existing tags already attached to the message.
# Delete Message (/api-reference/chat-messages/delete-message)
{/* This file was generated by Fumadocs. Do not edit this file directly. Any changes should be made by running the generation command again. */}
Delete a message from a chat. Please note that ONLY messages sent less than 24 hours ago can be deleted.
# Like Message (/api-reference/chat-messages/like-message)
{/* This file was generated by Fumadocs. Do not edit this file directly. Any changes should be made by running the generation command again. */}
Like a chat message.
# List Chat Messages (/api-reference/chat-messages/list-chat-messages)
{/* This file was generated by Fumadocs. Do not edit this file directly. Any changes should be made by running the generation command again. */}
Get messages from a specific chat.
# Pin Message (/api-reference/chat-messages/pin-message)
{/* This file was generated by Fumadocs. Do not edit this file directly. Any changes should be made by running the generation command again. */}
Pin a message from a chat.
# Search Chat Messages (/api-reference/chat-messages/search-chat-messages)
{/* This file was generated by Fumadocs. Do not edit this file directly. Any changes should be made by running the generation command again. */}
Search messages in a specific chat. Returns a list of message IDs matching the search query.
# Send Message (/api-reference/chat-messages/send-message)
{/* This file was generated by Fumadocs. Do not edit this file directly. Any changes should be made by running the generation command again. */}
Send a new message to a chat.
# Unlike Message (/api-reference/chat-messages/unlike-message)
{/* This file was generated by Fumadocs. Do not edit this file directly. Any changes should be made by running the generation command again. */}
Unlike a chat message.
# Unpin Message (/api-reference/chat-messages/unpin-message)
{/* This file was generated by Fumadocs. Do not edit this file directly. Any changes should be made by running the generation command again. */}
Unpin a message from a chat.
# Delete Chat (/api-reference/chats/delete-chat)
{/* This file was generated by Fumadocs. Do not edit this file directly. Any changes should be made by running the generation command again. */}
Delete a specific chat.
# Hide Chat (/api-reference/chats/hide-chat)
{/* This file was generated by Fumadocs. Do not edit this file directly. Any changes should be made by running the generation command again. */}
Hide a specific chat from the chat list. To unhide this chat, send a new message to the user.
# List Chat Media (Gallery) (/api-reference/chats/list-chat-media-gallery)
{/* This file was generated by Fumadocs. Do not edit this file directly. Any changes should be made by running the generation command again. */}
List media files shared in a specific chat.
# List Chats (/api-reference/chats/list-chats)
{/* This file was generated by Fumadocs. Do not edit this file directly. Any changes should be made by running the generation command again. */}
Get the list of chats for an Account.
# Mark All Chats as Read (/api-reference/chats/mark-all-chats-as-read)
{/* This file was generated by Fumadocs. Do not edit this file directly. Any changes should be made by running the generation command again. */}
Mark all chats as read.
# Mark Chat as Read (/api-reference/chats/mark-chat-as-read)
{/* This file was generated by Fumadocs. Do not edit this file directly. Any changes should be made by running the generation command again. */}
Mark a specific chat as read. Alternative to List Chat Messages endpoint, if you just want to mark the chat as read without fetching messages.
# Mute Chat Notifications (/api-reference/chats/mute-chat-notifications)
{/* This file was generated by Fumadocs. Do not edit this file directly. Any changes should be made by running the generation command again. */}
Mute notifications for a specific chat.
# Start Typing Indicator (/api-reference/chats/start-typing-indicator)
{/* This file was generated by Fumadocs. Do not edit this file directly. Any changes should be made by running the generation command again. */}
Calling this endpoint will show the target fan a "Model is typing..." note in the chat for \~4 seconds. If you want to continue showing the indicator call this endpoint multiple times. Free - no credits charged.
# Unmute Chat Notifications (/api-reference/chats/unmute-chat-notifications)
{/* This file was generated by Fumadocs. Do not edit this file directly. Any changes should be made by running the generation command again. */}
Unmute notifications for a specific chat.
# Create Client Session (/api-reference/client-sessions/create-client-session)
{/* This file was generated by Fumadocs. Do not edit this file directly. Any changes should be made by running the generation command again. */}
Create Client Session Token for later use in embedded auth components - eg. via @onlyfansapi/auth npm package.
# Poll Authentication Status (/api-reference/connect-onlyfans-account/poll-authentication-status)
{/* This file was generated by Fumadocs. Do not edit this file directly. Any changes should be made by running the generation command again. */}
Poll the status of the authentication process. Eg. if 2FA is required, we will ask you for the code using the `twoFactorPending = true` in the response body.
# Re-authenticate Account (/api-reference/connect-onlyfans-account/re-authenticate-account)
{/* This file was generated by Fumadocs. Do not edit this file directly. Any changes should be made by running the generation command again. */}
Trigger account reauthentication without the need to submit email & password again.
# Send 2FA E-mail to Creator (/api-reference/connect-onlyfans-account/send2fae-mail-to-creator)
{/* This file was generated by Fumadocs. Do not edit this file directly. Any changes should be made by running the generation command again. */}
Send 2FA verification e-mail to the creator's email so they can verify login on their device without your input. The e-mail will be sent to the e-mail address used for signing into OnlyFans.
# Start Authentication (/api-reference/connect-onlyfans-account/start-authentication)
{/* This file was generated by Fumadocs. Do not edit this file directly. Any changes should be made by running the generation command again. */}
Start the authentication process for a new account. Our systems will bypass Captcha and also ask you for 2FA code if required. All credentials are stored securely using bcrypt and only used during login.
# Submit 2FA (/api-reference/connect-onlyfans-account/submit2fa)
{/* This file was generated by Fumadocs. Do not edit this file directly. Any changes should be made by running the generation command again. */}
Submit the 2FA code, or Selfie Verification status, for the authentication process.
# Create Data Export (/api-reference/data-exports/create-data-export)
{/* This file was generated by Fumadocs. Do not edit this file directly. Any changes should be made by running the generation command again. */}
Create a new data export request. This will calculate the required credits and prepare the export for starting.
# Get Data Export Status (/api-reference/data-exports/get-data-export-status)
{/* This file was generated by Fumadocs. Do not edit this file directly. Any changes should be made by running the generation command again. */}
Get the current status and progress of a data export
# List Data Exports (/api-reference/data-exports/list-data-exports)
{/* This file was generated by Fumadocs. Do not edit this file directly. Any changes should be made by running the generation command again. */}
Get a paginated list of data exports for the team
# Start Data Export (/api-reference/data-exports/start-data-export)
{/* This file was generated by Fumadocs. Do not edit this file directly. Any changes should be made by running the generation command again. */}
Start processing a data export that has completed credit calculation. This will begin the actual export process and charge credits.
# Direct Messages Chart (/api-reference/engagement-messages/direct-messages-chart)
{/* This file was generated by Fumadocs. Do not edit this file directly. Any changes should be made by running the generation command again. */}
Get engagement chart metrics for direct messages: sent count and purchase amount over time.
# Direct Messages (/api-reference/engagement-messages/direct-messages)
{/* This file was generated by Fumadocs. Do not edit this file directly. Any changes should be made by running the generation command again. */}
List sent direct messages with engagement stats (sent, viewed, purchased, etc.).
# Mass Messages Chart (/api-reference/engagement-messages/mass-messages-chart)
{/* This file was generated by Fumadocs. Do not edit this file directly. Any changes should be made by running the generation command again. */}
Get engagement chart metrics for mass messages: sent count and purchase amount over time.
# Mass Messages (/api-reference/engagement-messages/mass-messages)
{/* This file was generated by Fumadocs. Do not edit this file directly. Any changes should be made by running the generation command again. */}
List sent mass messages with engagement stats (sent, viewed, purchased, etc.).
# Message Buyers (/api-reference/engagement-messages/message-buyers)
{/* This file was generated by Fumadocs. Do not edit this file directly. Any changes should be made by running the generation command again. */}
List buyers for a specific message.
# Top Message (/api-reference/engagement-messages/top-message)
{/* This file was generated by Fumadocs. Do not edit this file directly. Any changes should be made by running the generation command again. */}
Get the top performing message by purchases in the selected timeframe.
# Clear Fan Notes (/api-reference/fans/clear-fan-notes)
{/* This file was generated by Fumadocs. Do not edit this file directly. Any changes should be made by running the generation command again. */}
Clear notes for a specific fan.
# Create/Edit Fan Notes (/api-reference/fans/create-edit-fan-notes)
{/* This file was generated by Fumadocs. Do not edit this file directly. Any changes should be made by running the generation command again. */}
Create or edit notes for a specific fan.
# Get Fan Notes (/api-reference/fans/get-fan-notes)
{/* This file was generated by Fumadocs. Do not edit this file directly. Any changes should be made by running the generation command again. */}
Retrieve notes for a specific fan.
# Get Subscription History (/api-reference/fans/get-subscription-history)
{/* This file was generated by Fumadocs. Do not edit this file directly. Any changes should be made by running the generation command again. */}
Get Subscription History for a given OnlyFans User ID. This can be useful, for example, when the user's subscribed to your account for the first time.
# List Active Fans (/api-reference/fans/list-active-fans)
{/* This file was generated by Fumadocs. Do not edit this file directly. Any changes should be made by running the generation command again. */}
Get a paginated list of fans for an Account. Newest fans are first.
# List All Fans (/api-reference/fans/list-all-fans)
{/* This file was generated by Fumadocs. Do not edit this file directly. Any changes should be made by running the generation command again. */}
Get a paginated list of fans for an Account. Newest fans are first.
# List Expired Fans (/api-reference/fans/list-expired-fans)
{/* This file was generated by Fumadocs. Do not edit this file directly. Any changes should be made by running the generation command again. */}
Get a paginated list of expired fans for an Account. Newest fans are first.
# List Latest Fans (/api-reference/fans/list-latest-fans)
{/* This file was generated by Fumadocs. Do not edit this file directly. Any changes should be made by running the generation command again. */}
Get a paginated list fans, filterable by total, only new subscribers, or only renewals. Newest fans are first.
# List Top Fans (/api-reference/fans/list-top-fans)
{/* This file was generated by Fumadocs. Do not edit this file directly. Any changes should be made by running the generation command again. */}
Get a list of top fans sorted by spending. Filterable by total, subscriptions, tips, messages, posts, or streams.
# Set Fan's Custom Name (/api-reference/fans/set-fans-custom-name)
{/* This file was generated by Fumadocs. Do not edit this file directly. Any changes should be made by running the generation command again. */}
Change the Fan's Custom Name shown in OnlyFans
# List Active Followings (/api-reference/following/list-active-followings)
{/* This file was generated by Fumadocs. Do not edit this file directly. Any changes should be made by running the generation command again. */}
Get a paginated list of followings for an Account. Newest followings are first.
# List All Followings (/api-reference/following/list-all-followings)
{/* This file was generated by Fumadocs. Do not edit this file directly. Any changes should be made by running the generation command again. */}
Get a paginated list of followings for an Account. Newest followings are first.
# List Expired Followings (/api-reference/following/list-expired-followings)
{/* This file was generated by Fumadocs. Do not edit this file directly. Any changes should be made by running the generation command again. */}
Get a paginated list of expired followings for an Account. Newest followings are first.
# Add Free Trial Link Tags (/api-reference/free-trial-links/add-free-trial-link-tags)
{/* This file was generated by Fumadocs. Do not edit this file directly. Any changes should be made by running the generation command again. */}
Add tags to a specific free trial link. Existing tags are preserved. This is a free endpoint.
# Create Free Trial Link (/api-reference/free-trial-links/create-free-trial-link)
{/* This file was generated by Fumadocs. Do not edit this file directly. Any changes should be made by running the generation command again. */}
Create a new free trial link for the account
# Delete Free Trial Link (/api-reference/free-trial-links/delete-free-trial-link)
{/* This file was generated by Fumadocs. Do not edit this file directly. Any changes should be made by running the generation command again. */}
Delete a free trial link by its ID
# Get Free Trial Link Stats (/api-reference/free-trial-links/get-free-trial-link-stats)
{/* This file was generated by Fumadocs. Do not edit this file directly. Any changes should be made by running the generation command again. */}
Get dashboard-style summary plus daily and monthly metrics for a specific Free Trial Link
# Get Free Trial Link (/api-reference/free-trial-links/get-free-trial-link)
{/* This file was generated by Fumadocs. Do not edit this file directly. Any changes should be made by running the generation command again. */}
Get individual Free Trial Link details and it's revenue data
# Introduction (/api-reference/free-trial-links)
import {
ChartPieIcon,
LayersIcon
} from 'lucide-react';
Through our API, you are able to create and manage free trial links, as well as retrieve advanced analytics on their performance, spenders and subscribers.
### A note on our calculation logic \[!toc]
} title="Link Stacking">
We take link stacking into account (e.g., multiple free trial links stacked on top of each other) and divide the revenue equally between them.
} title="Spendings">
We only track the fan’s spending during the period through which they have been subscribed.
# List Free Trial Link Spenders (/api-reference/free-trial-links/list-free-trial-link-spenders)
{/* This file was generated by Fumadocs. Do not edit this file directly. Any changes should be made by running the generation command again. */}
Only available if we already scraped subscribers and calculated revenue per fan
# List Free Trial Link Subscribers (/api-reference/free-trial-links/list-free-trial-link-subscribers)
{/* This file was generated by Fumadocs. Do not edit this file directly. Any changes should be made by running the generation command again. */}
Get list of subscribers who joined through a Free Trial Link
# List Free Trial Link Tags (/api-reference/free-trial-links/list-free-trial-link-tags)
{/* This file was generated by Fumadocs. Do not edit this file directly. Any changes should be made by running the generation command again. */}
Get tags for a specific free trial link. This is a free endpoint.
# List Free Trial Links (/api-reference/free-trial-links/list-free-trial-links)
{/* This file was generated by Fumadocs. Do not edit this file directly. Any changes should be made by running the generation command again. */}
List all free trial links for the account, including the details and statistics
# Remove Free Trial Link Tags (/api-reference/free-trial-links/remove-free-trial-link-tags)
{/* This file was generated by Fumadocs. Do not edit this file directly. Any changes should be made by running the generation command again. */}
Remove tags from a specific free trial link. This is a free endpoint.
# List All Link Tags (/api-reference/link-tags/list-all-link-tags)
{/* This file was generated by Fumadocs. Do not edit this file directly. Any changes should be made by running the generation command again. */}
Get all existing tags that have been used on free trial links and/or tracking links for this account. This is a free endpoint.
# [Deprecated] Scrape media from the OnlyFans CDN (/api-reference/media/deprecated-scrape-media-from-the-only-fans-cdn)
{/* This file was generated by Fumadocs. Do not edit this file directly. Any changes should be made by running the generation command again. */}
**⚠️ This is a deprecated endpoint. Please use the new "Download media from the OnlyFans CDN" endpoint!** Scrapes a `https://cdn*.onlyfans.com/*` URL *or* Vault Media ID, and uploads it to the OnlyFans API CDN, where you can view or download the file. **Max file size is 500MB**
# Download Media from the OnlyFans CDN (/api-reference/media/download-media-from-the-only-fans-cdn)
{/* This file was generated by Fumadocs. Do not edit this file directly. Any changes should be made by running the generation command again. */}
Downloads a file directly from `https://cdn*.onlyfans.com/*` URL. Use this endpoint to directly download a file from URL.
# Upload media to the OnlyFans CDN (/api-reference/media/upload-media-to-the-only-fans-cdn)
{/* This file was generated by Fumadocs. Do not edit this file directly. Any changes should be made by running the generation command again. */}
The response can be used **only once** to manually include media in a post or message. This endpoint does not upload media to the Vault.
# Get Mass Message Overview (/api-reference/mass-messaging/get-mass-message-overview)
{/* This file was generated by Fumadocs. Do not edit this file directly. Any changes should be made by running the generation command again. */}
Get an overview of mass messages, showing the send count and view count.
# Get Mass Message (/api-reference/mass-messaging/get-mass-message)
{/* This file was generated by Fumadocs. Do not edit this file directly. Any changes should be made by running the generation command again. */}
Get the content of a mass message.
# List Mass Message Queue (/api-reference/mass-messaging/list-mass-message-queue)
{/* This file was generated by Fumadocs. Do not edit this file directly. Any changes should be made by running the generation command again. */}
List the pending or recently sent mass messages in the message queue.
# Send Mass Message (/api-reference/mass-messaging/send-mass-message)
{/* This file was generated by Fumadocs. Do not edit this file directly. Any changes should be made by running the generation command again. */}
Send a mass message to lists and/or users. You may use both the `userLists` and `userIds` parameters to send the same message to both lists and individual users.
# Unsend/Delete Mass Message (/api-reference/mass-messaging/unsend-delete-mass-message)
{/* This file was generated by Fumadocs. Do not edit this file directly. Any changes should be made by running the generation command again. */}
Unsend a recently sent mass message, or delete a scheduled/saved message. When unsending, purchased content will continue to be able to viewable.
# Update Mass Message (/api-reference/mass-messaging/update-mass-message)
{/* This file was generated by Fumadocs. Do not edit this file directly. Any changes should be made by running the generation command again. */}
Update a mass message.
# Delete Vault Media (/api-reference/media-vault/delete-vault-media)
{/* This file was generated by Fumadocs. Do not edit this file directly. Any changes should be made by running the generation command again. */}
Delete one or multiple media from your vault.
# Get Vault Media (/api-reference/media-vault/get-vault-media)
{/* This file was generated by Fumadocs. Do not edit this file directly. Any changes should be made by running the generation command again. */}
Retrieve details about a specific media item in your vault.
# List Vault Media (/api-reference/media-vault/list-vault-media)
{/* This file was generated by Fumadocs. Do not edit this file directly. Any changes should be made by running the generation command again. */}
List media items stored in your vault. See how many likes and how much tips did they get.
# Upload Media to Vault (/api-reference/media-vault/upload-media-to-vault)
{/* This file was generated by Fumadocs. Do not edit this file directly. Any changes should be made by running the generation command again. */}
Upload a media file directly to your vault.
# Add Media To List (/api-reference/media-vault-lists/add-media-to-list)
{/* This file was generated by Fumadocs. Do not edit this file directly. Any changes should be made by running the generation command again. */}
Add one or multiple media to a list.
# Create Vault List (/api-reference/media-vault-lists/create-vault-list)
{/* This file was generated by Fumadocs. Do not edit this file directly. Any changes should be made by running the generation command again. */}
Create a new Vault list.
# Delete Vault List (/api-reference/media-vault-lists/delete-vault-list)
{/* This file was generated by Fumadocs. Do not edit this file directly. Any changes should be made by running the generation command again. */}
Delete a Vault list.
# List Vault Lists (/api-reference/media-vault-lists/list-vault-lists)
{/* This file was generated by Fumadocs. Do not edit this file directly. Any changes should be made by running the generation command again. */}
List your Vault lists (categories).
# Remove Media From List (/api-reference/media-vault-lists/remove-media-from-list)
{/* This file was generated by Fumadocs. Do not edit this file directly. Any changes should be made by running the generation command again. */}
Remove one or multiple media from a list.
# Rename Vault List (/api-reference/media-vault-lists/rename-vault-list)
{/* This file was generated by Fumadocs. Do not edit this file directly. Any changes should be made by running the generation command again. */}
Rename a Vault list.
# Show Vault List (/api-reference/media-vault-lists/show-vault-list)
{/* This file was generated by Fumadocs. Do not edit this file directly. Any changes should be made by running the generation command again. */}
Show a Vault list.
# Get Notification Counts (/api-reference/notifications/get-notification-counts)
{/* This file was generated by Fumadocs. Do not edit this file directly. Any changes should be made by running the generation command again. */}
Get a quick overview of all unread notification types
# Get Notification Tabs Order (/api-reference/notifications/get-notification-tabs-order)
{/* This file was generated by Fumadocs. Do not edit this file directly. Any changes should be made by running the generation command again. */}
Get the order of an account's notification tabs as displayed on the OnlyFans notifications page
# List Notifications (/api-reference/notifications/list-notifications)
{/* This file was generated by Fumadocs. Do not edit this file directly. Any changes should be made by running the generation command again. */}
List all notifications for the account
# Mark All Notifications As Read (/api-reference/notifications/mark-all-notifications-as-read)
{/* This file was generated by Fumadocs. Do not edit this file directly. Any changes should be made by running the generation command again. */}
Mark all notifications of this account as read
# Search Users In Notifications (/api-reference/notifications/search-users-in-notifications)
{/* This file was generated by Fumadocs. Do not edit this file directly. Any changes should be made by running the generation command again. */}
Search users that have appeared in your notifications
# Update Notification Tabs Order (/api-reference/notifications/update-notification-tabs-order)
{/* This file was generated by Fumadocs. Do not edit this file directly. Any changes should be made by running the generation command again. */}
Update the order of an account's notification tabs as displayed on the OnlyFans notifications page
# Get Account Balances (/api-reference/payouts/get-account-balances)
{/* This file was generated by Fumadocs. Do not edit this file directly. Any changes should be made by running the generation command again. */}
Get the current available and pending balances for the account.
# Get Earning Statistics (/api-reference/payouts/get-earning-statistics)
{/* This file was generated by Fumadocs. Do not edit this file directly. Any changes should be made by running the generation command again. */}
Get total and monthly time-series earning statistics for the account.
# Get Eligibility (/api-reference/payouts/get-eligibility)
{/* This file was generated by Fumadocs. Do not edit this file directly. Any changes should be made by running the generation command again. */}
Get the eligibility details for receiving payouts.
# List Payout Requests (/api-reference/payouts/list-payout-requests)
{/* This file was generated by Fumadocs. Do not edit this file directly. Any changes should be made by running the generation command again. */}
List all payout requests for the account.
# List Transactions (Earnings) (/api-reference/payouts/list-transactions-earnings)
{/* This file was generated by Fumadocs. Do not edit this file directly. Any changes should be made by running the generation command again. */}
List all transactions for the account.
# Request Manual Withdrawal (/api-reference/payouts/request-manual-withdrawal)
{/* This file was generated by Fumadocs. Do not edit this file directly. Any changes should be made by running the generation command again. */}
Request a payout withdrawal, if the frequency is set to manual. Refer to our `/payouts/balances` endpoint to retrieve the minimum and maximum withdrawal amounts.
# Update Payout Frequency (/api-reference/payouts/update-payout-frequency)
{/* This file was generated by Fumadocs. Do not edit this file directly. Any changes should be made by running the generation command again. */}
Update the payout frequency for the account (Manual, Weekly or Monthly).
# Create Post Comment (/api-reference/post-comments/create-post-comment)
{/* This file was generated by Fumadocs. Do not edit this file directly. Any changes should be made by running the generation command again. */}
Create a comment on one of your posts.
# Delete Post Comment (/api-reference/post-comments/delete-post-comment)
{/* This file was generated by Fumadocs. Do not edit this file directly. Any changes should be made by running the generation command again. */}
Delete a comment on one of your posts.
# Like Post Comment (/api-reference/post-comments/like-post-comment)
{/* This file was generated by Fumadocs. Do not edit this file directly. Any changes should be made by running the generation command again. */}
Like a comment on one of your posts.
# List Post Comments (/api-reference/post-comments/list-post-comments)
{/* This file was generated by Fumadocs. Do not edit this file directly. Any changes should be made by running the generation command again. */}
Get comments from one of your posts.
# Pin Post Comment (/api-reference/post-comments/pin-post-comment)
{/* This file was generated by Fumadocs. Do not edit this file directly. Any changes should be made by running the generation command again. */}
Pin a comment on one of your posts.
# Unlike Post Comment (/api-reference/post-comments/unlike-post-comment)
{/* This file was generated by Fumadocs. Do not edit this file directly. Any changes should be made by running the generation command again. */}
Unlike a comment on one of your posts.
# Unpin Post Comment (/api-reference/post-comments/unpin-post-comment)
{/* This file was generated by Fumadocs. Do not edit this file directly. Any changes should be made by running the generation command again. */}
Unpin a comment from one of your posts.
# Create Label (/api-reference/post-labels/create-label)
{/* This file was generated by Fumadocs. Do not edit this file directly. Any changes should be made by running the generation command again. */}
Create a new post label.
# List Labels (/api-reference/post-labels/list-labels)
{/* This file was generated by Fumadocs. Do not edit this file directly. Any changes should be made by running the generation command again. */}
List the labels that you can use to organize your posts.
# Archive Post (/api-reference/posts/archive-post)
{/* This file was generated by Fumadocs. Do not edit this file directly. Any changes should be made by running the generation command again. */}
Archive a post from your account. Also can be used to move posts between the Regular and Private Archive.
# Delete Post (/api-reference/posts/delete-post)
{/* This file was generated by Fumadocs. Do not edit this file directly. Any changes should be made by running the generation command again. */}
Delete a post from your account.
# Get Post (/api-reference/posts/get-post)
{/* This file was generated by Fumadocs. Do not edit this file directly. Any changes should be made by running the generation command again. */}
Retrieve details of a post from your account.
# List Posts (/api-reference/posts/list-posts)
{/* This file was generated by Fumadocs. Do not edit this file directly. Any changes should be made by running the generation command again. */}
Get posts from your OnlyFans account.
# Pin/Unpin Post (/api-reference/posts/pin-unpin-post)
{/* This file was generated by Fumadocs. Do not edit this file directly. Any changes should be made by running the generation command again. */}
Pin or unpin a post to your account.
# Send Post (/api-reference/posts/send-post)
{/* This file was generated by Fumadocs. Do not edit this file directly. Any changes should be made by running the generation command again. */}
Compose and send a new post to your OnlyFans account.
# Show Post Statistics (/api-reference/posts/show-post-statistics)
{/* This file was generated by Fumadocs. Do not edit this file directly. Any changes should be made by running the generation command again. */}
Show the statistics of a post like purchases, views, likes, tips and more.
# Unarchive Post (/api-reference/posts/unarchive-post)
{/* This file was generated by Fumadocs. Do not edit this file directly. Any changes should be made by running the generation command again. */}
Unarchive a post from your account.
# Update Post (/api-reference/posts/update-post)
{/* This file was generated by Fumadocs. Do not edit this file directly. Any changes should be made by running the generation command again. */}
Update a posted, queued, or "saved for later" post.
# Create Promotion (/api-reference/promotions/create-promotion)
{/* This file was generated by Fumadocs. Do not edit this file directly. Any changes should be made by running the generation command again. */}
Create a new promotion for the account.
# Delete Promotion (/api-reference/promotions/delete-promotion)
{/* This file was generated by Fumadocs. Do not edit this file directly. Any changes should be made by running the generation command again. */}
Delete a promotion for the account.
# List Promotions (/api-reference/promotions/list-promotions)
{/* This file was generated by Fumadocs. Do not edit this file directly. Any changes should be made by running the generation command again. */}
List all promotions for the account.
# Stop Promotion (/api-reference/promotions/stop-promotion)
{/* This file was generated by Fumadocs. Do not edit this file directly. Any changes should be made by running the generation command again. */}
Stop an active promotion for the account.
# Get Profile Details (/api-reference/public-profiles/get-profile-details)
{/* This file was generated by Fumadocs. Do not edit this file directly. Any changes should be made by running the generation command again. */}
Get profile details by username.
# Search Profiles (/api-reference/public-profiles/search-profiles)
{/* This file was generated by Fumadocs. Do not edit this file directly. Any changes should be made by running the generation command again. */}
Full-text search for profiles with filters for pricing, free trials, location, media count and more.
# Count Queue Items (/api-reference/queue/count-queue-items)
{/* This file was generated by Fumadocs. Do not edit this file directly. Any changes should be made by running the generation command again. */}
Count posts and messages in the queue.
# List Queue Items (/api-reference/queue/list-queue-items)
{/* This file was generated by Fumadocs. Do not edit this file directly. Any changes should be made by running the generation command again. */}
List posts and messages in the queue.
# Publish Queue Item (/api-reference/queue/publish-queue-item)
{/* This file was generated by Fumadocs. Do not edit this file directly. Any changes should be made by running the generation command again. */}
Publish a queue item or "saved for later" item (post or mass message). This means that the item will be sent immediately, regardless of its scheduled date.
# Disable Automatic Messaging (/api-reference/saved-for-later-messages/disable-automatic-messaging)
{/* This file was generated by Fumadocs. Do not edit this file directly. Any changes should be made by running the generation command again. */}
Disable automatic messaging of Saved For Later messages.
# Enable/Update Automatic Messaging (/api-reference/saved-for-later-messages/enable-update-automatic-messaging)
{/* This file was generated by Fumadocs. Do not edit this file directly. Any changes should be made by running the generation command again. */}
Enable or update automatic messaging of Saved For Later messages.
# Get Message Settings (/api-reference/saved-for-later-messages/get-message-settings)
{/* This file was generated by Fumadocs. Do not edit this file directly. Any changes should be made by running the generation command again. */}
Get the Saved For Later message settings.
# List Saved For Later Messages (/api-reference/saved-for-later-messages/list-saved-for-later-messages)
{/* This file was generated by Fumadocs. Do not edit this file directly. Any changes should be made by running the generation command again. */}
List all messages that are marked as "Save For Later".
# List Taggable Users (/api-reference/release-forms/list-taggable-users)
{/* This file was generated by Fumadocs. Do not edit this file directly. Any changes should be made by running the generation command again. */}
Get a paginated list of users that can be tagged in release forms. These are verified creators who have signed release forms to appear in your content. Use `offset` and `limit` for pagination.
# Disable Automatic Posting (/api-reference/saved-for-later-posts/disable-automatic-posting)
{/* This file was generated by Fumadocs. Do not edit this file directly. Any changes should be made by running the generation command again. */}
Disable automatic posting of Saved For Later posts.
# Enable/Update Automatic Posting (/api-reference/saved-for-later-posts/enable-update-automatic-posting)
{/* This file was generated by Fumadocs. Do not edit this file directly. Any changes should be made by running the generation command again. */}
Enable or update automatic posting of Saved For Later posts.
# Get Post Settings (/api-reference/saved-for-later-posts/get-post-settings)
{/* This file was generated by Fumadocs. Do not edit this file directly. Any changes should be made by running the generation command again. */}
Get the Saved For Later post settings.
# List Saved For Later Posts (/api-reference/saved-for-later-posts/list-saved-for-later-posts)
{/* This file was generated by Fumadocs. Do not edit this file directly. Any changes should be made by running the generation command again. */}
List all posts that are marked as "Save For Later".
# Add Social Media Button (/api-reference/settings/add-social-media-button)
{/* This file was generated by Fumadocs. Do not edit this file directly. Any changes should be made by running the generation command again. */}
Adds a new social media button to the account
# Check Username Availability (/api-reference/settings/check-username-availability)
{/* This file was generated by Fumadocs. Do not edit this file directly. Any changes should be made by running the generation command again. */}
Check if a username is taken. Returns `false` if the username is available, `true` if it is already taken.
# Delete Social Media Button (/api-reference/settings/delete-social-media-button)
{/* This file was generated by Fumadocs. Do not edit this file directly. Any changes should be made by running the generation command again. */}
Deletes a social media button from the account
# Get Settings (/api-reference/settings/get-settings)
{/* This file was generated by Fumadocs. Do not edit this file directly. Any changes should be made by running the generation command again. */}
Returns the account settings
# List Social Media Buttons (/api-reference/settings/list-social-media-buttons)
{/* This file was generated by Fumadocs. Do not edit this file directly. Any changes should be made by running the generation command again. */}
Returns the list of social media buttons for the account
# Reorder Social Media Buttons (/api-reference/settings/reorder-social-media-buttons)
{/* This file was generated by Fumadocs. Do not edit this file directly. Any changes should be made by running the generation command again. */}
Changes the order of social media buttons for the account
# Update Profile (/api-reference/settings/update-profile)
{/* This file was generated by Fumadocs. Do not edit this file directly. Any changes should be made by running the generation command again. */}
Updates the account profile. **Only include the fields you want to update.** To make a field empty, set it to `null`.
# Update Social Media Button (/api-reference/settings/update-social-media-button)
{/* This file was generated by Fumadocs. Do not edit this file directly. Any changes should be made by running the generation command again. */}
Updates a social media button from the account
# Create Smart Link (/api-reference/smart-links/create-smart-link)
{/* This file was generated by Fumadocs. Do not edit this file directly. Any changes should be made by running the generation command again. */}
Create a new Smart Link for the account. Smart Links are pooled Free Trial or Tracking links that rotate inventory automatically.
# Delete Smart Link (/api-reference/smart-links/delete-smart-link)
{/* This file was generated by Fumadocs. Do not edit this file directly. Any changes should be made by running the generation command again. */}
Delete a Smart Link by its ID
# Get Smart Link Stats (/api-reference/smart-links/get-smart-link-stats)
{/* This file was generated by Fumadocs. Do not edit this file directly. Any changes should be made by running the generation command again. */}
Get dashboard-style summary plus daily and monthly metrics for a specific Smart Link on the current account
# Get Smart Link (/api-reference/smart-links/get-smart-link)
{/* This file was generated by Fumadocs. Do not edit this file directly. Any changes should be made by running the generation command again. */}
Get a specific Smart Link by its ID
# List Smart Link Clicks (/api-reference/smart-links/list-smart-link-clicks)
{/* This file was generated by Fumadocs. Do not edit this file directly. Any changes should be made by running the generation command again. */}
Query smart link clicks in a date range with optional bot/duplicate filtering
# List Smart Link Conversions (/api-reference/smart-links/list-smart-link-conversions)
{/* This file was generated by Fumadocs. Do not edit this file directly. Any changes should be made by running the generation command again. */}
Query smart link conversions in a date range with optional bot/duplicate and conversion type filtering
# List Smart Links (/api-reference/smart-links/list-smart-links)
{/* This file was generated by Fumadocs. Do not edit this file directly. Any changes should be made by running the generation command again. */}
List all Smart Links
# Calculate Total Transactions (/api-reference/statistics/calculate-total-transactions)
{/* This file was generated by Fumadocs. Do not edit this file directly. Any changes should be made by running the generation command again. */}
Calculate the total transactions and amounts.
# Get Earnings (/api-reference/statistics/get-earnings)
{/* This file was generated by Fumadocs. Do not edit this file directly. Any changes should be made by running the generation command again. */}
Get the earnings for a given period.
# Get Profile Visitors (/api-reference/statistics/get-profile-visitors)
{/* This file was generated by Fumadocs. Do not edit this file directly. Any changes should be made by running the generation command again. */}
Get the number of profile visitors for a given period.
# Get Subscriber Metrics (/api-reference/statistics/get-subscriber-metrics)
{/* This file was generated by Fumadocs. Do not edit this file directly. Any changes should be made by running the generation command again. */}
Get subscriber metrics including total, new, renewed, paid, and free subscriptions for a specified timeframe. `unknown_subscriptions` indicates deleted fan accounts.
# Get Subscriber Statistics (/api-reference/statistics/get-subscriber-statistics)
{/* This file was generated by Fumadocs. Do not edit this file directly. Any changes should be made by running the generation command again. */}
Get subscriber and earning statistics for an account for a specified timeframe. Optionally, filter by all, renews, or new subscribers.
# Statistics Overview (/api-reference/statistics/statistics-overview)
{/* This file was generated by Fumadocs. Do not edit this file directly. Any changes should be made by running the generation command again. */}
Get an overview of statistics for fans, visitors, posts, or general.
# Add to Story (/api-reference/stories/add-to-story)
{/* This file was generated by Fumadocs. Do not edit this file directly. Any changes should be made by running the generation command again. */}
Post a new media or vault file to your story.
# Delete Story (/api-reference/stories/delete-story)
{/* This file was generated by Fumadocs. Do not edit this file directly. Any changes should be made by running the generation command again. */}
Delete a specific story by its ID.
# Get Story Stats (/api-reference/stories/get-story-stats)
{/* This file was generated by Fumadocs. Do not edit this file directly. Any changes should be made by running the generation command again. */}
Retrieve viewer count, likes count, comments count, and tips statistics for a specific story by its ID.
# List Active Stories (/api-reference/stories/list-active-stories)
{/* This file was generated by Fumadocs. Do not edit this file directly. Any changes should be made by running the generation command again. */}
Retrieve a list of your currently active stories.
# List Story Archive (/api-reference/stories/list-story-archive)
{/* This file was generated by Fumadocs. Do not edit this file directly. Any changes should be made by running the generation command again. */}
Retrieve a list of your archived stories.
# List Story Viewers (/api-reference/stories/list-story-viewers)
{/* This file was generated by Fumadocs. Do not edit this file directly. Any changes should be made by running the generation command again. */}
Retrieve the list of viewers for a specific story by its ID.
# Mark Story as Watched (/api-reference/stories/mark-story-as-watched)
{/* This file was generated by Fumadocs. Do not edit this file directly. Any changes should be made by running the generation command again. */}
Mark a specific story as watched by its ID.
# Show Story (/api-reference/stories/show-story)
{/* This file was generated by Fumadocs. Do not edit this file directly. Any changes should be made by running the generation command again. */}
Retrieve details of a specific story by its ID.
# Add Story to Highlight (/api-reference/story-highlights/add-story-to-highlight)
{/* This file was generated by Fumadocs. Do not edit this file directly. Any changes should be made by running the generation command again. */}
Add a specific story to a story highlight.
# Create Story Highlight (/api-reference/story-highlights/create-story-highlight)
{/* This file was generated by Fumadocs. Do not edit this file directly. Any changes should be made by running the generation command again. */}
Create a new story highlight.
# Delete Story Highlight (/api-reference/story-highlights/delete-story-highlight)
{/* This file was generated by Fumadocs. Do not edit this file directly. Any changes should be made by running the generation command again. */}
Delete a specific story highlight by its ID.
# List Story Highlights (/api-reference/story-highlights/list-story-highlights)
{/* This file was generated by Fumadocs. Do not edit this file directly. Any changes should be made by running the generation command again. */}
Retrieve a list of your story highlights.
# Remove Story from Highlight (/api-reference/story-highlights/remove-story-from-highlight)
{/* This file was generated by Fumadocs. Do not edit this file directly. Any changes should be made by running the generation command again. */}
Remove a specific story from a story highlight.
# Show Story Highlight (/api-reference/story-highlights/show-story-highlight)
{/* This file was generated by Fumadocs. Do not edit this file directly. Any changes should be made by running the generation command again. */}
Retrieve details of a specific story highlight by its ID.
# Update Story Highlight (/api-reference/story-highlights/update-story-highlight)
{/* This file was generated by Fumadocs. Do not edit this file directly. Any changes should be made by running the generation command again. */}
Update the details of a specific story highlight by its ID.
# Create Bundle (/api-reference/subscription-bundles/create-bundle)
{/* This file was generated by Fumadocs. Do not edit this file directly. Any changes should be made by running the generation command again. */}
Create a new bundle for the account.
# Delete Bundle (/api-reference/subscription-bundles/delete-bundle)
{/* This file was generated by Fumadocs. Do not edit this file directly. Any changes should be made by running the generation command again. */}
Delete a bundle for the account.
# List Bundles (/api-reference/subscription-bundles/list-bundles)
{/* This file was generated by Fumadocs. Do not edit this file directly. Any changes should be made by running the generation command again. */}
List all bundles for the account.
# List Transactions (/api-reference/transactions/list-transactions)
{/* This file was generated by Fumadocs. Do not edit this file directly. Any changes should be made by running the generation command again. */}
Get a paginated list of transactions for an Account. Newest transactions are first. You can filter by transaction type and tips source.
# Add Tracking Link Tags (/api-reference/tracking-links/add-tracking-link-tags)
{/* This file was generated by Fumadocs. Do not edit this file directly. Any changes should be made by running the generation command again. */}
Add tags to a specific tracking link. Existing tags are preserved. This is a free endpoint.
# Create Tracking Link (/api-reference/tracking-links/create-tracking-link)
{/* This file was generated by Fumadocs. Do not edit this file directly. Any changes should be made by running the generation command again. */}
Create a new Tracking Link for the account
# Delete Tracking Link (/api-reference/tracking-links/delete-tracking-link)
{/* This file was generated by Fumadocs. Do not edit this file directly. Any changes should be made by running the generation command again. */}
Delete a Tracking Link
# Get Tracking Link Stats (/api-reference/tracking-links/get-tracking-link-stats)
{/* This file was generated by Fumadocs. Do not edit this file directly. Any changes should be made by running the generation command again. */}
Get dashboard-style summary plus daily and monthly metrics for a specific Tracking Link
# Get Tracking Link (/api-reference/tracking-links/get-tracking-link)
{/* This file was generated by Fumadocs. Do not edit this file directly. Any changes should be made by running the generation command again. */}
Get individual Tracking Link details and it's revenue data
# Introduction (/api-reference/tracking-links)
import {
ChartPieIcon,
LayersIcon
} from 'lucide-react';
Through our API, you are able to create and manage tracking links, as well as retrieve advanced analytics on their performance, spenders and subscribers.
### A note on our calculation logic \[!toc]
} title="Link Stacking">
We take link stacking into account (e.g., multiple tracking links stacked on top of each other) and divide the revenue equally between them.
} title="Spendings">
We only track the fan’s spending during the period through which they have been subscribed.
# List Tracking Link Spenders (/api-reference/tracking-links/list-tracking-link-spenders)
{/* This file was generated by Fumadocs. Do not edit this file directly. Any changes should be made by running the generation command again. */}
Get list of spenders who made purchases through a Tracking Link
# List Tracking Link Subscribers (/api-reference/tracking-links/list-tracking-link-subscribers)
{/* This file was generated by Fumadocs. Do not edit this file directly. Any changes should be made by running the generation command again. */}
Get list of subscribers who joined through a Tracking Link
# List Tracking Link Tags (/api-reference/tracking-links/list-tracking-link-tags)
{/* This file was generated by Fumadocs. Do not edit this file directly. Any changes should be made by running the generation command again. */}
Get tags for a specific tracking link. This is a free endpoint.
# List Tracking Links (/api-reference/tracking-links/list-tracking-links)
{/* This file was generated by Fumadocs. Do not edit this file directly. Any changes should be made by running the generation command again. */}
List all tracking links for the account and revenue data
# Remove Tracking Link Tags (/api-reference/tracking-links/remove-tracking-link-tags)
{/* This file was generated by Fumadocs. Do not edit this file directly. Any changes should be made by running the generation command again. */}
Remove tags from a specific tracking link. This is a free endpoint.
# Add Users to User List (/api-reference/user-list-collections/add-users-to-user-list)
{/* This file was generated by Fumadocs. Do not edit this file directly. Any changes should be made by running the generation command again. */}
Add multiple Users To OnlyFans User List
# Clear User List (/api-reference/user-list-collections/clear-user-list)
{/* This file was generated by Fumadocs. Do not edit this file directly. Any changes should be made by running the generation command again. */}
Remove all users from a OnlyFans User List
# Create User List (/api-reference/user-list-collections/create-user-list)
{/* This file was generated by Fumadocs. Do not edit this file directly. Any changes should be made by running the generation command again. */}
Create a OnlyFans User List
# Delete User List (/api-reference/user-list-collections/delete-user-list)
{/* This file was generated by Fumadocs. Do not edit this file directly. Any changes should be made by running the generation command again. */}
Delete a OnlyFans User List
# Get User List (/api-reference/user-list-collections/get-user-list)
{/* This file was generated by Fumadocs. Do not edit this file directly. Any changes should be made by running the generation command again. */}
Get a user list
# List User List Users (/api-reference/user-list-collections/list-user-list-users)
{/* This file was generated by Fumadocs. Do not edit this file directly. Any changes should be made by running the generation command again. */}
Get all users in a OnlyFans User List
# List User Lists (/api-reference/user-list-collections/list-user-lists)
{/* This file was generated by Fumadocs. Do not edit this file directly. Any changes should be made by running the generation command again. */}
Get a list of OnlyFans Collections - User Lists
# Remove User from a User List (/api-reference/user-list-collections/remove-user-from-a-user-list)
{/* This file was generated by Fumadocs. Do not edit this file directly. Any changes should be made by running the generation command again. */}
Remove User from OnlyFans User List
# Update User List (/api-reference/user-list-collections/update-user-list)
{/* This file was generated by Fumadocs. Do not edit this file directly. Any changes should be made by running the generation command again. */}
Update a OnlyFans User List
# Block User (/api-reference/users/block-user)
{/* This file was generated by Fumadocs. Do not edit this file directly. Any changes should be made by running the generation command again. */}
Block user from accessing your profile.
# Get User Details (/api-reference/users/get-user-details)
{/* This file was generated by Fumadocs. Do not edit this file directly. Any changes should be made by running the generation command again. */}
Get OnlyFans Profile details for a given username. User details are retrieved using the current `{account}` so fields like `subscribedOnData` which include potential subscription details will be included.
# Mass-List User Details (/api-reference/users/mass-list-user-details)
{/* This file was generated by Fumadocs. Do not edit this file directly. Any changes should be made by running the generation command again. */}
Save on credits by getting up to 10 user details with a single request. User details are retrieved using the current `{account}` so fields like `subscribedOnData` which include potential subscription details will be included.
# Restrict User (/api-reference/users/restrict-user)
{/* This file was generated by Fumadocs. Do not edit this file directly. Any changes should be made by running the generation command again. */}
Restrict a user. You will not see messages or comments from this them.
# Subscribe to User (/api-reference/users/subscribe-to-user)
{/* This file was generated by Fumadocs. Do not edit this file directly. Any changes should be made by running the generation command again. */}
Subscribe to a user's profile.
# Unblock User (/api-reference/users/unblock-user)
{/* This file was generated by Fumadocs. Do not edit this file directly. Any changes should be made by running the generation command again. */}
Unblock a previously blocked user.
# Unrestrict User (/api-reference/users/unrestrict-user)
{/* This file was generated by Fumadocs. Do not edit this file directly. Any changes should be made by running the generation command again. */}
Unrestrict a previously restricted user. You will start seeing messages and comments from them again.
# Available modules (/integrations/make/available-modules)
Please reach out to us, we can add it!
## Instant Triggers
An Instant Trigger (also known as a "webhook"), is a module that is executed immediately when an event occurs.
### 🤑 Chat Message PPV Purchased
A PPV (pay-per-view) message that you sent has been purchased by a fan
```json title="Example data"
{
"event": "messages.ppv.unlocked",
"account_id": "acct_123",
"payload": {
"id": "123",
"type": "paided_message",
"createdAt": "2025-05-05T22:18:00+00:00",
"text": "has purchased your message for $5.00!",
"replacePairs": {
"{NAME}": "Name",
"{MESSAGE_LINK}": "message",
"{AMOUNT}": "$5.00"
},
"subType": "subscriber_pay_for_chat_message",
"user_id": "123",
"isRead": false,
"canGoToProfile": true,
"user": {
"avatar": null,
"avatarThumbs": null,
"header": null,
"headerSize": null,
"headerThumbs": null,
"id": 123,
"name": "Name",
"username": "username",
"canLookStory": false,
"canCommentStory": false,
"hasNotViewedStory": false,
"isVerified": false,
"canPayInternal": false,
"hasScheduledStream": false,
"hasStream": false,
"hasStories": false,
"tipsEnabled": false,
"tipsTextEnabled": true,
"tipsMin": 5,
"tipsMinInternal": 1,
"tipsMax": 200,
"canEarn": false,
"canAddSubscriber": false,
"subscribePrice": 0,
"subscribedBy": false,
"subscribedOn": false,
"canReceiveChatMessage": false,
"hideChat": false,
"lastSeen": "2025-05-05T22:17:29+00:00",
"isPerformer": false,
"isRealPerformer": false,
"view": "mn",
"canReport": true,
"subscribedByData": null,
"subscribedOnData": null,
"isBlocked": false
}
}
}
```
### 📥 Chat Message Received
A new chat message has been received.
```json title="Example data"
{
"event": "messages.received",
"account_id": "acct_abc123",
"payload": {
"responseType": "message",
"text": "
",
"email": "user@example.com",
"wsUrl": "wss://ws2.onlyfans.com/ws3/01",
"avatar": "https://public.onlyfans.com/.../avatar.jpg",
"header": "https://public.onlyfans.com/.../header_image.jpg",
"isAuth": true,
"ivFlow": "default",
"upload": {
"geoUploadArgs": {
"preset": "of_beta",
"isDelay": true,
"additional": {
"user": "123"
},
"needThumbs": true,
"preset_png": "of_png",
"protected_preset": "of_drm"
}
},
"canChat": true,
"canEarn": true,
"hasTags": false,
"tipsMax": 200,
"tipsMin": 5,
"website": null,
"advBlock": ["banners"],
"hasLinks": false,
"ivStatus": "approved",
"joinDate": "2025-01-01T00:00:00+00:00",
"lastSeen": "2025-01-21T00:00:00+00:00",
"location": null,
"paidFeed": false,
"username": "username",
"wishlist": null,
"hasLabels": true,
"hasStream": false,
"hasStripe": false,
"ivCountry": "US",
"canAddCard": true,
"canPinPost": true,
"creditsMax": 200,
"creditsMin": 10,
"hasFriends": false,
"hasStories": false,
"headerSize": {
"width": 4032,
"height": 3024
},
"isVerified": true,
"payoutType": "bank_ebics_sepa",
"postsCount": 1,
"unreadTips": 0,
"audiosCount": 0,
"canAddStory": true,
"hasNewHints": true,
"hasScenario": false,
"isPerformer": true,
"mediasCount": 1,
"photosCount": 1,
"tipsEnabled": false,
"videosCount": 0,
"wsAuthToken": "wsAuthToken",
"avatarThumbs": {
"c50": "https://thumbs.onlyfans.com/.../avatar.jpg",
"c144": "https://thumbs.onlyfans.com/.../avatar.jpg"
},
"canLookStory": true,
"canStreaming": false,
"canTrialSend": false,
"hasNewAlerts": false,
"headerThumbs": {
"w480": "https://thumbs.onlyfans.com/.../header_image.jpg",
"w760": "https://thumbs.onlyfans.com/.../header_image.jpg"
},
"isOtpEnabled": true,
"ivFailReason": null,
"newTagsCount": 0,
"postMaxPrice": 100,
"postMinPrice": 3,
"trialMaxDays": 7,
"creditBalance": 0,
"faceIdRegular": [],
"isAgeVerified": false,
"isAllowTweets": false,
"isMakePayment": false,
"isStripeExist": false,
"isVatRequired": false,
"needIVApprove": false,
"vatNumberName": "VAT",
"watermarkText": "OnlyFans.com/username",
"canCreateLists": true,
"canCreateTrial": true,
"canPayInternal": true,
"favoritedCount": 0,
"favoritesCount": 0,
"hasPinnedPosts": false,
"isAdultContent": false,
"isEmailChecked": true,
"isWantComments": true,
"showMediaCount": true,
"subscribePrice": 4.99,
"canCommentStory": true,
"countPinnedChat": 0,
"isEmailRequired": false,
"isPaywallPassed": true,
"isRealPerformer": true,
"isVisibleOnline": true,
"messageMaxPrice": 100,
"messageMinPrice": 3,
"showPostsInFeed": true,
"subscribesCount": 123,
"tipsMinInternal": 1,
"tipsTextEnabled": true,
"twitterUsername": "TwitterUsername",
"canAddSubscriber": false,
"canSendChatToAll": true,
"isCountryWithVat": false,
"isCreditsEnabled": true,
"isVerifiedReason": false,
"pinnedPostsCount": 0,
"subscribedByData": null,
"subscribedOnData": null,
"subscribersCount": 123,
"chatMessagesCount": 123,
"countPriorityChat": 123,
"hasNotViewedStory": false,
"hasPurchasedPosts": false,
"hasWatermarkPhoto": true,
"hasWatermarkVideo": true,
"isDeleteInitiated": false,
"isReferrerAllowed": true,
"isSpringConnected": false,
"subscribeMaxPrice": 50,
"subscribeMinPrice": 4.99,
"watermarkPosition": "bottom_right",
"archivedPostsCount": 0,
"canCreatePromotion": true,
"canMakeExpirePosts": true,
"hasScheduledStream": false,
"isSpotifyConnected": false,
"isTwitterConnected": false,
"notificationsCount": 0,
"walletFirstRebills": false,
"canConnectOfAccount": true,
"connectedOfAccounts": [],
"hasInternalPayments": false,
"hasNewTicketReplies": {
"open": false,
"closed": false,
"solved": false
},
"isNeedConfirmPayout": false,
"isRealCardConnected": true,
"ivHideForPerformers": false,
"maxPinnedPostsCount": 5,
"subscriptionBundles": [],
"trialMaxExpiresDays": 30,
"canCreateFundRaising": false,
"isPrivateRestriction": false,
"isWalletAutorecharge": false,
"maxFundRaisingTarget": 10000,
"minFundRaisingTarget": 10,
"showSubscribersCount": false,
"canChangeContentPrice": true,
"canReceiveChatMessage": false,
"walletAutorechargeMin": 0,
"canReceiveManualPayout": true,
"canReceiveStripePayout": false,
"firstPublishedPostDate": "2025-01-01T00:00:00+00:00",
"hasSystemNotifications": false,
"isCountryVatRefundable": false,
"isLegalApprovedAllowed": true,
"isPaymentCardConnected": true,
"ageVerificationRequired": false,
"payoutLegalApproveState": "approved",
"walletAutorechargeAmount": 0,
"canAlternativeWalletTopUp": false,
"enabledImageEditorForChat": true,
"isCountryVatNumberCollect": false,
"isScheduledStreamsAllowed": false,
"privateArchivedPostsCount": 0,
"isMarkdownDisabledForAbout": true,
"avatarHeaderConverterUpload": true,
"hasNewChangedPriceSubscriptions": true
}
}
```
### 💰 List Earnings (monetary values)
Get the earnings in monetary values for a given period. E.g. `123.45`
```json title="Example data"
{
"date": "2025-01-01T00:00:00+00:00",
"count": 123.45
}
```
### 💰 List Earnings (transaction count)
Get the transaction counts for a given period. E.g. `123`
```json title="Example data"
{
"date": "2025-01-01T00:00:00+00:00",
"count": 123
}
```
### 🔗 List Tracking Links
List all tracking links & their revenue data for the account.
```json title="Example data"
{
"id": 123,
"campaignCode": 1,
"campaignName": "campaign-name",
"campaignUrl": "https://onlyfans.com/username/c1",
"subscribersCount": 123,
"clicksCount": 123,
"createdAt": "2025-05-23T16:19:38+00:00",
"endDate": null,
"revenue": {
"total": 0,
"revenuePerSubscriber": 0,
"revenuePerClick": 0,
"calculatedAt": "2025-05-23T16:45:36.000000Z",
"isLoading": false
},
"links": {
"related": {
"subscribers": "https://app.onlyfansapi.com/api/acct_123/tracking-links/123/subscribers"
}
}
}
```
### 🔗 List Tracking Link Subscribers
Get list of subscribers who joined through a Tracking Link.
```json title="Example data"
{
"view": "s",
"avatar": null,
"avatarThumbs": null,
"header": null,
"headerSize": null,
"headerThumbs": null,
"id": 123,
"name": "name",
"username": "username",
"canLookStory": false,
"canCommentStory": false,
"hasNotViewedStory": false,
"isVerified": false,
"canPayInternal": false,
"hasScheduledStream": false,
"hasStream": false,
"hasStories": false,
"tipsEnabled": false,
"tipsTextEnabled": true,
"tipsMin": 5,
"tipsMinInternal": 1,
"tipsMax": 200,
"canEarn": false,
"canAddSubscriber": false,
"subscribePrice": 0,
"displayName": "",
"notice": "",
"isRestricted": false,
"canRestrict": true,
"subscribedBy": true,
"subscribedByExpire": false,
"subscribedByExpireDate": "2025-01-01T00:00:00+00:00",
"subscribedByAutoprolong": true,
"subscribedIsExpiredNow": false,
"currentSubscribePrice": 0,
"subscribedOn": true,
"subscribedOnExpiredNow": false,
"subscribedOnDuration": "1 year",
"showMediaCount": true,
"lastSeen": null,
"canReport": true
}
```
### 💳 List Transactions
Get a paginated list of transactions for an Account. Newest transactions are first.
```json title="Example data"
{
"amount": 9.99,
"vatAmount": 0.5,
"taxAmount": 0,
"net": 7.99,
"fee": 2,
"createdAt": "2025-05-26T00:00:00+00:00",
"currency": "USD",
"description": "Payment for message from User",
"status": "loading",
"user": {
"view": "t",
"id": 123,
"name": "Name",
"username": "username",
"isVerified": false,
"avatar": null,
"avatarThumbs": null
},
"payoutPendingDays": 7,
"id": "exampleId"
}
```
### 🆓 List Trial Links
List all trial links & their revenue data for the account.
```json title="Example data"
{
"id": 123,
"trialLinkName": "My trial link",
"url": "https://onlyfans.com/username/trial/abc123",
"subscribeDays": 7,
"subscribeCounts": 123,
"claimCounts": 123,
"expiredAt": null,
"createdAt": "2025-01-01T00:00:00+00:00",
"isFinished": false
}
```
## Universal
### Make a custom API call
Call any OnlyFans API endpoint from Make.com.
# Make.com & OnlyFans - Quickstart (/integrations/make)
import { DownloadIcon } from "lucide-react";
import { Step, Steps } from "fumadocs-ui/components/steps";
import { Card } from "fumadocs-ui/components/card";
## Prerequisites
To get started, you must have:
* An OnlyFans API account with a creator account connected
* A [Make.com](https://www.make.com/en/register?pc=onlyfans) account
## Getting started
Log in to your Make.com account.
Install our Make.com integration:
} href="https://www.make.com/en/hq/app-invitation/ee8eed5fafe0c65c4989c5b7112b741d" title="Install our Make.com app" className="w-fit">
It only takes a few seconds.
## Connecting your OnlyFans API account to Make.com
### Go to a Make scenario, or create a new scenario \[!toc]
Go to the Scenarios page in Make.com, click on the relevant scenario, or click on "Create a new scenario".
### Add the OnlyFans API app \[!toc]
Click on the "+" button to add an app, and search for "OnlyFans API".
### Select or search for a module \[!toc]
### Add a new API connection \[!toc]
### Create a new API key from the OnlyFans API Console \[!toc]
#### Go to the OnlyFans API console -> API Keys \[!toc]
#### Create a new API key from the OnlyFans API Console \[!toc]
#### Give it a name, and press "Add" \[!toc]
#### Copy the API key to your clipboard \[!toc]
### Save the new API key in Make.com \[!toc]
Give the connection a helpful name, paste the API key, and click "Save".
You're now ready to use the OnlyFans API app in your Make.com scenario.
## Tutorial Video
# Ready-made scenarios (/integrations/make/ready-made-scenarios)
import { Step, Steps } from 'fumadocs-ui/components/steps';
### Available blueprints
### Account synchronization \[!toc]
This scenario will synchronize your OnlyFans accounts with Airtable, and update the data once a day.
**Download scenario blueprint ›**
### Hourly account revenue data \[!toc]
This scenario will synchronize your OnlyFans account revenue data with Airtable. Every account will have one record for each day, which updates hourly.
**Download scenario blueprint ›**
### How to use the scenario blueprints
If you import a blueprint while editing another scenario that hasn't been saved, all the changes in that scenario will be lost.
To import a blueprint:
#### On the Scenario Builder toolbar, click the three dots > Import blueprint. \[!toc]
#### Click Choose File, select the blueprint file in .json format, and click Save. \[!toc]
The imported scenario appears in the Scenario Builder. You can now configure your own account connections, make any necessary edits to the scenario, schedule it, and click the Save icon.
# Create Webhook (/api-reference/webhooks/create-webhook)
{/* This file was generated by Fumadocs. Do not edit this file directly. Any changes should be made by running the generation command again. */}
Create a new webhook for your Team
# Delete Webhook (/api-reference/webhooks/delete-webhook)
{/* This file was generated by Fumadocs. Do not edit this file directly. Any changes should be made by running the generation command again. */}
Delete an existing webhook
# List Available Events (/api-reference/webhooks/list-available-events)
{/* This file was generated by Fumadocs. Do not edit this file directly. Any changes should be made by running the generation command again. */}
Retrieve a list of all available webhook event types
# List Webhooks (/api-reference/webhooks/list-webhooks)
{/* This file was generated by Fumadocs. Do not edit this file directly. Any changes should be made by running the generation command again. */}
Retrieve a list of webhooks for your Team
# Show Webhook (/api-reference/webhooks/show-webhook)
{/* This file was generated by Fumadocs. Do not edit this file directly. Any changes should be made by running the generation command again. */}
Retrieve details about a specific webhook
# Update Webhook (/api-reference/webhooks/update-webhook)
{/* This file was generated by Fumadocs. Do not edit this file directly. Any changes should be made by running the generation command again. */}
Update an existing webhook
# n8n & OnlyFans - Available modules (/integrations/n8n/available-modules)
import {ZapIcon} from "lucide-react";
}>
Our n8n integration is our most actively maintained integration, and it supports every single endpoint in our API.
Currently, our n8n integration is available in the official n8n nodes library or as a self-hosted instance.
Browse our frequently used API endpoints below to get a feel for what's possible
with OnlyFans API.
## Chats & Messages \[!toc]
} href="/api-reference/chats/list-chats" title="List Chats">
Retrieve the latest chats, including details like last message and fan details.
} href="/api-reference/chat-messages/list-chat-messages" title="List Chat Messages">
Retrieve messages from a specific chat.
} href="/api-reference/chat-messages/send-message" title="Send Message">
Send a new chat message to a fan, including support for media and PPVs.
} href="/api-reference/mass-messaging/send-mass-message" title="Send Mass Message">
Send or schedule a mass message to collections or individual fans, including support for media and PPVs.
## Payouts & Earnings \[!toc]
} href="/api-reference/payouts/get-earning-statistics" title="Earning Statistics">
Get a summary of model earnings over time, including totals and breakdowns.
} href="/api-reference/payouts/list-transactions-earnings" title="List Transactions (Earnings)">
Get a list of earning transactions, including details like amount, type, and fan info.
} href="/api-reference/payouts/request-manual-withdrawal" title="Request Manual Withdrawal">
Initiate a manual withdrawal, perfect for automating daily payouts.
## Fans & Subscribers \[!toc]
} href="/api-reference/fans/list-all-fans" title="List All Fans">
Retrieve a list of all fans, and filter by online, total spendings, duration, and more.
} href="/api-reference/fans/list-active-fans" title="List Active Fans">
Get a list of fans who have an active subscription.
} href="/api-reference/fans/list-expired-fans" title="List Expired Fans">
Get a list of fans whose subscriptions have expired.
} href="/api-reference/fans/list-latest-fans" title="List Latest Fans">
Get a list of fans within a specific date range.
## Media & Vault \[!toc]
} href="/api-reference/media-vault/list-vault-media" title="List Vault Media">
Retrieve a list of all fans, and filter by online, total spendings, duration, and more.
} href="/api-reference/media-vault-lists/list-vault-lists" title="List Vault Lists">
Get a list of fans who have an active subscription.
} href="/api-reference/media/upload-media-to-the-only-fans-cdn" title="Upload media to OnlyFans">
Upload an image, video or audio file to the OnlyFans CDN to include in a message or post.
} href="/api-reference/media/download-media-from-the-only-fans-cdn" title="Download media from OnlyFans">
Download an image, video or audio file from OnlyFans to our own CDN.
Haven't found what you're looking for?
} title="Explore our full API reference in the sidebar" href="/api-reference">
We have over 100 endpoints covering most OnlyFans functionality. Check out the sidebar to explore all available endpoints.
} title="Ask our AI chatbot">
Our AI chatbot can help you find the right endpoint for your use case. Click the "Ask AI" button in the bottom right to get started.
} title="Request a new functionality" href="mailto:hello@onlyfansapi.com">
Need something specific? Let us know! We're constantly adding new endpoints based on user feedback.
# n8n & OnlyFans - Quickstart (/integrations/n8n)
import {
SiDigitalocean,
SiHostinger,
SiN8n,
} from "@icons-pack/react-simple-icons";
import { BoxIcon, ServerIcon, TerminalIcon } from "lucide-react";
import { Step, Steps } from "fumadocs-ui/components/steps";
import { Card, Cards } from "fumadocs-ui/components/card";
import { Accordion, Accordions } from "fumadocs-ui/components/accordion";
import {ZapIcon} from "lucide-react";
}>
Our n8n integration is our most actively maintained integration, and it supports every single endpoint in our API.
Currently, our n8n integration is available in the official n8n nodes library or as a self-hosted instance.
## Prerequisites
To get started, you must have:
} href="https://app.onlyfansapi.com" title="An OnlyFans API account">
If you don't have one yet, registering takes just a few seconds.
» Create a free account
} title="A n8n instance">
You can either use n8n's native infrastructure, or a one-click provider. Some popular options are:
n8n Cloud (native)
Hostinger (20% off)
DigitalOcean (Get $200 in credit)
Self-hosted
## Installing the OnlyFans API node
Only the n8n instance owner can install and manage verified community nodes.
The instance owner is the person who sets up and manages user management.
All members of an n8n instance can use already installed community nodes in their workflows.
To install the OnlyFans API node in your n8n instance:
Log in to your n8n instance.
Create a new workflow by clicking on **"Create workflow"** in the top right corner.
Go to the Canvas and open the nodes panel (either by selecting '+' or pressing `Tab`).
Search for "OnlyFans API" in the nodes panel, and select it. This takes you to a detailed view of the OnlyFans API node, showing all the supported actions.
Next to our logo, click on the **"Install node"** button.
This will install the node for your instance and enable all members to use it in their workflows.
That's it! You can now add the node to your workflows.
## Updating the OnlyFans API node
We frequently release updates to our n8n node, adding new features and fixing bugs. To update to the latest version, follow the instructions below:
Access the **"Community nodes"** page through the n8n settings
Find the OnlyFans API node in the list of installed nodes, and click on the **"Update"** button next to it
Follow the prompts to complete the update process.
Access your Docker shell:
```bash
docker exec -it n8n sh
```
Update our node through your package manager:
```bash
npm update @onlyfansapi/n8n-nodes-onlyfansapi
```
## Connecting your OnlyFans API account to n8n
Head to your n8n instance's homepage, and click on **"Create Credential"**
in the **"Create Workflow"** dropdown.
Select **"OnlyFans API"** from the list of available credential types, and
click **"Continue"**.
### Create a new API key from the OnlyFans API Console \[!toc]
#### Go to the OnlyFans API console -> API Keys \[!toc]
#### Create a new API key from the OnlyFans API Console \[!toc]
#### Give it a name, and press "Add" \[!toc]
#### Copy the API key to your clipboard \[!toc]
Paste the API key into the **"API Key"** field, and click **"Save"**.
# Notes (/integrations/n8n/main-callouts)
import {ZapIcon} from "lucide-react";
}>
Our n8n integration is our most actively maintained integration, and it supports every single endpoint in our API.
Currently, our n8n integration is available in the official n8n nodes library or as a self-hosted instance.
# Available modules (/integrations/zapier/available-modules)
Please reach out to us, we can add it!
## Instant Triggers
An Instant Trigger (also known as a "webhook"), is a module that is executed immediately when an event occurs.
### 🤑 Chat Message PPV Purchased
A PPV (pay-per-view) message that you sent has been purchased by a fan
```json title="Example data"
{
"event": "messages.ppv.unlocked",
"account_id": "acct_123",
"payload": {
"id": "123",
"type": "paided_message",
"createdAt": "2025-05-05T22:18:00+00:00",
"text": "has purchased your message for $5.00!",
"replacePairs": {
"{NAME}": "Name",
"{MESSAGE_LINK}": "message",
"{AMOUNT}": "$5.00"
},
"subType": "subscriber_pay_for_chat_message",
"user_id": "123",
"isRead": false,
"canGoToProfile": true,
"user": {
"avatar": null,
"avatarThumbs": null,
"header": null,
"headerSize": null,
"headerThumbs": null,
"id": 123,
"name": "Name",
"username": "username",
"canLookStory": false,
"canCommentStory": false,
"hasNotViewedStory": false,
"isVerified": false,
"canPayInternal": false,
"hasScheduledStream": false,
"hasStream": false,
"hasStories": false,
"tipsEnabled": false,
"tipsTextEnabled": true,
"tipsMin": 5,
"tipsMinInternal": 1,
"tipsMax": 200,
"canEarn": false,
"canAddSubscriber": false,
"subscribePrice": 0,
"subscribedBy": false,
"subscribedOn": false,
"canReceiveChatMessage": false,
"hideChat": false,
"lastSeen": "2025-05-05T22:17:29+00:00",
"isPerformer": false,
"isRealPerformer": false,
"view": "mn",
"canReport": true,
"subscribedByData": null,
"subscribedOnData": null,
"isBlocked": false
}
}
}
```
### 📥 Chat Message Received
A new chat message has been received.
```json title="Example data"
{
"event": "messages.received",
"account_id": "acct_abc123",
"payload": {
"responseType": "message",
"text": "
",
"giphyId": null,
"lockedText": true,
"isFree": true,
"price": 0,
"isMediaReady": true,
"mediaCount": 0,
"media": [ ],
"previews": [ ],
"isTip": false,
"isReportedByMe": false,
"isCouplePeopleMedia": false,
"queueId": 123,
"isMarkdownDisabled": true,
"releaseForms": [ ],
"isFromQueue": false,
"id": 123,
"isOpened": false,
"isNew": true,
"createdAt": "2025-07-02T00:00:00+00:00",
"changedAt": "2025-07-02T00:00:00+00:00",
"cancelSeconds": 86400,
"isLiked": false,
"canPurchase": false,
"canPurchaseReason": "free",
"canReport": false,
"canBePinned": true,
"isPinned": false,
"toUser": {
"view": "s",
"avatar": null,
"avatarThumbs": null,
"header": null,
"headerSize": null,
"headerThumbs": null,
"id": 123,
"name": "Name",
"username": "username",
"canLookStory": false,
"canCommentStory": false,
"hasNotViewedStory": false,
"isVerified": false,
"canPayInternal": true,
"hasScheduledStream": false,
"hasStream": false,
"hasStories": false,
"tipsEnabled": false,
"tipsTextEnabled": true,
"tipsMin": 5,
"tipsMinInternal": 1,
"tipsMax": 200,
"canEarn": false,
"canAddSubscriber": true,
"subscribePrice": 0,
"displayName": "",
"notice": "",
"isRestricted": false,
"canRestrict": true,
"subscribedBy": false,
"subscribedByExpire": null,
"subscribedByExpireDate": null,
"subscribedByAutoprolong": null,
"subscribedIsExpiredNow": null,
"currentSubscribePrice": null,
"subscribedOn": true,
"subscribedOnExpiredNow": false,
"subscribedOnDuration": "1 month",
"listsStates": [
{
"id": "friends",
"type": "friends",
"name": "Friends",
"hasUser": false,
"canAddUser": false,
"cannotAddUserReason": "USER_NOT_PERFORMER"
},
{
"id": "muted",
"type": "muted",
"name": "Muted",
"hasUser": false,
"canAddUser": true,
"cannotAddUserReason": null
},
{
"id": "tagged",
"type": "tagged",
"name": "Tagged",
"hasUser": false,
"canAddUser": false,
"cannotAddUserReason": "SYSTEM_LIST"
},
{
"id": "rebill_on",
"type": "rebill_on",
"name": "Renew On",
"hasUser": false,
"canAddUser": false,
"cannotAddUserReason": null
},
{
"id": "recent",
"type": "recent",
"name": "Recent (last 24 hours)",
"hasUser": false,
"canAddUser": false,
"cannotAddUserReason": "SYSTEM_LIST"
},
{
"id": "fans",
"type": "fans",
"name": "Fans",
"hasUser": true,
"canAddUser": false,
"cannotAddUserReason": "ALREADY_EXISTS"
},
{
"id": "rebill_off",
"type": "rebill_off",
"name": "Renew Off",
"hasUser": true,
"canAddUser": false,
"cannotAddUserReason": "ALREADY_EXISTS"
},
{
"id": "following",
"type": "following",
"name": "Following",
"hasUser": false,
"canAddUser": false,
"cannotAddUserReason": "SYSTEM_LIST"
}
],
"showMediaCount": true,
"lastSeen": "2025-07-02T00:00:00+00:00",
"canReport": false
}
}
}
```
### 🎉 New Subscriber
A new fan has subscribed.
```json title="Example data"
{
"event": "subscriptions.new",
"account_id": "acct_123",
"payload": {
"id": "123",
"type": "subscribed",
"createdAt": "2025-05-05T21:27:00+00:00",
"text": "subscribed to your profile!",
"replacePairs": {
"{SUBSCRIBER_LINK}": "Name",
"{PRICE}": "free"
},
"subType": "new_subscriber",
"user_id": "123",
"isRead": false,
"canGoToProfile": true,
"user": {
"avatar": "https://example.com",
"avatarThumbs": {
"c50": "https://example.com",
"c144": "https://example.com"
},
"header": "https://example.com",
"headerSize": {
"width": 767,
"height": 1152
},
"headerThumbs": {
"w480": "https://example.com",
"w760": "https://example.com"
},
"id": 123,
"name": "Name",
"username": "username",
"canLookStory": false,
"canCommentStory": false,
"hasNotViewedStory": false,
"isVerified": true,
"canPayInternal": false,
"hasScheduledStream": false,
"hasStream": false,
"hasStories": false,
"tipsEnabled": true,
"tipsTextEnabled": true,
"tipsMin": 5,
"tipsMinInternal": 1,
"tipsMax": 200,
"canEarn": true,
"canAddSubscriber": false,
"subscribePrice": 0,
"subscribedBy": false,
"subscribedOn": false,
"canReceiveChatMessage": false,
"hideChat": false,
"lastSeen": "2025-05-05T21:26:04+00:00",
"isPerformer": true,
"isRealPerformer": true,
"view": "mn",
"canReport": true,
"subscribedByData": null,
"subscribedOnData": null,
"isBlocked": false
}
}
}
```
### 🎉 Subscription renewed
A fan has renewed their subscription.
```json title="Example data"
{
"event": "subscriptions.renewed",
"account_id": "acct_123",
"payload": {
"id": "123",
"type": "subscribed",
"createdAt": "2025-05-05T21:27:00+00:00",
"text": "Good news! u34547118 has Just restarted their monthly subscription to your OnlyFans profile!",
"replacePairs": {
"{SUBSCRIBER_LINK}": "u34547118",
"{PRICE}": "$4.00"
},
"subType": "returning_subscriber",
"user_id": "34547118",
"isRead": false,
"canGoToProfile": true,
"user": {
"avatar": "https://example.com",
"avatarThumbs": {
"c50": "https://example.com",
"c144": "https://example.com"
},
"header": "https://example.com",
"headerSize": {
"width": 767,
"height": 1152
},
"headerThumbs": {
"w480": "https://example.com",
"w760": "https://example.com"
},
"id": 34547118,
"name": "Name",
"username": "username",
"canLookStory": false,
"canCommentStory": false,
"hasNotViewedStory": false,
"isVerified": true,
"canPayInternal": false,
"hasScheduledStream": false,
"hasStream": false,
"hasStories": false,
"tipsEnabled": true,
"tipsTextEnabled": true,
"tipsMin": 5,
"tipsMinInternal": 1,
"tipsMax": 200,
"canEarn": true,
"canAddSubscriber": false,
"subscribePrice": 0,
"subscribedBy": false,
"subscribedOn": false,
"canReceiveChatMessage": false,
"hideChat": false,
"lastSeen": "2025-05-05T21:26:04+00:00",
"isPerformer": true,
"isRealPerformer": true,
"view": "mn",
"canReport": true,
"subscribedByData": null,
"subscribedOnData": null,
"isBlocked": false
}
}
}
```
### ❤️ Post Liked
A fan has liked one of your posts.
```json title="Example data"
{
"event": "posts.liked",
"account_id": "acct_123",
"payload": {
"id": "123",
"type": "favorited",
"createdAt": "2025-05-05T22:22:00+00:00",
"text": "liked your post",
"replacePairs": {
"{POST_LINK}": "post"
},
"subType": "new_favorite",
"user_id": "123",
"isRead": false,
"canGoToProfile": true,
"user": {
"avatar": null,
"avatarThumbs": null,
"header": null,
"headerSize": null,
"headerThumbs": null,
"id": 123,
"name": "Name",
"username": "username",
"canLookStory": false,
"canCommentStory": false,
"hasNotViewedStory": false,
"isVerified": false,
"canPayInternal": false,
"hasScheduledStream": false,
"hasStream": false,
"hasStories": false,
"tipsEnabled": false,
"tipsTextEnabled": true,
"tipsMin": 5,
"tipsMinInternal": 1,
"tipsMax": 200,
"canEarn": false,
"canAddSubscriber": false,
"subscribePrice": 0,
"subscribedBy": false,
"subscribedOn": false,
"canReceiveChatMessage": false,
"hideChat": false,
"lastSeen": null,
"isPerformer": false,
"isRealPerformer": false,
"view": "mn",
"canReport": true,
"subscribedByData": null,
"subscribedOnData": null,
"isBlocked": false
}
}
}
```
### 💬 Fan is Typing
A fan is typing a message.
```json title="Example data"
{
"event": "users.typing",
"account_id": "acct_123",
"payload": {
"id": 123
}
}
```
### ℹ️ Account Connected
A new OnlyFans account was connected.
```json title="Example data"
{
"event": "accounts.connected",
"account_id": "acct_123",
"payload": {
"state": "authenticated",
"progress": "started",
"latestAuthAttempt": {
"started_at": "2025-05-13T20:26:56.000000Z",
"completed_at": null,
"success": false,
"error_message": null,
"needs_otp": false,
"needs_face_otp": false,
"otp_phone_ending": null
}
}
}
```
### ℹ️ Account Reconnected
An OnlyFans account was reconnected.
```json title="Example data"
{
"event": "accounts.reconnected",
"account_id": "acct_123",
"payload": {
"state": "authenticated",
"progress": "started",
"latestAuthAttempt": {
"started_at": "2025-05-13T20:26:56.000000Z",
"completed_at": null,
"success": false,
"error_message": null,
"needs_otp": false,
"needs_face_otp": false,
"otp_phone_ending": null
}
}
}
```
### ℹ️ Account Connection Failed
An OnlyFans account's connection has expired, and we couldn't automatically re-connect it using our system.
```json title="Example data"
{
"event": "accounts.authentication_failed",
"account_id": "acct_123",
"payload": {
"state": "authenticated",
"progress": "started",
"latestAuthAttempt": {
"started_at": "2025-05-13T20:26:56.000000Z",
"completed_at": null,
"success": false,
"error_message": null,
"needs_otp": false,
"needs_face_otp": false,
"otp_phone_ending": null
}
}
}
```
### ℹ️ Account Session Expired
An OnlyFans account's connection has expired, but we're automatically re-connecting it using our system — you don't need to do anything.
```json title="Example data"
{
"event": "accounts.session_expired",
"account_id": "acct_123",
"payload": {
"state": "authenticated",
"progress": "started",
"latestAuthAttempt": {
"started_at": "2025-05-13T20:26:56.000000Z",
"completed_at": null,
"success": false,
"error_message": null,
"needs_otp": false,
"needs_face_otp": false,
"otp_phone_ending": null
}
}
}
```
### ℹ️ Account Requires Face Verification
Face verification is required to connect one of your OnlyFans accounts
```json title="Example data"
{
"event": "accounts.face_otp_required",
"account_id": "acct_123",
"payload": {
"state": "authenticated",
"progress": "started",
"face_otp_verification_url": "https://id.onlyfans.com/s?123",
"latestAuthAttempt": {
"started_at": "2025-05-13T20:26:56.000000Z",
"completed_at": null,
"success": false,
"error_message": null,
"needs_otp": false,
"needs_face_otp": false,
"otp_phone_ending": null
}
}
}
```
### ℹ️ Account Requires OTP (2FA) Code
A two-factor authentication code is required to connect one of your OnlyFans accounts.
```json title="Example data"
{
"event": "accounts.otp_code_required",
"account_id": "acct_123",
"payload": {
"state": "authenticated",
"progress": "started",
"latestAuthAttempt": {
"started_at": "2025-05-13T20:26:56.000000Z",
"completed_at": null,
"success": false,
"error_message": null,
"needs_otp": false,
"needs_face_otp": false,
"otp_phone_ending": null
}
}
}
```
# Zapier & OnlyFans - Quickstart (/integrations/zapier)
import { DownloadIcon, ZapIcon } from "lucide-react";
import { Step, Steps } from "fumadocs-ui/components/steps";
import { Card } from "fumadocs-ui/components/card";
## Prerequisites
To get started, you must have:
* An OnlyFans API account with a creator account connected
* A [Zapier](https://zapier.com) account
## Getting started
Log in to your Zapier account.
Install our Zapier app:
} href="https://zapier.com/developer/public-invite/227143/bfb7f34aa95032c5d8801a65821e4a5c/" title="Install our Zapier app" className="w-fit">
It only takes a few seconds.
## Connecting your OnlyFans API account to Zapier
### Create a new Zap, or edit an existing one \[!toc]
} href="https://zapier.com/webintent/create-zap" title="Create new Zap" className="w-fit">
Build automated OnlyFans workflows by creating your first Zap.
### Choose the OnlyFans API App as the trigger \[!toc]
### Select a trigger event \[!toc]
### Create a new API key from the OnlyFans API Console \[!toc]
#### Go to the OnlyFans API console -> API Keys \[!toc]
#### Create a new API key from the OnlyFans API Console \[!toc]
#### Give it a name, and press "Add" \[!toc]
#### Copy the API key to your clipboard \[!toc]
### Connect Zapier with OnlyFans API \[!toc]
### Paste the API Key into the Zapier connection window \[!toc]
### Your Zapier account is now connected to OnlyFans API \[!toc] If all went
well, under "Account", Zapier will show your API key name, and the name of
your OnlyFans API team.
You're now ready to use the OnlyFans API app in your Zaps.
# Credit System (/introduction/essentials/credits)
import {
ChartNoAxesCombinedIcon,
CodeIcon,
CoinsIcon,
DatabaseZapIcon,
FileTextIcon,
HeartPlusIcon,
MonitorIcon,
ScanSearchIcon,
SquareActivityIcon,
TrendingUpIcon,
} from "lucide-react";
## Credit calculator
## Credit cost overview
Please refer to the table below to get a general overview of the credit cost for our endpoints.
For detailed information about where to find credit information in API responses, see our [Response Structure](/introduction/essentials/response-structure) documentation.
| Endpoint(s) | Cost | Notes |
| ------------------------------------------------------------------------------- | ------------------------------- | ----------------------------------------------------------------------------------- |
| [Search Profiles](/api-reference/public-profiles/search-profiles) | 1 credit per result | E.g. if your search query has 10 results, you will be debited 10 credits. |
| [Media Uploading](/api-reference/media/upload-media-to-the-only-fans-cdn) | 3 credits per MB | For easy calculation, we use decimal measurements. This means that 1MB is 1,000 KB. |
| [Media Downloading](/api-reference/media/download-media-from-the-only-fans-cdn) | 3 credits per MB | For easy calculation, we use decimal measurements. This means that 1MB is 1,000 KB. |
| [Webhooks](/webhooks) | 1 credit per 100 Webhook events | - |
| [All other uncached responses](#uncached-responses) | 1 credit per request | - |
| [All other cached responses](#cached-responses) | 0 credits | - |
## Cached vs uncached
### Cached responses
Public endpoints make use of automatic caching by default, and thus won't cost you any credits if a cached response already exists.
**Account-specific endpoints will never be cached**, and will always give you
a fresh response from OnlyFans.
#### Forcing a fresh response
You can force a fresh response by appending the endpoint URL with `?fresh=true`
### Uncached responses
All account-specific endpoints, and endpoints that reply on real-time data, will always return a fresh response from OnlyFans and thus will consume credits.
## Subscription Plans
Our subscription tiers provide different credit allocations:
• Perfect for small to medium projects\
• Includes all basic features\
• Automatic credit tracking
• Ideal for larger applications\
• Priority support\
• Advanced features included
• Tailored to your needs\
• Contact us to discuss requirements\
• Custom features and support
## Credit Features
All subscription tiers include:
}>
• Up to 200% of monthly allocation\
• Automatic rollover management\
• No manual activation required
}>
• Real-time balance tracking\
• Detailed usage analytics\
• Automated notifications
}>
• Automatic response caching\
• Zero-credit cached responses\
• Cache control with `?fresh=true`
## Monitoring Tools
You can easily track your credit usage through all of our API responses, and through our Console
}>
* Real-time credit balance
* Request-specific credit usage
* Cache status indicators
}>
* Real-time credit balance
* View your rate limit usage
* Easily purchase more credits
## Credit Management
Best practices for optimizing credit usage:
}>
Leverage cached responses when possible.
}>
Monitor your credit balance regularly.
}>
Review usage patterns regularly. Consider optimizing your requests.
Cached responses are free and don't consume any credits from your balance.
This applies to public endpoints like profile information.
## Enterprise Solutions
For high-volume requirements, we offer:
} />
} />
} />
} />
Please contact our team to discuss your specific needs and get a tailored solution.
# Proxies (/introduction/essentials/proxies)
## Proxy Infrastructure
OnlyFans API leverages an advanced proxy architecture to ensure high-availability connections and robust security. Our infrastructure automatically manages dedicated proxy assignments for each account, providing enterprise-grade reliability and performance.
### Built-in Proxy System (Recommended)
We provide a sophisticated proxy management system at no additional cost:
* **Dedicated Mobile IP**: Each connected account gets its own exclusive mobile proxy IP
* **Intelligent Routing**: Advanced traffic routing optimized for OnlyFans platform
* **Geographic Distribution**: Choose your preferred proxy country during setup
* **Zero Configuration**: Everything is handled automatically
Our proxy infrastructure is specifically engineered for optimal OnlyFans API
performance. We recommend using our built-in system for the best experience.
### Custom Proxy Integration
For organizations with existing proxy infrastructure:
1. Select "Use custom proxy" during account configuration
2. Configure your proxy details:
* Host
* Port
* Username (if required)
* Password (if required)
### Technical Requirements
Custom proxy configurations must meet these specifications:
* **IP Exclusivity**: Dedicated, non-shared IP address per account
* **Network Type**: Mobile or residential IP ranges (datacenter IPs not supported)
* **Geolocation**: IP geolocation matching historical access patterns
* **Protocol Support**: HTTP/HTTPS protocols
### Best Practices
* Maintain consistent geolocation patterns
* Use the same proxy consistently for each account
* Monitor proxy health metrics
* Contact support if you experience connection issues
# Rate Limits (/introduction/essentials/rate-limits)
We have decided to remove our daily rate limits. Please remove any references to these values in your integrations.
## Rate Limiting Overview
Our platform employs a distributed rate limiting system to ensure optimal performance and resource allocation. Rate limits vary based on your subscription plan:
### Plan-Based Limits
1. **Basic Plan**:
* 1,000 requests per minute (RPM)
* Resets every minute
* Perfect for most applications
* Tracked via `remaining_minute` counter
2. **Pro Plan**:
* 5,000 requests per minute (RPM)
* Higher throughput for demanding applications
* Priority request processing
* Tracked via `remaining_minute` counter
3. **Enterprise Plan**:
* No rate limits
* Unlimited requests per minute
* Custom infrastructure
* Performance monitoring included
Enterprise customers get unlimited request throughput with dedicated
infrastructure to ensure optimal performance at any scale.
For information about where to find rate limit data in responses, see our [Response Structure](/introduction/essentials/response-structure) documentation.
### Caching and Rate Limits
Our caching system helps you optimize your rate limit usage:
* Public endpoints (like profile information) are automatically cached
* Cached responses don't count towards your rate limits
* Use `?fresh=true` when you need real-time data
* Cache duration varies by endpoint type
When using cached responses, you're not consuming any of your rate limits,
making it an effective way to optimize your API usage.
### Rate Limit Monitoring
Track your rate limit usage through:
1. **Response Headers**
* Current limits
* Remaining requests
* Reset timers
2. **Dashboard Analytics**
* Usage patterns
* Peak usage times
* Rate limit warnings
### Best Practices
Implement these strategies for optimal throughput:
1. **Monitor Your Limits**
* Track usage patterns
* Plan for limit resets
* Set up alerts before limits are reached
2. **Optimize Request Patterns**
* Distribute requests evenly
* Avoid request bursts
* Use batch operations when available
3. **Handle Rate Limits Gracefully**
* Implement exponential backoff
* Queue requests when near limits
* Use cached responses when possible
4. **Cache Strategy**
* Leverage cached responses
* Only use `?fresh=true` when necessary
* Implement local caching when appropriate
### Error Handling
When you exceed rate limits:
* Response will have status code `429 Too Many Requests`
* Contains information about when limits reset
* Implement automatic retry with backoff
Example backoff strategy:
```javascript
async function fetchWithRetry(url, maxRetries = 3) {
for (let i = 0; i < maxRetries; i++) {
try {
const response = await fetch(url);
if (response.status !== 429) return response;
// Get retry delay from headers or use exponential backoff
const retryAfter = response.headers.get("retry-after") || Math.pow(2, i);
await new Promise((resolve) => setTimeout(resolve, retryAfter * 1000));
} catch (error) {
if (i === maxRetries - 1) throw error;
}
}
}
```
### Enterprise Options
For high-volume requirements:
* No rate limits
* Dedicated infrastructure
* Custom performance tuning
* Advanced monitoring tools
Contact our enterprise team to discuss your specific needs.
# Response Structure (/introduction/essentials/response-structure)
## Response Format
Every API response follows a consistent structure with two main components:
1. The `data` field containing OnlyFans information
2. Optional `_pagination` field with pagination information, if the endpoint is paginated
3. The `_meta` object containing request metadata
Here's an example response:
### Response Body Structure
We have decided to remove our daily rate limits. Please remove any references to these values in your integrations.
```json
{
"data": {
// OnlyFans response data
"view": "f",
"avatar": "https://...",
"isFriend": false,
"isBlocked": false,
"canReport": false
},
"_meta": {
"_credits": {
"used": 0,
"balance": 9852,
"note": "Cache HIT. No credits debited"
},
"_cache": {
"is_cached": true,
"cached_at": "2025-01-29T16:30:43+00:00",
"note": "Add ?fresh=true to the request URL to skip the cache and get a fresh response from OnlyFans"
},
"_rate_limits": {
"limit_minute": 60,
"limit_day": null, // Legacy
"remaining_minute": 59,
"remaining_day": null, // Legacy
"notice": "We have decided to remove our daily rate limits. Please remove any references to this in your integrations."
}
}
}
```
### The `data` Field
The `data` field always contains the actual OnlyFans response data. Its structure varies depending on the endpoint being called. For example:
* Profile information for `/profiles/{username}`
* Message data for `/messages` endpoints
* Subscriber data for `/subscribers` endpoints
### The optional `_pagination` field
Some endpoints return paginated data. For example, `/chats`, `/chats/XYZ/messages` or `/tracking-links`.
In this case, the response will include a `_pagination` field with the `next_page` field that you can use to fetch the next page of results.
If there are no more pages, the `next_page` field will be `null`.
```json
{
"data": {
// OnlyFans response data
},
"_meta": {
"_pagination": {
"next_page": "https://app.onlyfansapi.com/api/acct_XXXXXXXXXXX/chats/?offset=10&limit=10"
}
}
}
```
### The `_meta` Object
The `_meta` object contains three sections of metadata about your request:
1. **`_credits`**: Credit usage information
* `used`: Credits consumed by this request
* `balance`: Your remaining credit balance
* `note`: Additional information about credit usage
2. **`_cache`**: Caching status and information
* `is_cached`: Whether this response was served from cache
* `cached_at`: When the response was cached
* `note`: Instructions for bypassing cache if needed
3. **`_rate_limits`**: Rate limiting information
* `limit_minute`: Requests allowed per minute
* `limit_day`: Legacy: Requests allowed per day **(removed)**
* `remaining_minute`: Remaining requests this minute
* `remaining_day`: Legacy: Remaining requests today **(removed)**
## Response Headers
Each response includes comprehensive metadata in the headers:
| Header | Value | Category | Description |
| ------------------------------- | ------------------ | ------------------ | ----------------------------- |
| `content-type` | `application/json` | Content Headers | Always `application/json` |
| `x-ofapi-credits-balance` | `9852` | Credit Headers | Your remaining credit balance |
| `x-ofapi-credits-used` | `0` | Credit Headers | Credits used by this request |
| `x-ofapi-is-cached` | `true` | Credit Headers | Whether response was cached |
| `x-rate-limit-limit-day` | `1000` | Rate Limit Headers | **Legacy: Removed** |
| `x-rate-limit-limit-minute` | `60` | Rate Limit Headers | Per-minute limit |
| `x-rate-limit-remaining-day` | `988` | Rate Limit Headers | **Legacy: Removed** |
| `x-rate-limit-remaining-minute` | `59` | Rate Limit Headers | Remaining minute requests |
## Cache Control
You can control caching behavior using query parameters:
* By default, responses are cached when possible (only for public endpoints)
* Add `?fresh=true` to force a fresh response from OnlyFans
* Cached responses don't consume credits
* Cache duration varies by endpoint
The same information is available in both headers and the `_meta` object. Use
headers for quick access in code, and the `_meta` object for more detailed
information including notes and timestamps.
# Composing messages (/introduction/guides/composing-messages)
This guide will give you a brief overview of how to compose messages with various elements using our API.
Please keep in mind that all of the below examples are meant to be sent as a `POST` request to our `https://app.onlyfansapi.com/api/{account}/chats/{chat_id}/messages` endpoint.
**Looking for the `chat_id`? Use our [List Chats](/api-reference/chats/list-chats) endpoint.**
**Looking for the developer-oriented documentation?** Please refer to our [API Reference](/api-reference/chats/send-message).
## Text-only messages
Simply want to send a regular message? Use the following payload:
```json
{
"text": "The text of your message"
}
```
## Adding media
Please refer to our dedicated guide on [uploading media](/introduction/guides/uploading-media) for more information on how to upload media files, and how to include them in your chat messages.
## Setting a price (PPV)
To set a price for your chat message, you can use the `price` field in your payload. This will make your message paid (PPV). **All paid messages must contain at least one media file.**
### Only including paid media
To send a paid message without any free preview media, you can use the following payload:
```json
{
"text": "The text of your message",
"mediaFiles": ["ofapi_media_123", 3866342509],
"price": 5
}
```
The `mediaFiles` parameter can contain either `ofapi_media` IDs, or OnlyFans Vault Media ID (e.g., `3866342509`). You can find more information about these IDs in our [media uploads guide](/introduction/guides/uploading-media). **You can mix-and-match these IDs in the same array.**
### Including free preview media
To send a paid message with free preview media, you can use the `previews` field in your payload. This allows you to include media that will be visible to the recipient, even if they haven't paid for the message.
**Important!**\
Make sure to list every `previews` media file in the `mediaFiles` array as well. Otherwise, the API will return an error.
The `previews` array is only used to indicate which media files are free, while the `mediaFiles` array contains all media files included in the message, regardless of whether they are paid or free.
```json
{
"text": "The text of your message",
"mediaFiles": ["ofapi_media_123", 3866342509],
"previews": ["ofapi_media_456", 1234567890],
"price": 5
}
```
The `mediaFiles` and `previews` parameters can contain either `ofapi_media` IDs, or OnlyFans Vault Media ID (e.g., `3866342509`). You can find more information about these IDs in our [media uploads guide](/introduction/guides/uploading-media). **You can mix-and-match these IDs in the same array.**
## Tagging other OnlyFans creators
To tag other OnlyFans creators in your message, you can use the `rfTag` field in your payload. You can specify multiple creators by providing an array of their OnlyFans user IDs.
```json
{
"text": "The text of your message",
"rfTag": [123, 456]
}
```
**How to find the OnlyFans user ID of a creator?**
* **If you've connected the relevant creator account to OnlyFans API**, you can use our [List Accounts](/api-reference/account/list-accounts) endpoint.
* **Not connected, but you know the creator's username?** You can use our [Get Profile Details](/api-reference/public-profiles/get-profile-details) endpoint.
* **Not connected and don't know the username?** You can use our [Search Profiles](/api-reference/public-profiles/search-profiles) endpoint.
## Formatting your message text
Please refer to our dedicated guide on [text formatting](/introduction/guides/text-formatting) for more information on how to format your message text, including text styles, colors, and more.
# Composing posts (/introduction/guides/composing-posts)
This guide will give you a brief overview of how to compose posts with various elements using our API.
Please keep in mind that all of the below examples are meant to be sent as a `POST` request to our `https://app.onlyfansapi.com/api/{account}/posts` endpoint.
**Looking for the developer-oriented documentation?** Please refer to our [API Reference](/api-reference/posts/send-post).
## Text-only posts
Simply want to send a regular text post? Use the following payload:
```json
{
"text": "The text of your post"
}
```
## Post labels
### Retrieving the account's existing labels
**Looking for the developer-oriented documentation?** Please refer to our [API Reference](/api-reference/post-labels/list-labels).
You can retrieve the account's existing labels by sending a `GET` request to the `https://app.onlyfansapi.com/api/{account}/posts/labels` endpoint.
It will return a payload like:
```json
[
{
"id": "archived",
"name": "Archive",
"type": "archived",
"isClearInProgress": false,
"postsCount": 0,
"posts": []
},
{
"id": "private_archived",
"name": "Private Archive",
"type": "private_archived",
"isClearInProgress": false,
"postsCount": 0,
"posts": []
},
{
"id": 123,
"name": "My new label",
"type": "custom",
"isClearInProgress": false,
"postsCount": 123,
"posts": []
}
]
```
You can then use the `id` of the label(s) to apply it to your post.
### Creating a new label
**Looking for the developer-oriented documentation?** Please refer to our [API Reference](/api-reference/post-labels/create-label).
To create a new label, send a `POST` request to the `https://app.onlyfansapi.com/api/{account}/posts/labels` endpoint with the following payload:
```json
{
"name": "My new label"
}
```
It will then return a payload like:
```json
{
"data": {
"id": 123,
"name": "My new label",
"type": "custom",
"isClearInProgress": false,
"postsCount": 0,
"posts": []
}
}
```
You can then use the `id` of the newly created label to apply it to your post.
### Adding label(s) to your post
To add label(s) to your post, you can use the `labels` field in your payload. You can specify multiple labels by providing an array of label IDs.
```json
{
"text": "The text of your post",
"labelIds": [123, 456]
}
```
## Adding media
Please refer to our dedicated guide on [uploading media](/introduction/guides/uploading-media) for more information on how to upload media files, and how to include them in your posts.
## Adding polls
Both regular polls and quizzes are supported in our API. You can choose which type of poll to include in your post by setting the `votingType` field in your payload to either `poll` or `quiz`.
### Regular polls
To include a regular poll in your post, set the `votingType` field to `poll`.
**Specifying the options**\
The poll's options can be set by using the `votingOptions` field. It should be an array of strings. **You must provide at least 2 options.**
**Setting a due date** (optional)\
You can set a due date by using the `votingDue` field, which specifies the number of days until the poll expires. Valid values are **1**, **3**, **7**, or **30** days. If not specified, the poll will never expire.
```json
{
"text": "The text of your post",
"votingType": "poll",
"votingOptions": ["Option 1", "Option 2"],
"votingDue": 7
}
```
### Quizzes
To include a quiz in your post, set the `votingType` field to `quiz`.
**Specifying the options**\
The quiz options can be set by using the `votingOptions` field. It should be an array of strings. **You must provide at least 2 options.**
**Specifying the correct answer**\
Specify the correct answer by using the `votingCorrectIndex` field. It should be an integer representing the index of the correct answer in the `votingOptions` array (starting from 0). For example, if the correct answer is the first option, set it to `0`.
**Setting a due date** (optional)\
You can set a due date by using the `votingDue` field, which specifies the number of days until the quiz expires. Valid values are **1**, **3**, **7**, or **30** days. If not specified, the quiz will never expire.
```json
{
"text": "The text of your post",
"votingType": "quiz",
"votingOptions": ["Option 1", "Option 2"],
"votingCorrectIndex": 0,
"votingDue": 7
}
```
## Setting an expiration date
To set an expiration date for your post, you can use the `expireDays` field in your payload. The value must be **1**, **3**, **7** or **30** days.
```json
{
"text": "The text of your post",
"expireDays": 7
}
```
## Scheduling posts
To schedule your post, you can use the `scheduledDate` field in your payload. The value must be a valid date-time string formatted as `2025-06-03T15:30:00.000Z` (ISO 8601 format) in UTC timezone.
```json
{
"text": "The text of your post",
"scheduledDate": "2023-10-01T12:00:00Z"
}
```
## Saving a post for later
To save a post for later, you can use the `saveForLater` field in your payload. Set it to `true` to save the post without publishing it immediately. You can then find your post here: [https://onlyfans.com/saved-for-later-posts](https://onlyfans.com/saved-for-later-posts)
```json
{
"text": "The text of your post",
"saveForLater": true
}
```
## Setting a fundraising target
To include a fundraising target in your post, you can use the `fundRaisingTargetAmount` and `fundRaisingTipsPresets` fields in your payload.
**Setting a target amount**\
The `fundRaisingTargetAmount` field specifies the target amount for your fundraising post. It must be a at least `10` representing the amount in your account's currency.
**Setting tip presets**\
The `fundRaisingTipsPresets` field allows you to specify the preset tip amounts that users can choose from. It should be an array of integers representing the amounts in your account's currency.
**Tip preset rules**
* You must provide at least one preset value.
* Each preset value must be at least `5`.
* Each preset value may not be more than the `fundRaisingTargetAmount`.
```json
{
"text": "The text of your post",
"fundRaisingTargetAmount": 30,
"fundRaisingTipsPresets": [5, 10, 15]
}
```
## Tagging other OnlyFans creators
To tag other OnlyFans creators in your post, you can use the `rfTag` field in your payload. You can specify multiple creators by providing an array of their OnlyFans user IDs.
```json
{
"text": "The text of your post",
"rfTag": [123, 456]
}
```
**How to find the OnlyFans user ID of a creator?**
* **If you've connected the relevant creator account to OnlyFans API**, you can use our [List Accounts](/api-reference/account/list-accounts) endpoint.
* **Not connected, but you know the creator's username?** You can use our [Get Profile Details](/api-reference/public-profiles/get-profile-details) endpoint.
* **Not connected and don't know the username?** You can use our [Search Profiles](/api-reference/public-profiles/search-profiles) endpoint.
## Formatting your post text
Please refer to our dedicated guide on [text formatting](/introduction/guides/text-formatting) for more information on how to format your post text, including text styles, colors, and more.
# Connect OnlyFans account (/introduction/guides/connect-onlyfans-account)
## Why do you need to connect your OnlyFans account?
If you want to use our API to interact with OnlyFans API endpoints like:
* Reading chats
* Sending messages to fans
* Getting statistics
* Getting fans
* Following / unfollowing users
* Getting webhook notifications
* ... basically anything that requires you to be logged in to your OnlyFans account.
Then, you need to connect your OnlyFans account to our API.
Currently, there are two ways to connect your OnlyFans account to our API:
1. Using our automated login flow (email & password) - **Captcha and 2FA supported** *(Recommended)*
2. By providing cURL request
### Option 1: Using our automated login flow (email & password)
This is the recommended way to connect your OnlyFans account to our API.
Our system can bypass captcha and if you've setup 2FA, you'll be able to enter the 2FA code directly inside our interface while we sign in your profile.
Your credentials are securely stored in our database and are never shared with
anyone (not even our engineers can see your credentials).
Steps to connect your OnlyFans account:
1. Go to the [OnlyFansAPI Console -> Accounts](https://app.onlyfansapi.com/accounts)
2. Click on the **+ Connect Account** button
3. Enter name of the account (this will be used for your reference)
4. Enter your OnlyFans email and password
5. Choose Proxy Country (we will automatically assign a dedicated mobile IP address for this account), or enter your own proxy details
6. Click on the **Add** button
7. Your account will start connecting and you'll see the live progress of the login process.
8. **If you've 2FA enabled on your OnlyFans account**, you'll be asked to enter the 2FA code.
9. Done! ✅ You're now able to see the account details and start using your account with our API.
### Option 2: By providing cURL request
This is the manual way to connect your OnlyFans account to our API.
We recommend to sign in and enter the cURL request from a **incognito
window**. Please do NOT sign out account after you've connected it to our API,
just close the incognito window.
Honestly, it's easier to watch the video below and follow the steps.
# Downloading Media from OnlyFans CDN (/introduction/guides/downloading-media)
OnlyFans API makes it easy to download media files directly from OnlyFans CDN URLs. You can download photos, videos, and audio files by calling our download endpoint with the CDN URL.
## Download media from OnlyFans CDN
The full media download endpoint documentation can be found
[here](/api-reference/media/download-media-from-the-only-fans-cdn).
Media can be downloaded by calling GET `https://app.onlyfansapi.com/api/{account}/media/download/{ONLYFANS_CDN_URL}`.
The `{ONLYFANS_CDN_URL}` parameter should be a URL from OnlyFans CDN (e.g., `https://cdn2.onlyfans.com/files/e/e5/123/600x400_123.jpg?Tag=2&u=123&Policy=123&Signature=signature&Key-Pair-Id=123`). You can just enter the OnlyFans CDN URL after the `.../media/download/{ONLYFANS_CDN_URL}` without any need for encoding the URL.
cURL
JavaScript (Fetch)
Node.js (Axios)
PHP (Guzzle)
```bash
curl --location 'https://app.onlyfansapi.com/api/{account}/media/download/https://cdn2.onlyfans.com/files/e/e5/123/600x400_123.jpg?Tag=2&u=123&Policy=123&Signature=signature&Key-Pair-Id=123' \
--header 'Authorization: Bearer {token}' \
--output 'downloaded-media.jpg'
```
```ts
const myHeaders = new Headers();
myHeaders.append("Authorization", "Bearer {token}");
const cdnUrl =
"https://cdn2.onlyfans.com/files/e/e5/123/600x400_123.jpg?Tag=2&u=123&Policy=123&Signature=signature&Key-Pair-Id=123";
const requestOptions = {
method: "GET",
headers: myHeaders,
};
fetch(
`https://app.onlyfansapi.com/api/{account}/media/download/${cdnUrl}`,
requestOptions
)
.then((response) => response.blob())
.then((blob) => {
// Save the blob to a file or process it
const url = window.URL.createObjectURL(blob);
const a = document.createElement("a");
a.href = url;
a.download = "downloaded-media.jpg";
a.click();
})
.catch((error) => console.error(error));
```
```js
const axios = require("axios");
const fs = require("fs");
const cdnUrl =
"https://cdn2.onlyfans.com/files/e/e5/123/600x400_123.jpg?Tag=2&u=123&Policy=123&Signature=signature&Key-Pair-Id=123";
let config = {
method: "get",
url: `https://app.onlyfansapi.com/api/{account}/media/download/${cdnUrl}`,
headers: {
Authorization: "Bearer {token}",
},
responseType: "stream",
};
axios
.request(config)
.then((response) => {
response.data.pipe(fs.createWriteStream("downloaded-media.jpg"));
})
.catch((error) => {
console.log(error);
});
```
```php
$client = new Client();
$headers = [
'Authorization' => 'Bearer {token}'
];
$cdnUrl = "https://cdn2.onlyfans.com/files/e/e5/123/600x400_123.jpg?Tag=2&u=123&Policy=123&Signature=signature&Key-Pair-Id=123";
$request = new Request('GET', "https://app.onlyfansapi.com/api/{account}/media/download/{$cdnUrl}", $headers);
$res = $client->sendAsync($request)->wait();
file_put_contents('downloaded-media.jpg', $res->getBody());
```
The endpoint will return the media file directly, which you can then save to your local storage or process as needed.
# Meta Pixel-Like Revenue Tracking for OnlyFans Media Buyers (/introduction/guides/onlyfans-meta-pixel-smart-links)
## Pixel-Perfect Smart Links
Imagine you're running Meta Ads for a creator and you need to know which ad creative, which ad set, or which campaign is actually making money. Traditional pixels can miss events, get blocked by ad blockers, or lose data when users switch devices. **Smart Links solve all of that** with server-side tracking that never fails.
Think of a Smart Link as your one-stop tracking URL. You use it in your ads, and it automatically tracks everything: who clicked, who subscribed, and every dollar they spend—forever.
Here's what a Smart Link looks like:
```text
https://trk.of-traffic.com/go/XXXXXXXXXX?ecid={{YOUR_EXTERNAL_CLICK_ID}}
```
When someone clicks this link, here's what happens behind the scenes:
* We record the click instantly (no JavaScript needed)
* We create a unique connection between that click and the fan
* We track every subscription and transaction that fan makes
* We send you postbacks in real-time so you can optimize your campaigns
**The best part?** No pixels, no JavaScript, no lost events. It all happens server-side, so it's impossible to block or miss.
***
## Who This Is For
**Media buyers** who are tired of guessing which ads are profitable. Whether you're running Meta Ads, Google Ads, native traffic, push notifications, or adult traffic—Smart Links give you the accuracy you need to scale confidently.
**Agencies** managing multiple creators and dozens of campaigns. You need to know which creator's campaigns are performing, which traffic sources convert best, and where to double down your ad spend.
**Developers and BI teams** who need clean, reliable data. Smart Links provide deterministic attribution that you can trust for reporting, optimization, and building custom dashboards.
***
## How Smart Links Work (In Plain English)
Let's walk through a real scenario:
**SELECT AGENCY is running Meta Ads for a creator named Madison.** They create a Smart Link and use it as the destination URL in their Meta Ads campaign.
1. **A user named John sees SELECT AGENCY's ad** on Facebook and clicks it
2. **John gets redirected** through `trk.of-traffic.com` (this happens in 50-80ms—so fast he won't even notice)
3. **OnlyFans API generates a unique subscription link** just for John (this could be a free trial or paid subscription, depending on the creator's settings)
4. **John subscribes to Madison's page** and starts spending money on the creator
5. **Every transaction gets tracked** and sent to SELECT AGENCY via postbacks, so they know exactly which ad brought in John and how much he's worth
**Real-world performance:**
* Redirect happens in **50-80ms** (faster than most people can blink)
* **99.98% uptime** means it works when you need it
* No JavaScript means it works even when ad blockers are active
***
## Smart Link URL Structure
Here's the basic format:
```text
https://trk.of-traffic.com/go/{SMART_LINK_ID}?ecid={{EXTERNAL_CLICK_ID}}
```
You can replace the `{{EXTERNAL_CLICK_ID}}` parameter with any external click ID you want to track. This could be from Meta, Google Ads, or your own tracking system.
### Real Example
Let's say SELECT AGENCY has a creator called Madison who wants to track her Meta Ads campaign. They create a Smart Link in the dashboard and get this ID: `01KE2JN9RBPAZNYSXKMYHR4JP2`
In Meta Ads, they set up their campaign to pass the click ID as a parameter. Their final tracking URL looks like:
```text
https://trk.of-traffic.com/go/01KE2JN9RBPAZNYSXKMYHR4JP2?ecid={{ad.id}}
```
When a user clicks the ad, Meta's system automatically replaces `{{ad.id}}` with the Ad ID from their platform, so SELECT AGENCY can match conversions back to specific ads in Meta's dashboard.
### Parameters
| Parameter | Required | Description |
| --------------- | -------- | ------------------------------------------------------------------------------------------------------------------------------- |
| `SMART_LINK_ID` | ✅ | Your unique Smart Link ID. Find it in the [Smart Links dashboard](https://app.onlyfansapi.com/smart-links) after you create one |
| `ecid` | ❌ | Any external click ID you want to track. This could be from Meta, Google Ads, or your own tracking system |
***
## Attribution Rules (What You Need to Know)
### Click Deduplication & Fraud Prevention
**The problem:** Some users (or bots) might click your ad multiple times, inflating your click numbers and making it look like you're getting more traffic than you actually are.
**The solution:** Smart Links use browser fingerprinting to detect and prevent double-clicks. Each legitimate click gets a globally unique `click_id` that you can use to track that specific user's journey.
**Real example:** If John accidentally double-clicks SELECT AGENCY's ad, we'll only count it as one click. But if John clicks, then his friend Mike clicks from a different device, we'll count both as separate clicks.
### Conversion Window
**How it works:** When someone clicks your Smart Link, they have **90 minutes** to subscribe. If they subscribe within that window, the conversion is attributed to your click.
**Why this matters:** This prevents old clicks from getting credit for new subscribers. If someone clicked your ad last week but only subscribes today after seeing a different ad, the attribution goes to the most recent click.
**Real scenario:** John clicks SELECT AGENCY's ad at 2:00 PM. He browses around, checks out the creator's social media, and finally subscribes at 2:45 PM. That conversion is attributed to that ad click. But if John waits until 3:30 PM (more than 90 minutes), the attribution window has closed.
### Click → Fan Binding
Once a fan is bound to a click, they stay bound unless something significant changes:
* They switch to a different browser or device
* The `?ecid=` parameter changes
**What this means:** If John subscribes after clicking your Smart Link, all of his future spending is attributed to that original click—even if he comes back days or weeks later.
### Multiple Smart Links: Who Gets Credit?
**The rule:** Attribution always goes to the **most recently clicked Smart Link**.
**Real-world scenario:**
* Monday: John clicks SELECT AGENCY's Smart Link A (Meta Ads campaign)
* John subscribes → attributed through the Smart Link A
* John spends $50 over the next two weeks → all attributed through the Smart Link A
* Two weeks later: John clicks SELECT AGENCY's Smart Link B (Google Ads campaign)
* From that moment forward, all of John's spending is attributed through the Smart Link B
Smart Links are **creator-scoped**, meaning attribution rules only apply within the same creator's account. If John clicks a Smart Link for Creator A (Madison), then later clicks a Smart Link for Creator B (Sarah), each creator's attribution is tracked separately—clicking Creator B's link doesn't affect attribution for Creator A.
***
## Lifetime Revenue Attribution (The Game Changer)
This is where Smart Links really shine. Once a fan subscribes through your Smart Link, **every dollar they spend** gets attributed to your original click—forever.
### Real Example Timeline
Let's follow John's journey:
```text
Monday, Jan 1 at 12:00 PM
→ John clicks SELECT AGENCY's Smart Link A (Meta Ads / Madison / Creative #1)
Monday, Jan 1 at 12:10 PM
→ John subscribes to Madison's page ($10/month)
→ Attribution: Smart Link A
Tuesday, Jan 2 at 3:00 PM
→ John tips $25 for a PPV message
→ Attribution: Smart Link A (still!)
Monday, Jan 15 at 12:00 PM
→ John's subscription renews ($10/month)
→ Attribution: Smart Link A (yes, renewals count too!)
Monday, Jan 20 at 2:00 PM
→ John clicks SELECT AGENCY's Smart Link B (Google Ads / Madison / Creative #2)
→ Attribution switches to Smart Link B
Monday, Jan 20 at 2:05 PM
→ John tips $15
→ Attribution: Smart Link B (newest click wins)
```
**Why this matters:** SELECT AGENCY can see that their Meta Ads campaign (Smart Link A) generated $45 in revenue from John, even though he only subscribed once. This gives them the true lifetime value (LTV) of their ad spend, not just the initial subscription.
***
## Events & Postbacks (Getting Your Data)
Smart Links send you real-time notifications when important things happen:
* **`new_subscriber`** - Someone who clicked your link just subscribed
* **`new_transaction`** - A subscriber made a purchase (tip, PPV, renewal, etc.)
**How postbacks work:**
* They're **GET requests** (simple URL calls)
* They're **fire-and-forget** (we send them, but don't wait for a response)
* They might arrive out of order (so make sure your system can handle that)
* Each event has a globally unique `click_id` so you can match it to the original click
### Setting Up Postbacks: Real Examples
**Example 1: Meta Pixel Integration**
SELECT AGENCY wants to send conversions back to Meta so they can optimize their campaigns. They set up a postback URL like this:
```text
https://www.facebook.com/tr?id=YOUR_PIXEL_ID&ev=Purchase&cd[value]={amount_gross}&cd[currency]=USD&external_id={external_click_id}
```
When someone subscribes, Meta gets notified with the exact revenue amount, and SELECT AGENCY can see it in their Meta Ads dashboard.
**Example 2: Custom Tracking System**
Mike runs his own tracking system and wants to log all conversions. He sets up a postback URL:
```text
https://tracking.mikeads.com/webhook?click_id={external_click_id}&amount={amount_net}&fan_id={fan_onlyfans_id}&conversion_type={conversion_type}
```
His system receives the data and stores it in his database for reporting.
**Example 3: Slack Notifications**
An agency wants to get notified in Slack when big conversions happen. They set up:
```text
https://hooks.slack.com/services/YOUR/WEBHOOK/URL?text=New+{conversion_type}+from+{creator_onlyfans_username}+%24{amount_gross}
```
Now they get instant notifications when subscribers convert.
### Available Postback Variables
You can use these variables in your postback URL to get the data you need:
#### Creator Information
| Variable | Description | Example |
| ----------------------------- | ------------------------------------- | ---------------------------- |
| `{ofapi_account_id}` | The Creator's OnlyFans API Account ID | `acct_XXXXXXXXXXXXXXXXXXXXX` |
| `{creator_onlyfans_id}` | The Creator's OnlyFans User ID | `1234567890` |
| `{creator_onlyfans_username}` | The Creator's OnlyFans Username | `madison420ivy` |
| `{creator_onlyfans_name}` | The Creator's Profile Name | `Madison Ivy` |
#### Smart Link Information
| Variable | Description | Example |
| ------------------- | --------------------------------------------------------- | --------------------------------- |
| `{smart_link_id}` | The Smart Link ID | `01KE2JN9RBPAZNYSXKMYHR4JP2` |
| `{smart_link_name}` | The Smart Link Name (you set this when creating the link) | `Meta Ads / Madison / Creative A` |
#### Conversion Details
| Variable | Description | Example |
| --------------------- | ---------------------------------------------------------- | ---------------------------------------- |
| `{conversion_type}` | The type of conversion | `new_subscriber` or `new_transaction` |
| `{click_id}` | The unique click ID from when they first clicked | `01ke2ndttgbvnmaxegbyhr9z3v` |
| `{external_click_id}` | The external click ID you passed in the URL (via `?ecid=`) | `meta-click-12345` or `google-ads-67890` |
| `{conversion_at}` | When the conversion happened (UTC) | `2026-01-04T04:40:40+00:00` |
| `{amount_gross}` | The total amount before OnlyFans takes their cut | `10.00` (for a $10 subscription) |
| `{amount_net}` | The amount after OnlyFans takes their 20% cut | `8.00` (your actual revenue) |
#### Fan Information
| Variable | Description | Example |
| ------------------------- | --------------------------- | ------------ |
| `{fan_onlyfans_id}` | The Fan's OnlyFans User ID | `999999999` |
| `{fan_onlyfans_username}` | The Fan's OnlyFans Username | `johndoe123` |
| `{fan_onlyfans_name}` | The Fan's Profile Name | `John Doe` |
#### Transaction Details (only for `new_transaction` events) ⚠️
| Variable | Description | Example |
| --------------------------- | ------------------------------------- | -------------------------------------------------------------------------------------------- |
| `{transaction_type}` | What kind of transaction it was | `new_subscription`, `recurring_subscription`, `tip`, `post`, `message`, `stream`, or `other` |
| `{transaction_description}` | A description of the transaction | `Payment for message from John Doe` |
| `{transaction_status}` | The current status of the transaction | `loading`, `done`, `pending_return`, or `undo` |
***
## Financial Details (The Money Stuff)
**Currency:** All amounts are in **USD**
**Precision:** All amounts are rounded to **2 decimal places**
**Understanding Gross vs Net:**
* `{amount_gross}` = The total amount the fan paid (before OnlyFans takes their cut)
* `{amount_net}` = The amount the creator actually receives (after OnlyFans takes their 20% cut)
**Real example:**
* John subscribes for $10/month
* `{amount_gross}` = `10.00`
* `{amount_net}` = `8.00` (OnlyFans keeps $2, creator gets $8)
**Why this matters:** When you're calculating ROI, you probably want to use `{amount_net}` since that's what the creator actually earns. But if you're tracking total customer value, `{amount_gross}` shows the full amount the fan spent.
***
## Dashboard & Reporting (See Your Results)
The Smart Links dashboard gives you everything you need to understand your campaign performance:
**Key Metrics:**
* **Clicks** - How many people clicked your link
* **Subscribers** - How many of those clicks converted to subscribers
* **Revenue** - Total revenue generated (you can toggle between gross and net)
* **CR %** - Conversion rate (subscribers ÷ clicks)
* **ARPS** - Average Revenue Per Subscriber
**Reports:**
* **Clicks Report** - See when clicks happened with a time-series chart and detailed table
* **Conversions Report** - See when conversions happened with revenue breakdowns
**Real use case:** SELECT AGENCY runs three different ad creatives and wants to know which one is most profitable. They create three Smart Links (one for each creative) and compare them in the dashboard. They can see that Creative A has a 3.2% conversion rate and $45 ARPS, while Creative B has a 2.1% conversion rate and $32 ARPS. They double down on Creative A.
***
## Common Use Cases
### Use Case 1: Tracking Multiple Ad Creatives
**The problem:** You're testing 5 different ad creatives and need to know which one converts best.
**The solution:** Create 5 Smart Links (one for each creative) and use them as destination URLs in your ad platform. Compare conversion rates and revenue in the dashboard.
### Use Case 2: Tracking by Traffic Source
**The problem:** You're running ads on Meta, Google, and native networks. Which source is most profitable?
**The solution:** Create separate Smart Links for each traffic source. Name them clearly (e.g., "Meta Ads", "Google Ads", "Native - TrafficJunky") so you can easily compare in reports.
### Use Case 3: Tracking by Country or Campaign
**The problem:** You want to know if your US campaigns perform better than your UK campaigns.
**The solution:** Create Smart Links with descriptive names like "Meta Ads - US" and "Meta Ads - UK". Use the `?ecid=` parameter to pass additional data like campaign ID or ad set ID from your ad platform.
### Use Case 4: Agency Reporting
**The problem:** You manage 10 creators and need to show each one which campaigns are working.
**The solution:** Create Smart Links with creator names in them (e.g., "Meta Ads - Madison", "Meta Ads - Sarah"). Use the dashboard filters to show each creator their specific performance.
***
## Summary
Smart Links give you **server-side, pixel-perfect attribution** that you can actually trust. No more guessing which ads are profitable, no more lost conversions, no more incomplete data. Just clean, accurate tracking that helps you scale your media buying with confidence.
Whether you're a solo media buyer or an agency managing dozens of campaigns, Smart Links provide the accuracy you need to make data-driven decisions and maximize your ROI.
# Text formatting (/introduction/guides/text-formatting)
## Best practices
Generally, all text should be contained within one singular `
` tag. Example:
```html
Hi there! This is a message containing normal text
```
## New lines
To create a new line, you can use the ` ` tag. Example:
```html
Hi there! This is a message containing normal text
This is a new line!
```
Which will render as:
> Hi there! This is a message containing normal text\
> This is a new line!
## Text sizes
OnlyFans has the following text size options:
* Largest
* Large
* Default
* Small
* Smallest
You can use them as follows:
### Smallest
To create the smallest text, you can use the `` tag. Example:
```html
Hi there! This is a message containing normal text
This is the smallest text!
```
### Small
To create a small text, you can use the `` tag. Example:
```html
Hi there! This is a message containing normal text
This is a small text!
```
### Large
To create a large text, you can use the `` tag. Example:
```html
Hi there! This is a message containing normal text
This is a large text!
```
### Largest
To create the largest text, you can use the `` tag. Example:
```html
Hi there! This is a message containing normal text
This is the largest text!
```
## Text styles
When using text styles like **bold** or *italic*, make sure that you wrap the text in a `` tag. Example:
```html
Bold textItalic text
```
### Bold
To create bold text, you can use the `` tag. Example:
```html
Hi there! This is a message containing normal text
This is bold text!
```
### Italic
To create italic text, you can use the `` tag. Example:
```html
Hi there! This is a message containing normal text
This is italic text!
```
## Text colors
OnlyFans has three possible colors for text:
* Gray (`#8a96a3`)
* Blue 1 (`#00aff0`)
* Blue 2 (`#1b98e0`)
You can use them as follows:
### Gray
To create gray text, you can use the `` tag. Example:
```html
Hi there! This is a message containing normal text
This is gray text!
```
### Blue 1
To create blue 1 text, you can use the `` tag. Example:
```html
Hi there! This is a message containing normal text
This is blue 1 text!
```
### Blue 2
To create blue 2 text, you can use the `` tag. Example:
```html
Hi there! This is a message containing normal text
This is blue 2 text!
```
# Uploading media (/introduction/guides/uploading-media)
OnlyFans API makes it really easy to include photos and videos in your posts and messages. You can upload media files directly to our API, and then reference them in our relevant endpoints.
## Prepare the relevant photo or video
* If you want to use a new photo or video, you may upload it to our API.
* Alternatively, if you want to use a photo or video from your Vault, you may reference its ID directly in the relevant endpoints.
### Upload your photo or video to our API
The full media upload endpoint documentation can be found
[here](/api-reference/media/upload-media-to-the-only-fans-cdn).
Submit a POST request to our `https://app.onlyfansapi.com/api/{account}/media/upload` endpoint, with `form-data` as the body type.
It must have a `file` field, which is the media file you want to upload. This can either be a photo or a video, and it can be in any format that OnlyFans supports (e.g., JPEG, PNG, MP4).
cURL
JavaScript (Fetch)
Node.js (Axios)
PHP (Guzzle)
```bash
curl --location 'https://app.onlyfansapi.com/api/{account}/media/upload' \
--header 'Authorization: Bearer {token}' \
--form 'file=@"/Users/me/Documents/MyVideo.mp4"'
```
```ts
const myHeaders = new Headers();
myHeaders.append("Authorization", "Bearer {token}");
const formdata = new FormData();
formdata.append("file", fileInput.files[0], "MyVideo.mp4");
const requestOptions = {
method: "POST",
headers: myHeaders,
body: formdata,
redirect: "follow",
};
fetch("https://app.onlyfansapi.com/api/{account}/media/upload", requestOptions)
.then((response) => response.text())
.then((result) => console.log(result))
.catch((error) => console.error(error));
```
```js
const axios = require("axios");
const FormData = require("form-data");
const fs = require("fs");
let data = new FormData();
data.append("file", fs.createReadStream("/Users/me/Documents/MyVideo.mp4"));
let config = {
method: "post",
maxBodyLength: Infinity,
url: "https://app.onlyfansapi.com/api/{account}/media/upload",
headers: {
Authorization: "Bearer {token}",
...data.getHeaders()
},
data: data
};
axios
.request(config)
.then((response) => {
console.log(JSON.stringify(response.data));
})
.catch((error) => {
console.log(error);
});
```
```php
$client = new Client();
$headers = [
'Authorization' => 'Bearer {token}'
];
$options = [
'multipart' => [
[
'name' => 'file',
'contents' => Utils::tryFopen('/Users/me/Documents/MyVideo.mp4', 'r'),
'filename' => '/Users/me/Documents/MyVideo.mp4',
]
]];
$request = new Request('POST', 'https://app.onlyfansapi.com/api/{account}/media/upload', $headers);
$res = $client->sendAsync($request, $options)->wait();
echo $res->getBody();
```
**If the upload was successful, the response will be something as follows:**
```json
{
"prefixed_id": "ofapi_media_123",
"file_name": "MyVideo.mp4",
"processId": "a9k3l2m7n8p0q4r5s6t",
"host": "convert1.onlyfans.com",
"sourceUrl": "https://of2transcoder.s3.amazonaws.com/upload/642a4d7e-134e-4cb4-99b5-6774248341c2/57141494436/file_name.jpg?X-Amz-Content-Sha256=UNSIGNED-PAYLOAD&X-Amz-Security-Token=token&X-Amz-Algorithm=AWS4-HMAC-SHA256&X-Amz-Credential=credentials&X-Amz-Date=20250521T151119Z&X-Amz-SignedHeaders=host&X-Amz-Expires=604800&X-Amz-Signature=signature",
"extra": "YW4gZW5jb2RlZCBzdHJpbmcgYW4gZW5jb2RlZCBzdHJpbmcgYW4gZW5jb2RlZCBzdHJpbmcgYW4gZW5jb2RlZCBzdHJpbmcgYW4gZW5jb2RlZCBzdHJpbmcgYW4gZW5jb2RlZCBzdHJpbmcgYW4gZW5jb2RlZCBzdHJpbmcgYW4gZW5jb2RlZCBzdHJpbmcgYW4gZW5jb2RlZCBzdHJpbmcgYW4gZW5jb2RlZCBzdHJpbmcgYW4gZW5jb2RlZA==",
"additional": {
"user": "123"
},
"thumbs": [
{
"id": 1,
"url": "https://cdn2.onlyfans.com/files/f/f0/fsdnjdsnf3k2rk/300x300_fjkdnknk23efsknj.jpg?Expires=1750518679&Signature=signature&Key-Pair-Id=PAIRID"
}
]
}
```
You may use the `prefixed_id` (e.g., `ofapi_media_123`) in our relevant endpoints to include this media file.
**Important!**
The `prefixed_id` from the above request can only be used **once**. After you use it in a post or message, it will no longer be valid for future use. If you want to reuse the same media file, you must upload it again to get a new `prefixed_id`.
## Including your media in a new post
The full send post endpoint documentation can be found
[here](/api-reference/posts/send-post).
Once you have retrieved the correct media IDs (either from the upload response, or from your Vault), you can include them in your post:
```json Example request body
{
"text": "The text of your post",
"mediaFiles": ["ofapi_media_123", "1234567890"]
}
```
## Including your media in a chat message
The full send chat message endpoint documentation can be found
[here](/api-reference/chats/send-message).
Once you have retrieved the correct media IDs (either from the upload response, or from your Vault), you can include them in your post:
```json Example request body
{
"text": "The text of your message",
"mediaFiles": ["ofapi_media_123", "1234567890"]
}
```
## Media file array options
You can include two different types of IDs in the `mediaFiles` array:
1. An OnlyFans API ID starting with `ofapi_media_`. This needs to be the `prefixed_id` of the media file we just uploaded.
**Important! The `ofapi_media_` ID from a media file upload can only be used once.**
After you use it in a post or message, it will no longer be valid for future use. To use the media again, you must use the OnlyFans Vault Media ID.
2. An OnlyFans Vault Media ID like `1234567890`. This is the OnlyFans ID of a media file that already exists in the Vault. Use our [List Vault Media](api-reference/media-vault/list-vault-media) endpoint to retrieve this ID.
## Demo video
# Example scenarios (/integrations/make/example-scenarios)
import {ArrowLeftRightIcon, LinkIcon} from "lucide-react";
} href="/integrations/make/example-scenarios/tracking-links-airtable" title="Tracking Links + Airtable">
Learn how to easily synchronize Tracking Link Data from your OnlyFans accounts to Airtable.
} href="/integrations/make/example-scenarios/transaction-data-airtable" title="Transaction Data + Airtable">
Learn how to easily synchronize Transaction Data from your OnlyFans accounts to Airtable.
# [Airtable] Tracking links (/integrations/make/example-scenarios/tracking-links-airtable)
import { Step, Steps } from 'fumadocs-ui/components/steps';
For this example, we'll create a scenario that periodically retrieves the tracking link data from all of your connected OnlyFans accounts, and saves the data to Airtable.
#### Create a base on Airtable
Go to Airtable and create a base. You can name it "OnlyFans API", or anything else that will help you identify it later.
#### Create a table within your base
Within the base, create a table named "Tracking links". Give the table the following fields:
* `ID` (primary) - Single line text
* `Campaign code` - Single line text
* `Campaign URL` - URL
* `Clicks count` - Number
* `Subscriber count` - Number
* `Total revenue` - Currency
Your table should now look like this:
#### Add our "List Accounts" module
If you don't see this module, make sure to click on "Show more".
#### Add our "List Tracking Links" module
After adding "List Tracking Links" module, you will be asked to provide an "Account ID".
Simply click on the field, and drag the "ID" from the left card into the field, like in the below image. Make sure to click on "Save".
#### Add the Airtable "Create a Record" module
If you don't see this module, make sure to click on "Show more".
#### Connect your Airtable account, and select the correct Base and Table
#### Map the fields
Now, let's map the OnlyFans API module fields to your Airtable's table fields. Make sure to click on "Save".
If you've done it correctly, your scenario should look like this:
#### Finally, schedule and run the scenario!
You can set a schedule time, and then run it manually with the "Run once" button to see if everything works correctly.
If it does, you will see the tracking link data of all your accounts appear in your Airtable table, like so:
The tracking link data of all of your connected OnlyFans accounts will now automatically be updated in Airtable.
Of course, you can further customize this scenario for a more advanced setup.
# [Airtable] Tracking links (/integrations/make/example-scenarios/transaction-data-airtable)
import { Step, Steps } from 'fumadocs-ui/components/steps';
For this example, we'll create a scenario that periodically retrieves the transaction data from all of your connected OnlyFans accounts, and saves the data to Airtable.
#### Create a base on Airtable
Go to Airtable and create a base. You can name it "OnlyFans API", or anything else that will help you identify it later.
#### Create a table within your base
Within the base, create a table named "Transaction data". Give the table the following fields:
* `Transaction ID` (primary) - Single line text
* `Account name` - Single line text
* `Amount` - Currency
* `Net amount` - Currency
Your table should now look like this:
#### Add our "List Accounts" module
#### Add our "List Transactions" module
You will be asked to provide an "Account ID".
Simply click on the field, and drag the "ID" from the left card into the field. Afterwards, choose a start date like "-30 days".
Afterwards, make sure to click on "Save".
#### Add the Airtable "Create a Record" module
If you don't see this module, make sure to click on "Show more".
#### Connect your Airtable account, and select the correct Base and Table
#### Map the fields
Now, let's map the OnlyFans API module fields to your Airtable's table fields. Make sure to click on "Save".
If you've done it correctly, your scenario should look like this:
#### Finally, schedule and run the scenario!
You can set a schedule time, and then run it manually with the "Run once" button to see if everything works correctly.
If it does, you will see the tracking link data of all your accounts appear in your Airtable table, like so:
The transaction data of all of your connected OnlyFans accounts will now automatically be updated in Airtable.
Of course, you can further customize this scenario for a more advanced setup.
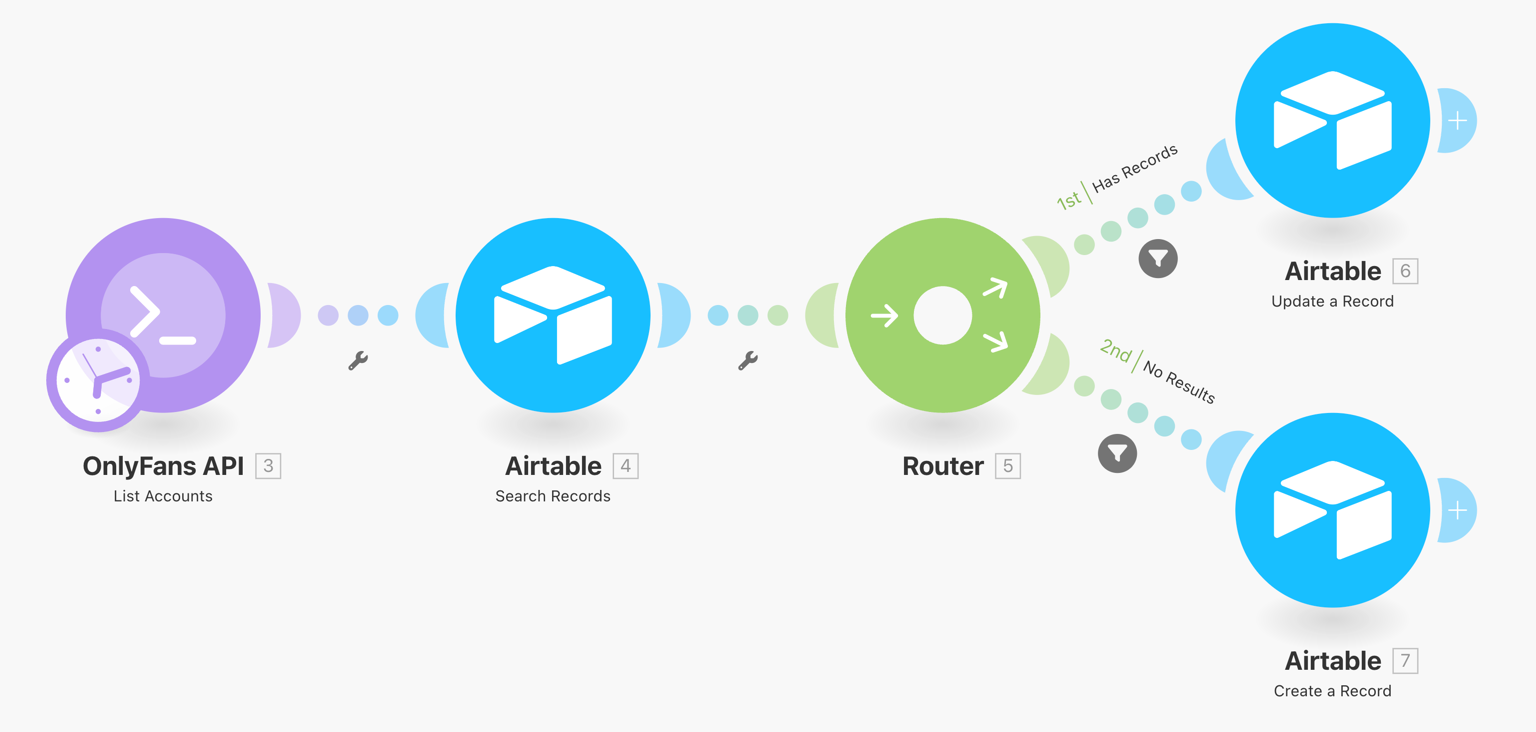 This scenario will synchronize your OnlyFans accounts with Airtable, and update the data once a day.
**Download scenario blueprint ›**
This scenario will synchronize your OnlyFans accounts with Airtable, and update the data once a day.
**Download scenario blueprint ›**
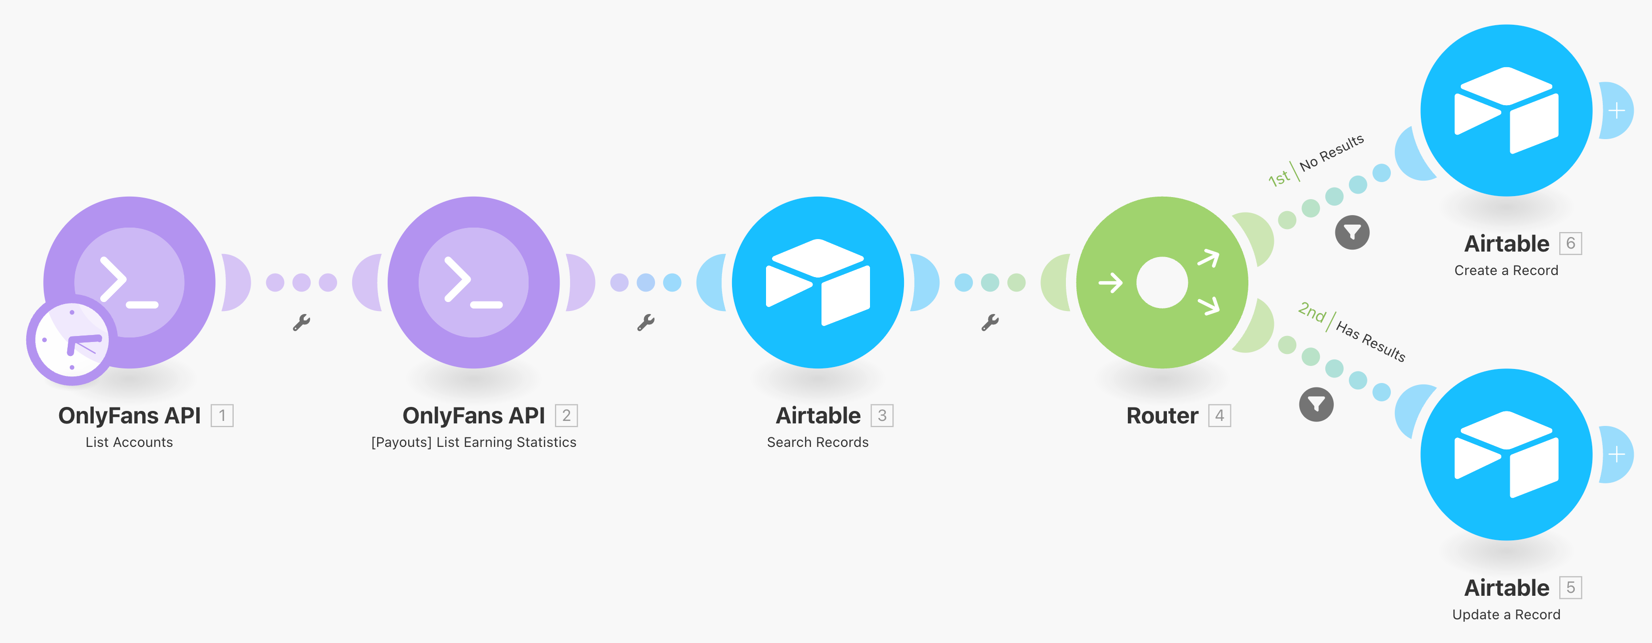 This scenario will synchronize your OnlyFans account revenue data with Airtable. Every account will have one record for each day, which updates hourly.
**Download scenario blueprint ›**
This scenario will synchronize your OnlyFans account revenue data with Airtable. Every account will have one record for each day, which updates hourly.
**Download scenario blueprint ›**